React useState is a hook that allows function components to manage the state of their variables. It enables function components to keep track of the values of their variables between multiple calls. It is one of state management hooks provided by React.
When the value of a state variable initialised with useState() is updated, React automatically calls the function component to re-render the application view. This implies that the useState hook is crucial for keeping track of values that are rendered in the application view, and which we will want the UI to automatically update when the state values change.
In this post, we will learn to understand the React useState hook and how to correctly update state data initialised with useState().
Table of Contents
Stateless vs Stateful Functions
To better understand React useState hook and why we may need it, it will be helpful to understand the difference between stateless and stateful functions.
Stateless Functions
When we say a function is stateless, we imply that the function does not remember the state of data it contained between multiple calls. That is, if the function is called and completes its task, the state of any data that it contained are lost. If we make another call to the same function after an earlier call, it will not be able to remember or retrieve the state of the variables defined in the function. In other words, the data contained in the variables defined in the function in the previous call are lost.
Consider code listing 1 below:
function addToList(number) {
    // define variable and assign default value
    let list = [];

    // append number to array
    list.push(number);

    // log the total value
    console.log(list);
}

// call function multiple times with values
addToList(50);
addToList(70);
addToList(100);
In listing 1, the addToList() function creates an array on line 3. On line 6, the function adds the number passed as argument to the list of items. From line 13 to line 15, we call addToList() to add numbers the list.
If we run the javascript code in listing1, we will observe that the log of the array for the second and third calls to addToList() do not contain the previous values added. The following is a sample run in the browser:
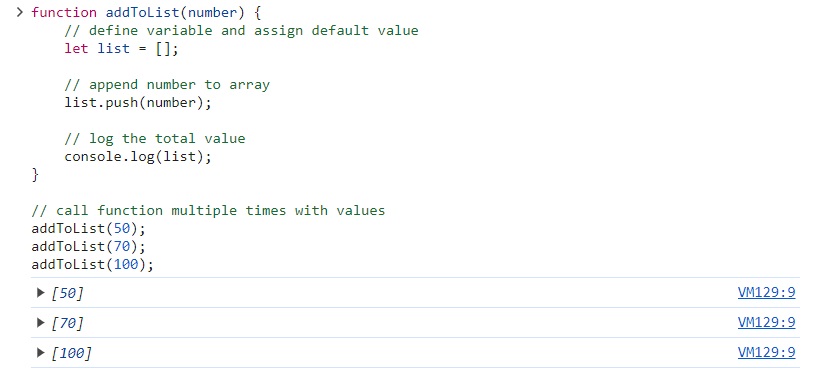
The first call to addToList() with the value 50 is seen in the output as [50], thus list array contains a single item. This is what we expect. However, when the second call to addToList() is made with the value 70, we see from the second output that the array still contains a single item, [70]. The previous item, 50, has been lost. The same applies to the third call to addToList(), as seen in the third output, [100].
What happens is that when the function completes its task, it loses track of the state of the data it contained. Hence, as subsequent calls are made, the function is not able to remember the state of its previous data.
Functions that are not able to track the state of their data between multiple calls, as seen in listing 1, are stateless functions. This is the default behaviour of javascript functions, and is also the default in almost all programming languages.
Stateful Functions
Contrary to stateless functions, stateful functions remember the state of their data between multiple calls. If subsequent calls are made, a stateful function can remember the state of its data in the previous call and continue to work with the data in the current call.
In the past years, React apps were developed using ES6 classes. Classed-based React components made it simple to keep the state of data in objects. In modern React apps development, functions are used to create components. This shift has been necessitated by the introduction of hooks in React 16.8.
The shift to function components implies that, for components that need to track the state of their data, there should be a way to create stateful function components that can track the state of data between multiple function calls. This is what React useState addresses. React useState makes it possible for function components to recall the state of variables in previous calls into current calls.
Another React feature that makes a function component stateful is the useRef hook. One difference between useState and useRef hooks is that when a state variable returned from a useState() is updated, it causes a re-render for the UI to update. However, an update to a state variable returned from useRef() hook does not cause a re-render.
Another difference between useState() and useRef() hooks is that a state variable from useState() is updated by calling a special setter function which sets the new state value whiles a state variable from useRef() hook can be updated by directly setting it to the new value. The discussion on understanding useRef hooks delves deeper into how useRef works.
Let’s take an extensive look at how to make a function component stateful with useState.
useState Makes Function Component Stateful
React useState is a hook that allows a function component to track its data, or variables, between multiple calls (render and re-renders). This means that useState makes a function component stateful. It makes the function component remember state variables between multiple renders. When a state variable intialised with useState is updated, the component re-renders for the UI to update.
When React needs to render or update a component, it makes a call to the function component. For components that may be re-rendered, it implies that multiple calls to the function component are made. In these updates (re-renders), in which the function component is called multiple times, a stateful function component can remember the content of state variables in the previous call and use them in the current call..
How to use useState Hook
As we have indicated, React useState hook makes a function component stateful. It enables a function component to keep track of some or all of its data variables.
It must be emphasised that React hooks are used in function components only. They are not used in class components. Additionally, the use of hooks in function components is governed by some rules. For instance, Hooks must be used at the top of the body of the function component. We will go by the Rules of Hooks in the rest of this discussion.
To use React useState hook in a function component, we first need to import useState from React. This has to be done at the top of the function component file:
import { useState } from 'react';Within the body of the function component, we initialise a state variable that needs to be tracked in a function component. We initialise a state variable with useState() call. useState() accepts a default value that will be set to the state variable that gets created:
const state_var = useState('Initial Value');What we pass to useState() call depends on the type of the data that we want to create:
const numericStateData = useState(40);     // numeric state data
const booleanStateData = useState(true);   // boolean state data
const stringStateData = useState('Sample Text');  // string state data
const arrayStateData = useState([]);       // array state data
const objectStateData = useState({});      // object state data
We can even initialise state variables to null or undefined with useState():
// state data initially set to null
const someStateData = useState(null);

// state data initially set to undefined
const anotherStateData = useState(undefined);
Remember that what we pass to useState() is just an initial value we want to set to the state variable that gets created. We can update the value in the state variable later with a special function that useState() creates for us. We will see how this is done shortly.
useState Returns an Array
There is more that we need to know about useState() initialisations which I did not mention listing 4 and listing 5 above. It is the reason I did not show the earlier useState() initialisations in a function component. Now is the right time to know more about the data returned from useState() initialisation calls.
A call to useState() returns an array that contains two items: the state variable and a state setter function. The setter function is used to update the data stored in the state variable. We can access the state variable at index 0, whiles the state setter function is at index 1:
import React, { useState } from 'react';

const App = () => {
    // initialise state data and set initial value to zero (0)
    const stateData = useState(0);

    // variables for state data and setter function
    const count = stateData[0];     // the state variable
    const setCount = stateData[1];  // the state setter function
}
Rather than use array indexing to refer to the state variable and setter function, we can use array destructuring to get the state variable and the setter function from the useState() initialisation, all in just a single line:
import React, { useState } from 'react';

const App = () => {
    // variables for state data and setter function
    const [count, setCount] = useState(0);
}
The array destructuring approach, used in listing 7, enables us to assign names to the array elements returned from useState() in just a single call. Due to its simplicity and elegancy, we will be using this approach in the rest of the discussion.
You are at your own liberty to choose names that you will assign to the state variable and the setter function returned by useState(), The names should however obey the variable and function naming restrictions in javascript. A very common practice is to precede the state setter function name with set, combined with the name assigned to the state variable. The following code listing has some examples:
import React, { useState } from 'react';

const App = () => {
    const [count, setCount] = useState(0);
    const [age, setAge] = useState(0);
    const [names, setNames] = useState([]);
}
When updating the value of a state variable initialised with useState(), it is inappropriate to directly set the value using an assignment statement. For example, it is wrong to set count to a new value as demonstrated in the following code listing:
const [count, setCount] = useState(0);

// This update to state variable is wrong
count = 10
If we need to update a state variable, for example count to a new value, we need to call the state setter function. In this case, we will call setCount() to set the new value of count.
The following code shows the correct way to update the value of a state variable returned by useState(). The update is done using the state setter function:
const [count, setCount] = useState(0);

// set the state variable, count, to a new value
setCount(10);
As seen in this code listing, we set a new value to the count variable using the state setter function setCount(). This is the correct way to update a state variable initialised with useState() hook. We will see working examples shortly.
Working with useState Hook
To put what we have covered so far into practice, we will consider a very simple function component that updates a heading text. As we enter text in an input control, the heading will be updated using a state setter function returned from useState() initialisation.
import React, { useState } from "react";

// default heading text
const DEFAULT_HEADING = 'Heading';

const Heading = () => {
    // initialise state data for heading
    const [heading, setHeading] = useState(DEFAULT_HEADING);

    return (
        <div style={{textAlign: 'center'}}>
            <h1>{heading}</h1>
            <input
                type='text'
                onChange={(e) => {
                    const value = e.target.value;
                    setHeading(value.length ? value : DEFAULT_HEADING);
                }}
            />
        </div>
    )
}

export default Heading;
From listing 11, useState() is called to initialise and return a state variable and a setter function on line 8. In the JSX returned from the function component, the h1 element is set to the heading state variable. In the onChange event handler for the input element, we call setHeading() to update the heading state variable to the entered text.
A sample run in the browser is shown below:

As the input text changes, setHeading() is called to update heading state variable.
State Update Triggers Re-Render
In listing 11, we update the state variable heading by calling setHeading(). This occurs whenever the text entry in the input control changes. Updates to the text entry immediately updates the heading text.
What actually happens is that when the state variable updates, the UI component, in this case Heading, is automatically called to re-render. In other words, the function component gets called to update its UI. This is the behaviour of updates to a state variable initialised with a useState() call. If the state variable is updated, the function component containing the state variable is automatically called to re-render.
But is there really a way to prevent a re-render when we update a state variable?, Yes, there is. If we do not want a component to be called automatically to update the UI when a state variable updates, then the state variable should not be initialised with useState(). In this case, we will rather initialise the state variable with useRef().
An update to a state variable initialised with useRef() will not automatically cause a re-render of the component. We discuss useRef hook in a separate post covering understanding of React useRef hook.
A Look at State Setter Functions
A state setter function, which is needed to update state variables, accepts either the new value or a function that needs to be called to return the new value. After updating a state variable with a state setter function, the function component will be called to re-render for the UI to be updated.
A state setter function has the following signature:
setFunction(new_value | () => { return new_value});As can be seen, we can pass a new value, or a function that will return a new value, to the state setter function. If a value or an expression that results in a value is specified, the new value will replace the current value of the state variable. For example:
const [count, setCount] = useState(0);

// set state variable to already known value
setCount(20);

// set state variable to result of an expression
setCount(20 * Math.PI);
On the other hand, if a function is specified as argument to the state setter function, then the specified function will be called to return the new value. Consider the following code listing:
const [count, setCount] = useState(0);

// set state variable to a function that will
// detemine and return the new value
setCount(() => {
    return 20;
});
In listing 14, we pass to setCount() an anonymous function that will determine and return the new value of the state variable. The value that is returned from the function will be used to update the state variable.
Sometimes, we may need the previous value in order to determine the new value that has to be returned. For example, think of a counter variable that calculates the new value by adding 1 to the currently existing value. In this case, we will need to have the current value in order to calculate the new value to be set.
When we pass a function to the state setter function, the current value of the state variable is passed as argument. If the new value to be returned depends on the current value, then this becomes a great opportunity. We can determine the new value based on the current value of the state variable that is passed:
// set state variable to a function that will detemine the new value
setCount((currValue) => {
    return currValue + 1;
});
Observe that the current value is passed to the anonymous function that returns the new value. We return the new value by adding 1 to the current value of the state variable.
In fact, we can even rewrite listing 15 as the following code listing which will yield the same result:
// set state variable to a function that will detemine the new value
setCount((currValue) => currValue + 1);
The following is a working example of a component that updates state data:
import React, { useState } from 'react';

const ClicksCounter = () => {
    // initialise a state variable
    const [count, setCount] = useState(0);

    return (
        <div style={{textAlign: 'center'}}>
            <h2>Button Clicks Counter</h2>
            <hr />
            <p>You clicked {count} time{count == 1 ? '' : 's'}.</p>
            <button onClick={() => setCount((currCount) => currCount + 1)}>
                Click to Count
            </button>
        </div>
    )
}

export default ClicksCounter;
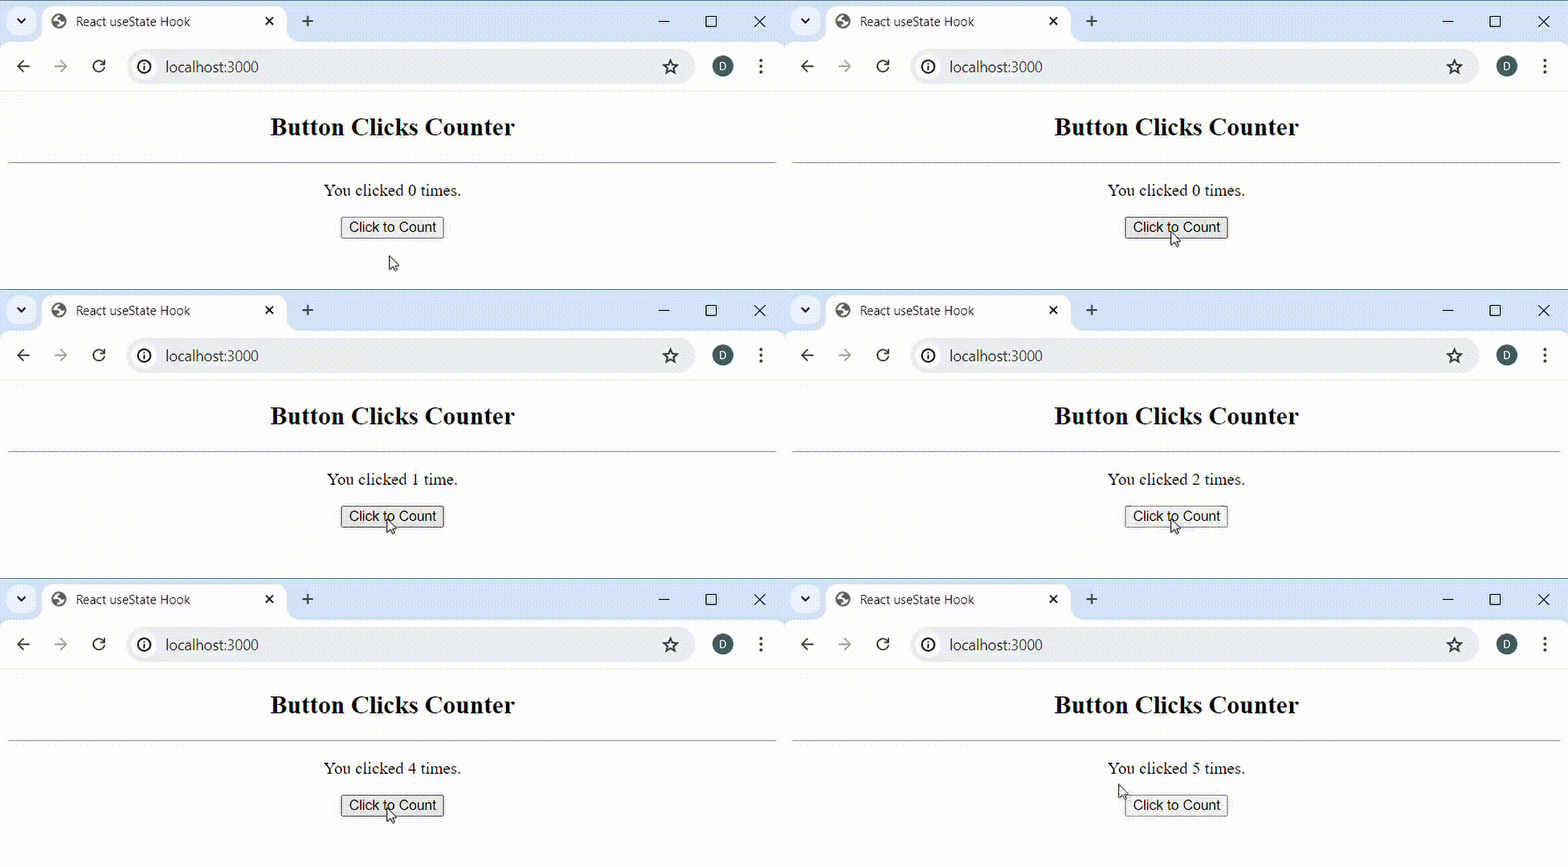
The onClick handler of the button calls the state setter function setCount() to update the number of times the button has been clicked. We pass an anonymous function that receives the current value of count as currCount and add 1 to it.
A sample run of listing 17 in the browser is shown below:
Updating State Data
We have already emphasised that the initial value for a state variable is specified as argument to useState() initialisation call. Any other call to set a new value to a state variable is actually an update. We have also said that all updates to a state variable must be done using the state setter function returned from useState().
For example, In listing 10, we demonstrated how to update state variable. However, there is more that we need to know. We need to have an in-depth look at setter functions that upate state variables. Understanding how to correctly update state variables is key to developing an interactive and more dynamic React application.
Updating State with Setter Function
To update state data, we need to call the state setter function returned by useState() and pass the new value as argument. If we set the state variable to a new value directly, our function component will not be called to re-render and update the UI. To demonstrate this, let’s consider the following code listing:
import React, { useState } from 'react';

const ClicksCounter = () => {
    // initialise a state variable
    let [count, setCount] = useState(0);

    return (
        <div style={{textAlign: 'center'}}>
            <h2>Button Clicks Counter</h2>
            <hr />
            <p>You clicked {count} time{count == 1 ? '' : 's'}.</p>
            <button onClick={() => setCount((curVal) => curVal + 1)}>
                Click to Count
            </button>
        </div>
    )
}

export default ClicksCounter;
Listing 18 above is a minor modification to listing 17 The only difference is that we have changed the state data declaration on line 5 from const to let. We have done this because we want to be able to set a new value to count. const declaration will not allow us to do this. Although not recommended, we are using let because we only want to demonstrate that setting state variable directly will not lead to component update.
If we run the code in listing 18, the result should be the same as in listing 17.
Now, on line 13, let’s update the code to set the count state variable directly:
<button onClick={() => count = count + 1}>Click to Count</button>Observe that we are setting the count state variable directly rather than calling setCount(). If we run the application, we will notice that clicking on the button does not update h2 element for count:
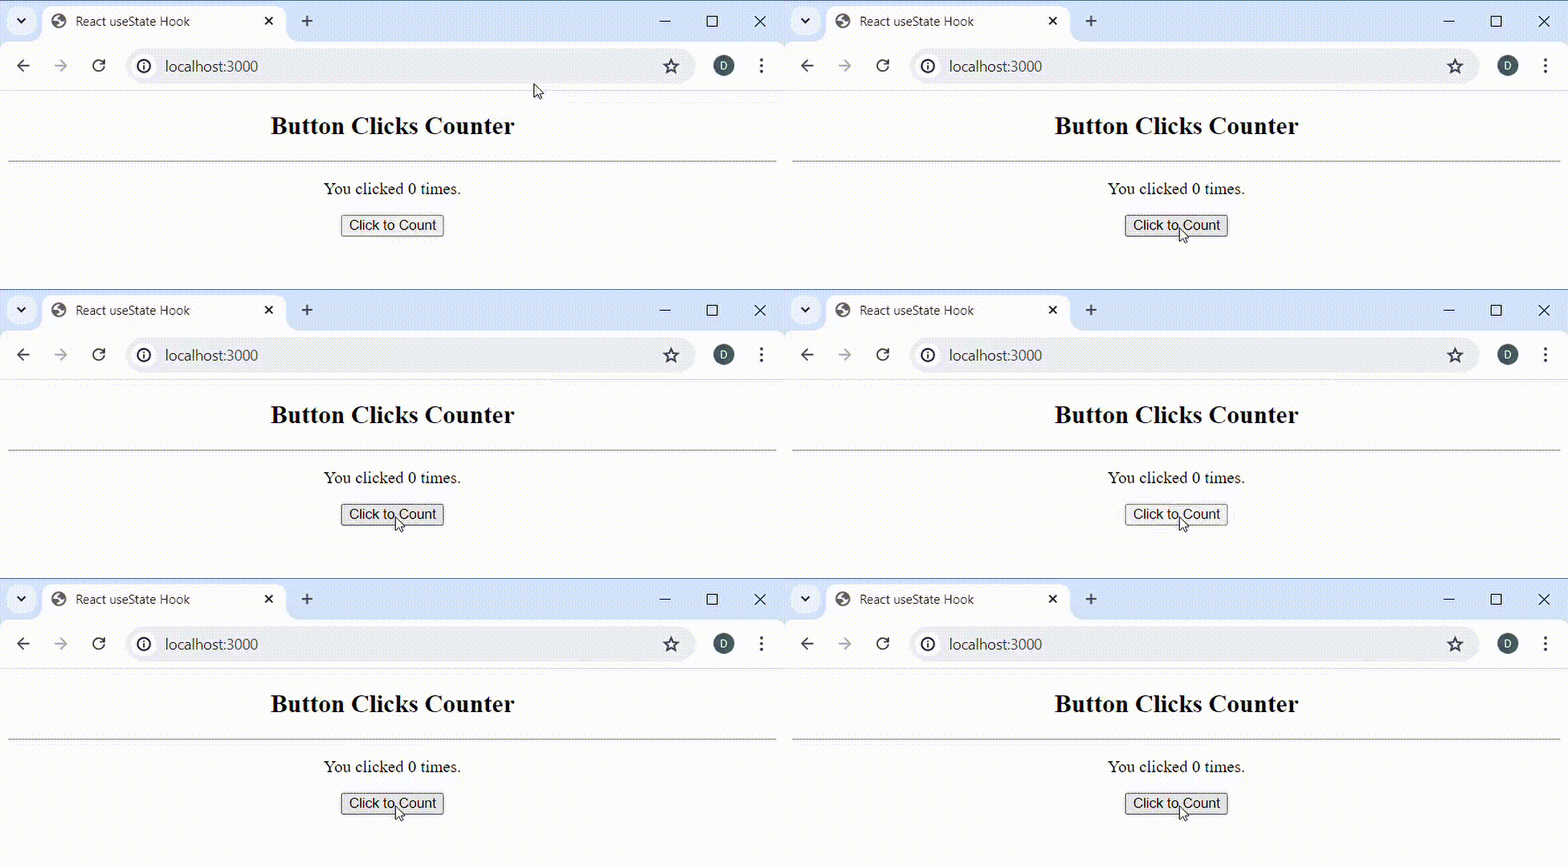
Because we directly set a new value to count without using the state setter function, our function component is not automatically called to re-render and update the UI.
If we change line 13 back to set the new value with setCount(), then the application should be working as expected. The understanding here is clear: we should only update state variables using the state setter function returned from useState().
Updating Array Data
When updating state data that is an array, we need to treat the data as immutable. By this, we imply that once we have initialised the array data, we should treat it as one that we cannot modify directly, although we can. If we need to update the array data, we will have to initialise the array variable to a new array data.
To better understand it, let’s consider the following code in which we create an array data:
// initialise array data
let names = ['Daniel', 'Joe'];
In classic javascript, we can update the names array, for instance add or remove items, by calling push() or pop() methods respectivley. For example:
// initialise array data
let names = ['Daniel', 'Joe'];

// add new item
names.push('Emmanuel');
However, when developing React applications, we need to treat array state variables, such as names, as immutable. We do not need to directly modify the array data as was done in listing 21.
With data immutability, the recommended approach is to initialise the array state variable, in this case names, to a new array data. There are several ways to do this but the newest and friendier way is the use of the javascript spread syntax:
// initialise array data
let names = ['Daniel', 'Joe'];

// add new item and assign to same variable
names = [...names, 'Emmanuel'];

// add new item and assign to new variable
const updatedNames = [...names, 'Joyce'];
On lines 2, 5, and 8, the expressions on the right side of the assignment operator create a new array, and a reference to these new array are assigned to the variables on the left of the assignment operator. The variables on the left side of the assignment operator are actually references to the array data that are created. Anytime we need to modify an array data, we need to create a new one rather than modify the existing array data.
The following code listing is an example React component that demonstrates the update of array state data. We create a new array rather than modify the current state of the array data.
import React, { useState } from "react";

const Names = () => {
    // state variables for name entry and names list
    const [names, setNames] = useState([]);
    const [name, setName] = useState('');

    // called when form needs to be submitted
    const onFormSubmit = (e) => {
        // prevent form submit
        e.preventDefault();

        // add to names list if name entered
        name.length > 0 ? setNames((currNames) => [...currNames, name]) : '';

        // reset input text to empty string
        setName('');
    }

    return (
        <div>
            <form onSubmit={onFormSubmit}>
                <input
                    type='text'
                    value={name}
                    placeholder='Enter Name'
                    onChange={(e) => setName(e.target.value)}
                 />
                <button type='submit'>Add Name</button>
            </form>

            <hr />
            <ul>
                { names.map((name, idx) => <li key={idx}>{name}</li>) }
            </ul>
        </div>
    )
}

export default Names;
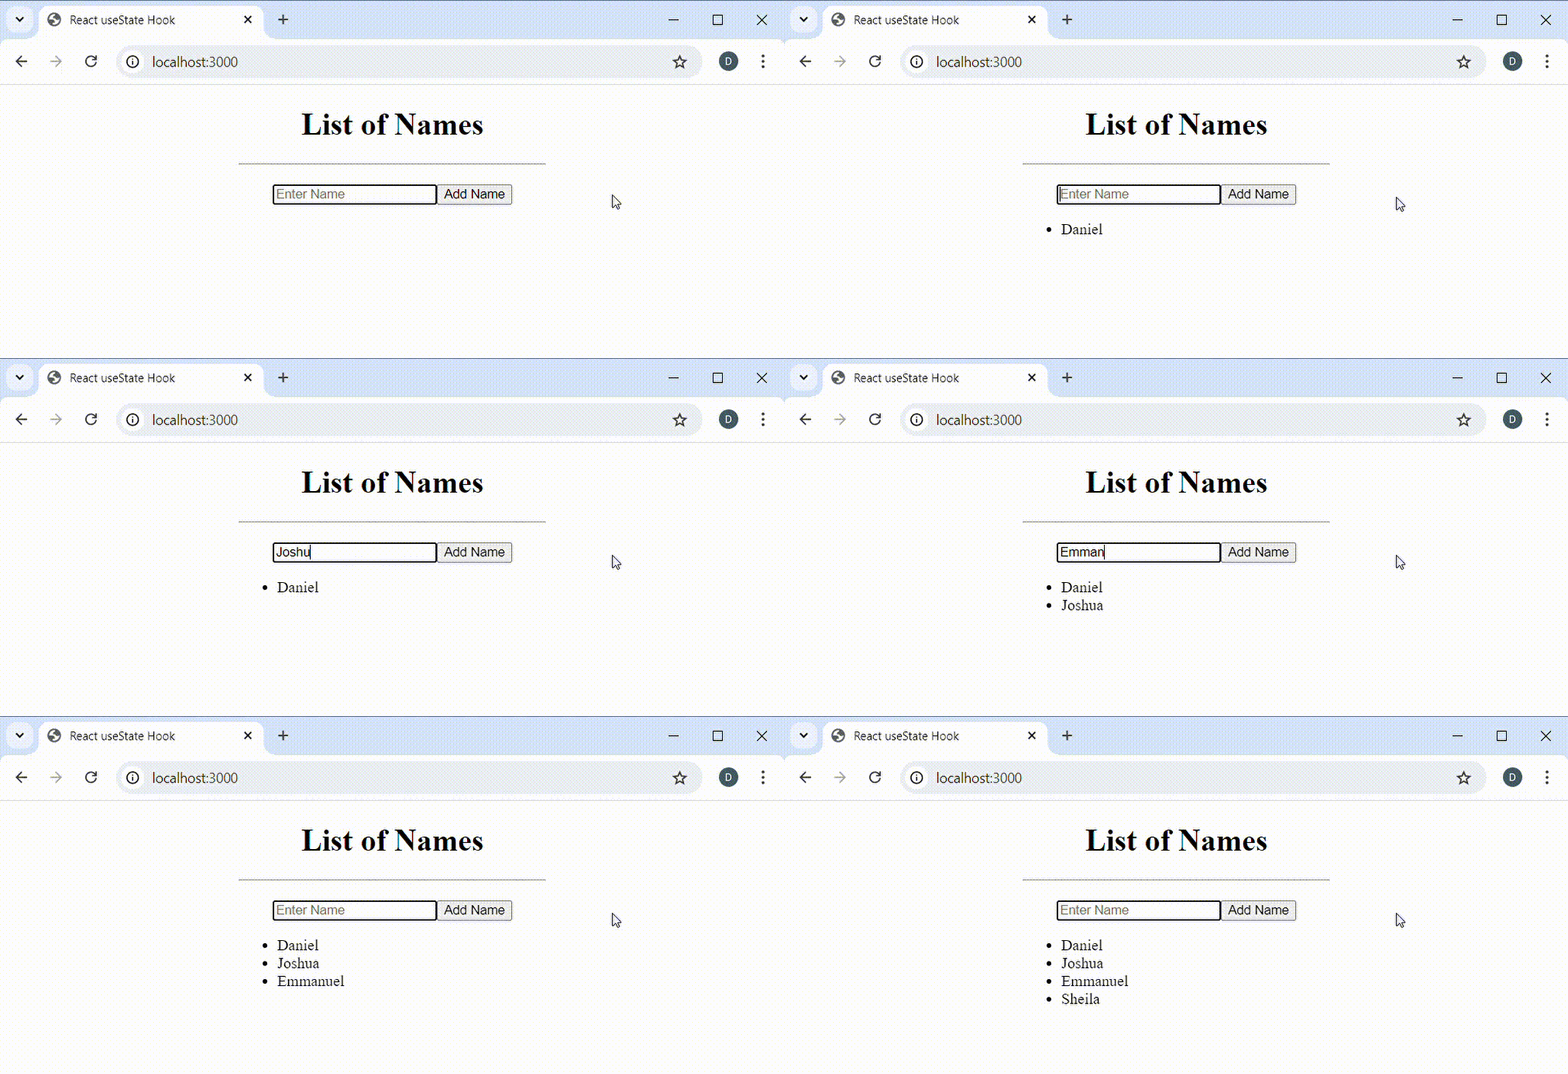
On line 5, we initialise the state variable names to an empty array in the useState() call. In addition to the names state variable, useState() returns a state setter function which we use to update the names state data, in this case an array.
In the JSX returnd from the component, an onChange handler for the input sets the text entered to the name state variable. When the form is submitted, the onFormSubmit handler updates the names state data by creating a new array and setting it to the state setter function setNames(), as seen on line 14 in listing 23:
// add to names list if name entered
name.length > 0 ? setNames((currNames) => [...currNames, name]) : '';
From the above code listing, we pass an anonymous function to setNames(). This anonymous function receives the current names list as currNames parameter, and then creates and returns a new array by adding name to the currNames state array. In this example, we use the javascript spread syntax to add the new name:
setNames((currNames) => [...currNames, name])You may be tempted to use the names state variable with the javascript spread syntax to create the new array such as in the following:
// add to names list if name entered
setNames([...names, name])
I must say that this will likely work for you in most cases. However, it must be noted that React queues calls to state setter functions. If several calls to a state setter function are so fast that a component is not able to update quickly, then you may be passing a state value which isn’t updated yet to the state setter function. The result will be that the UI may not correctly update to reflect expected data.
Remember what we talked about earlier: if the new state value depends on the current value of the state variable, then it is a good practice to pass a function to the state setter function and receive the current state value.
In the example discussed earlier, we added a new name to the names state variable. This implies that the new array that we create depends on the current names array data. Therefore, we pass a function to the state setter function and receive the current state of the names array, which we use to create and return a new array data:
setNames((currNames) => [...currNames, name])A sample run of listing 23 is shown below:
Updating Object Data
Similarly to array state data, object state data must also be treated as immutable. If we need to update a state data that is an object, we do not need to modify it directly. We rather need to create a new one. We do this by making a copy of the current object data and perform the update in the new object that is being created:
Suppose we have the following object data:
// create an object data
let Person = {
    name: 'Daniel',
    role: 'Full Stack Developer'
};
Let’s also suppose that we want to perform an update to the name property. In classic javascript, we can modify the Person object directly by setting the name property to a new name:
// create an object data
let Person = {
    name: 'Daniel',
    role: 'Full Stack Developer'
};

// update the name
Person.name = 'Emmanuel';
In React, we have to treat state data that are objects as immutable. Rather than modify the Person object by setting the new name directly, we have to initialise a new object data as a copy of the one we want to modify, and then perform the update in the new object initialisation:
// create an object data
let Person = {
    name: 'Daniel',
    role: 'Full Stack Developer'
};

// update and set to same object reference
Person = {...Person, name: 'Emmanuel'};

// update and set to a new object reference
let updatedPerson = {...Person, name: 'Emmanuel'}
Let’s consider an example in which we will update an object data. Let’s suppose we have the following component that displays the profile of a developer:
import React from "react";

const Profile = (props) => {
    return (
        <table>
            <tbody>
                <tr>
                    <td>Name:</td>
                    <td><strong>{props.profile.name}</strong></td>
                </tr>
                <tr>
                    <td>Email:</td>
                    <td><strong>{props.profile.email}</strong></td>
                </tr>
                <tr>
                    <td>Role:</td>
                    <td><strong>{props.profile.role}</strong></td>
                </tr>
            </tbody>
        </table>
    )
}

export default Profile;
To be able to update the developer profile, we will also consider the following component which will display a form to collect new information about the developer:
import React, { useState } from "react";

const ProfileEditor = (props) => {
    const [name, setName] = useState('');
    const [email, setEmail] = useState('');
    const [role, setRole] = useState('');

    const onSubmit = () => {
        props.onUpdate({name, email, role});
    }

    const disableUpdateBtn = () => {
        return role === '' || name == '' || email == '';
    }

    return (
        <div style={{margin: '20px 0'}}>
            <form onSubmit={onSubmit}>
                <div style={{marginBottom: '10px'}}>
                    <input
                        type='text'
                        value={name}
                        placeholder="Enter name"
                        onChange={(e) => setName(e.target.value)}
                        style={{minWidth: '90%', marginBottom: '10px'}}
                    />
                    <input
                        type='email'
                        value={email}
                        placeholder="Enter email"
                        onChange={(e) => setEmail(e.target.value)}
                        style={{minWidth: '90%', marginBottom: '10px'}}
                    />
                    <select
                        value={role}
                        onChange={(e) => {
                            // get selected index
                            const selectedIdx = e.target.selectedIndex;

                            setRole(e.target.options[selectedIdx].value)}
                        }
                        style={{minWidth: '90%'}}
                    >
                        <option value=''> --Select role --</option>
                        <option value='Back-End Developer'>
                            Back-End Developer
                        </option>
                        <option value='Front-End Developer'>
                            Front-End Developer
                        </option>
                        <option value='Full Stack Developer'>
                            Full Stack Developer
                        </option>
                    </select>
                </div>
                <button type='submit' disabled={disableUpdateBtn()}>
                    Update
                </button>
                <button type='button' onClick={() => props.onClose()}>
                    Close
                </button>
            </form>
        </div>
    )
}

export default ProfileEditor;
The code listing for our final component which uses the Profile and ProfileEditor components, and within which we will update the state variable for the profile, is shown below:
import React, { useState } from "react";
import Profile from "./Profile";
import ProfileEditor from "./ProfileEditor";

const Developer = () => {
    const [profile, setProfile] = useState({name: '', email: '', role: ''});
    const [edit, setEdit] = useState(false);

    const onUpdate = (data) => {
        // update profile by initialising a new object
        setProfile({
            name: data.name,
            email: data.email,
            role: data.role
        });
    }

    const hideEditor = () => {
        setEdit(false);
    }

    return (
        <div style={{width: '40%', margin: '0 auto'}}>
            <div>
                <h1 style={{display: 'inline'}}>Developer Profile</h1>
                {!edit && (
                    <span>
                      <a href='#' onClick={() => setEdit(true)}>Edit</a>
                    </span>
                )}
            </div>
            <hr />

            {edit && (<ProfileEditor
                        onUpdate={onUpdate}
                        onClose={hideEditor}
                      />
                    )}

            <Profile profile={profile} />
        </div>
    )
}

export default Developer;
The key area to consider in listing 33 is the implementation of the onUpdate() function:
const onUpdate = (data) => {
    // update profile by initialising a new object
    setProfile({
        name: data.name,
        email: data.email,
        role: data.role
    });
}
As can be seen, we pass a new object that contains the new profile information to setProfile() setter function. If we initialise state data with useState(), then we should treat the data as immutable. We do not need to modify the data directly but rather initialise a new data as a modified copy of the initial data and pass to the state setter function for update.
A sample run of listing 33 in the browser is shown below:
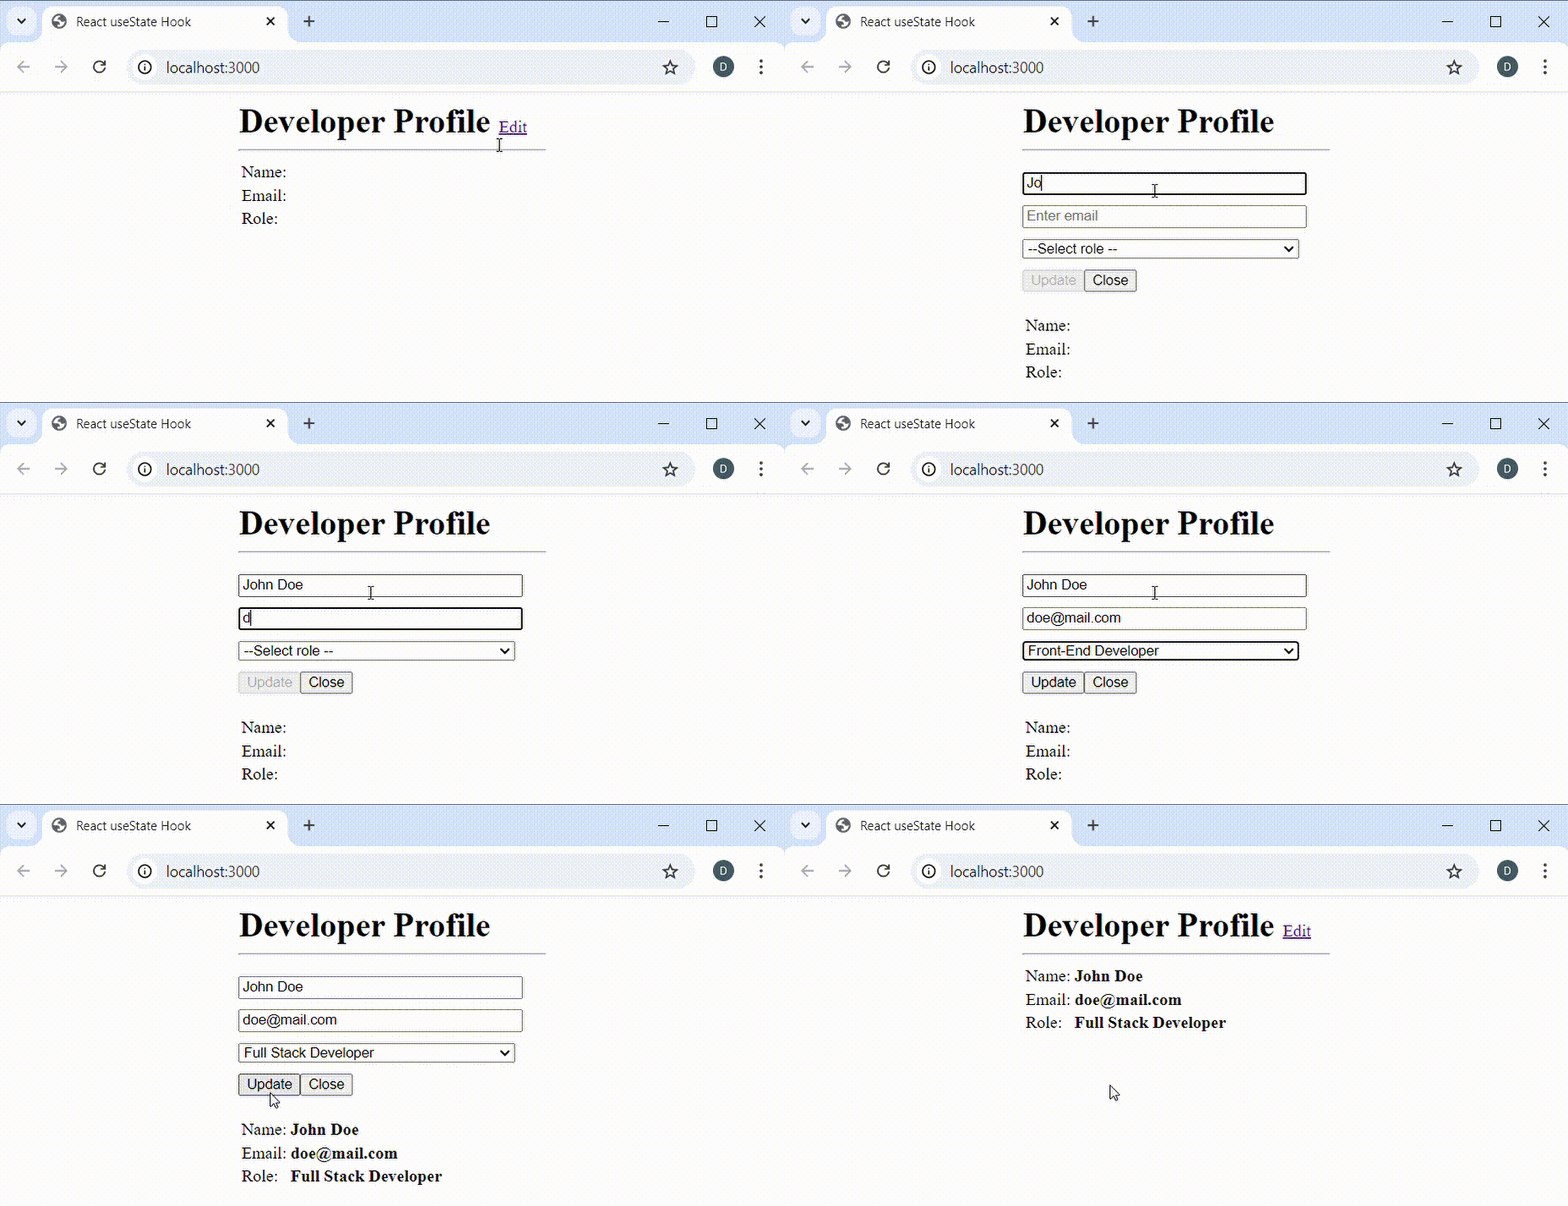
When the application first launches, the profile Name, Email, and Role are all set to empty text as seen on line 6 in listing 33.
const [profile, setProfile] = useState({name: '', email: '', role: ''});To update the profile object, we first display the profile editor form to enter name, email, and select developer role. When the form is submitted, the form data is received in the onUpdate() function defined in the Developer component. The important thing to notice is that we pass a new object data which contains the new state information for the profile object. In passing the new profile information to setProfile(), we did not modify the profile object directly.
What if We Mutate Array and Object State Data?
We have said that state data which are arrays or objects must be treated as immutable. We should not modify them for update but rather make a copy of them and then perform the update during initialisation of the new data. So what happens if we mutate the array or object data directly? The result will be unexpected application behaviour and or bugs.
To demonstrate unexpected behaviour of mutating state data that are arrays or objects, we will use a code listing we have already seen. To avoid scrolling back and forth, we will reproduce listing 23 below:
import React, { useState } from "react";

const Names = () => {
    // state variables for name entry and names list
    const [names, setNames] = useState([]);
    const [name, setName] = useState('');

    // called when form needs to be submitted
    const onFormSubmit = (e) => {
        // prevent form submit
        e.preventDefault();

        // add to names list if name entered
        name.length > 0 ? setNames((currNames) => [...currNames, name]) : '';

        // reset input text to empty string
        setName('');
    }

    return (
        <div>
            <form onSubmit={onFormSubmit}>
                <input
                    type='text'
                    value={name}
                    placeholder='Enter Name'
                    onChange={(e) => setName(e.target.value)}
                 />
                <button type='submit'>Add Name</button>
            </form>

            <hr />
            <ul>
                { names.map((name, idx) => <li key={idx}>{name}</li>) }
            </ul>
        </div>
    )
}

export default Names;
Now let’s consider the implementation of the onFormSubmit event handler:
// called when form needs to be submitted
const onFormSubmit = (e) => {
    // prevent form submit
    e.preventDefault();

    // add to names list if name entered
    name.length ? setNames((currNames) => [...currNames, name]) : '';

    // reset input text to empty string
    setName('');
}
Let’s also comment the call to setName() on line 10 and update line 7 to use the names array as argument to setNames() setter function. We will also use the push() method of the names array to add the new name.
The code in the onFormSubmit handler should look similar to the following:
// called when form needs to be submitted
const onFormSubmit = (e) => {
    // prevent form submit
    e.preventDefault();

    // add new name
    names.push(name);

    // add to names list if name entered
    name.length ? setNames(names) : '';

    // reset input text to empty string
    // setName('');
}
On line 7, we mutate the state data referenced by names array by calling push() to add the new name:
names.push(name)Then on line 10, we pass the same names array to setNames() rather than create a new array data:
// add to names list if name entered
setNames(names)
Because we did not create a new array but rather mutated the names array directly before setting as argument to setNames(), the result will be unexpected. If we run the application, we will notice that the UI does not update to show the names list when we click on the Add Name button:
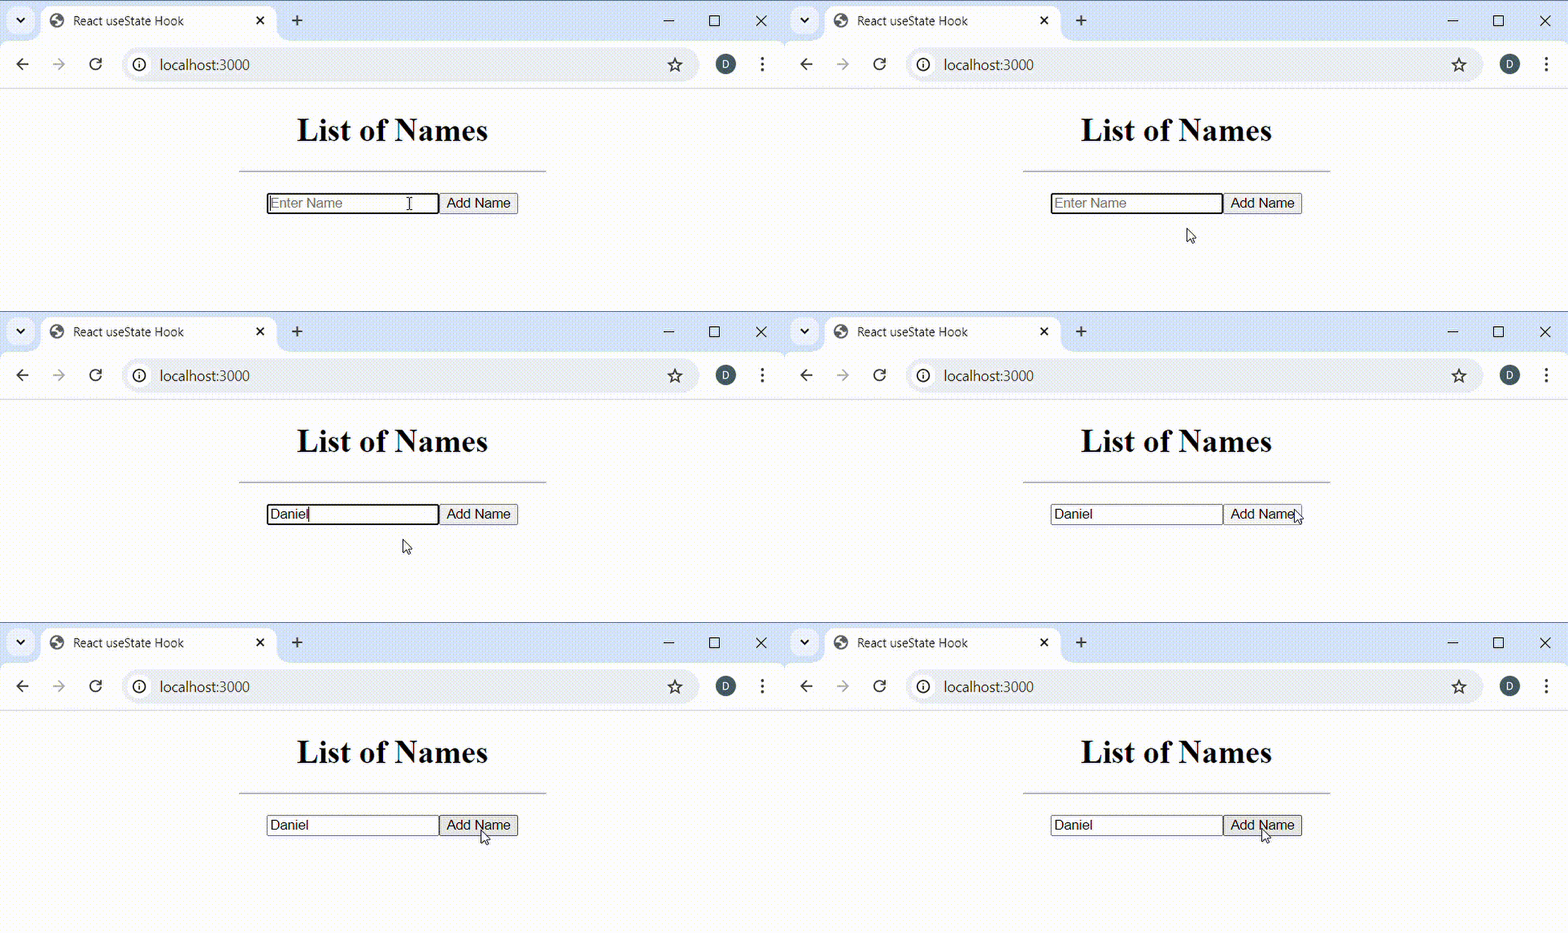
In listing 23, the names list was populated after clicking on the Add Name button. However, in this example, the list of names is not populated after clicking the Add Name button. The reason is that when we do not create a new object or array but rather modify and set the same data reference, the function component will not be called to re-render and update the UI.
So, if the UI does not update, does the internal code update the state data? To know the answer, continue to type in the input control. You should now see the list populated with with names.
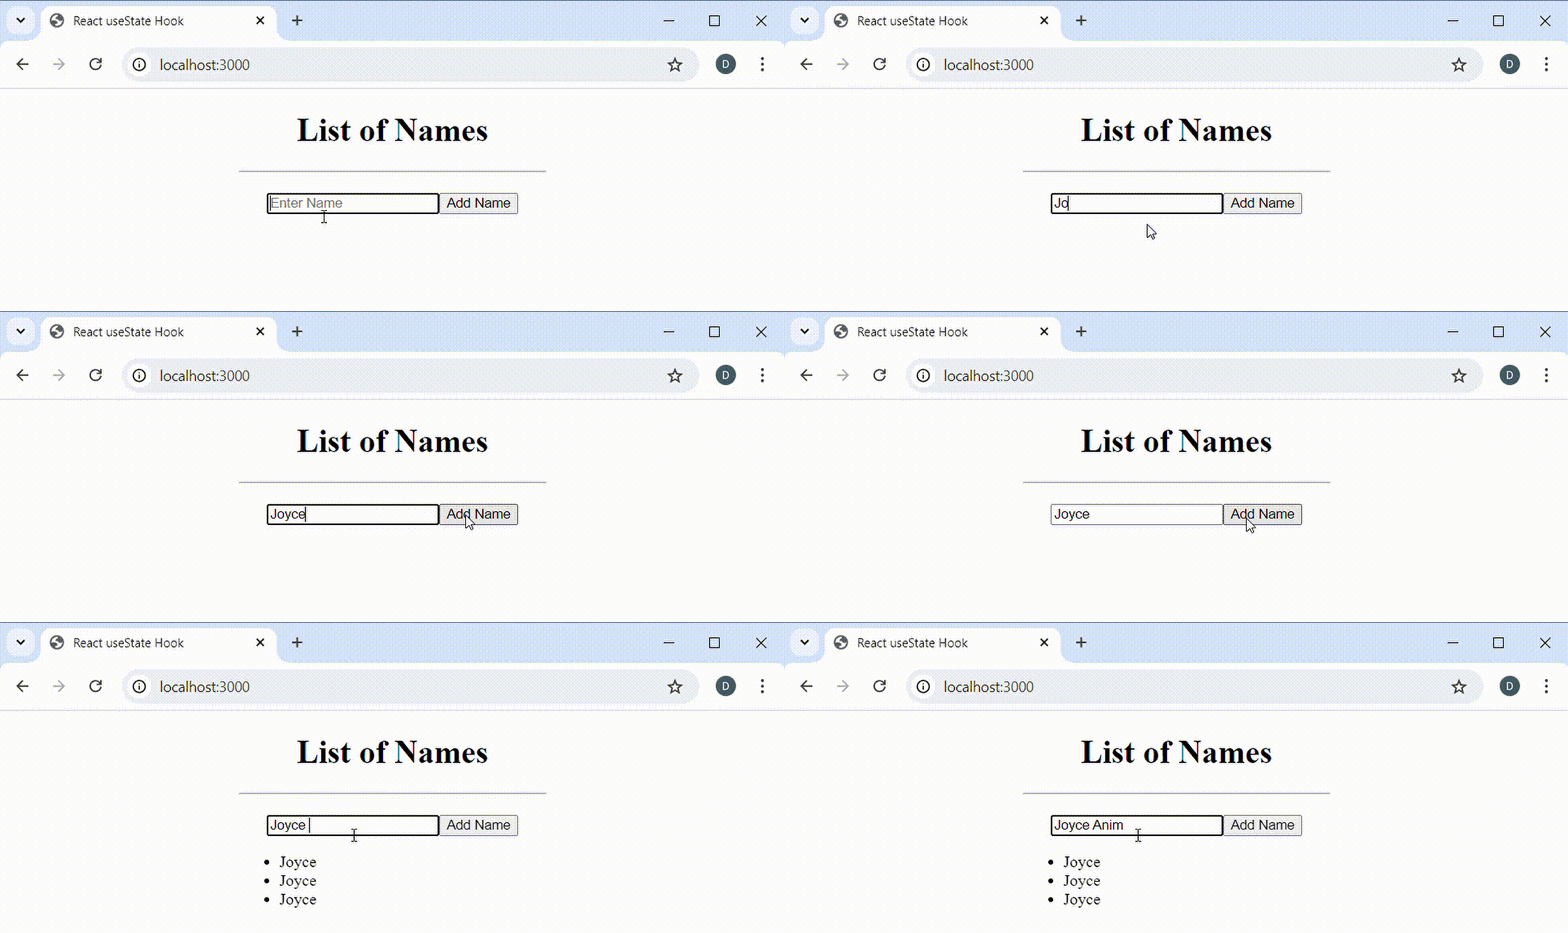
But why is the list not populated when we click on the Add Name button but rather when we type in the input control? Well, the component is called to update the UI at this time because the onChange handler of the input control calls the state setter function setName() which triggers a re-render., otherwise we would not see the list of names.
One thing is clear: if we mutate an array or object data rather than initialise a modified copy, then the component will not be called to update the UI. Therefore, we should always treat state data that we want to be automcatically updated in UI as immutable and initialise modified copies to be set as new state data.
There may be situations when we may want to track and recall the values of a state data but wouldn’t necessarily want the component to be re-rendered after we update the state data. In such cases, we will need to initialise the state data with useRef().
Like useState(), the useRef() hook also creates a state variable which can maintain state data between component re-renders. The major difference is that updates to state data initialised with useRef() do not trigger a re-render of the component. The discussion on understanding useRef hook delves deeper into this.
Key Considerations for Updating State
- We should only update state variables with state setter functions
- We should always consider state variables immutable. If we need to update state variables, we need to return a new variable
Summary
React useState is a hook that is used to make function components stateful so that they can maintain the state of their data when called multiple times to update the UI.
To initialise a state data, we call the useState() hook and pass the initial value that should be set the the state data which will be created.
The useState() initialisation call returns an array which contains two items. The first item at index 0 is the state data which needs to be tracked. The second item at index 1 is a state setter function which is called to update the state data. We can use javascripts array destructuring to obtain the state data and the setter function.
// initialise state data
const [count, setCount] = useState(0);
When performing an update to a state data, we need to call the state setter function and pass to it the new value.
// initialise state data
const [count, setCount] = useState(0);

// set count to new value
setCount(40);
If the new value has to be determined from the current state data, then we need to pass a function to the state setter function. In this case, the function passed to the state setter function will receive the current state data so that we can determine or calculate the new value from the current state data:
// initialise state data for count
const [count, setCount] = useState(0);

// set new count value based on the current value
setCount((currCount) => currCount + 1);
To trigger a component re-render when a state data changes, we need to treat a state data as immutable and pass a modified copy to the state setter function for update. If we modify the same state data and pass for update, we will have an unexpected result.
Leave a Reply