OpenVPN is an open-source Virtual Private Network (VPN) software that is used to create secure network tunnels to connect devices. Rather than connect devices through public networks, it creates a secure tunnel that is hidden away from the public internet.
Communications between connected devices through the private network are encrypted. This makes them more secure and private. Communications between connected devices in a private network cannot be intercepted by public networks.
Another major advantage of using the OpenVPN server is that it can shield your internet identity from other networks. Rather than connect to the internet with your network identity, such as your IP address, it uses the server’s network information when you connect to the internet. Many have used this feature to bypass restrictions on certain network products and features to clients in certain locations.
In this guide, we will look at how to install OpenVPN server on a Ubuntu Linux system using a very simple and uncomplicated approach. Rather than perform advanced configurations from scratch, we will use a script to quickly get the VPN server up and running.
If you need a deeper understanding of how to set up a secure a VPN server from scratch without using a script to hide the details, then read through the discussion on the advanced approach to installing OpenVPN server on Ubuntu system.
Table of Contents
Prerequisites
To get along with the discussions in this guide, it is assumed that you are using a Ubuntu Linux system. This guide has been tested on Ubuntu 24.04 and Ubuntu 22.04. If you are using an earlier version of Ubuntu than mentioned, it is most likely your journey through this guide will be successful.
Additionally, you should have an account with administrative privileges to install software packages. Basic knowledge of Ubuntu Linux commands is essential to complete the instructions in this guide.
Step 1: Download OpenVPN Install Script
To install OpenVPN server without dealing with the many advanced configuration setup which is typical in the installation of OpenVPN from scratch, we will install a script that will simplify the installation process for us. The script will initiate an assistant that will ask questions about the configuration values needed to set up the VPN server.
Type and execute the following command to download the OpenVPN server install script:
curl -O https://raw.githubusercontent.com/angristan/openvpn-install/master/openvpn-install.shThe above command will download and save the install script in your home directory with the name openvpn-install.sh. It is important to keep this name in mind, as it will be needed to run the assistant.
Step 2: Run Install Script
To install OpenVPN server, we will need to make the install script that we downloaded executable. Type and execute the following command to do it:
sudo chmod +x openvpn-install.shIn the above command, we use chmod (change mode) command to change the permissions of the downloaded file: x denotes executable permission, and + means addition. Thus, +x implies that we are adding executable permission to the openvpn-install.sh file that we downloaded.
After we have made the script executable, we will need to run the script to begin the installation. Type the following in the command interface to start the installation assistant:
sudo ./openvpn-install.shThis will initiate an assistant that will guide you through the installation. You will be asked a series of questions to provide answers for setting up the VPN server.
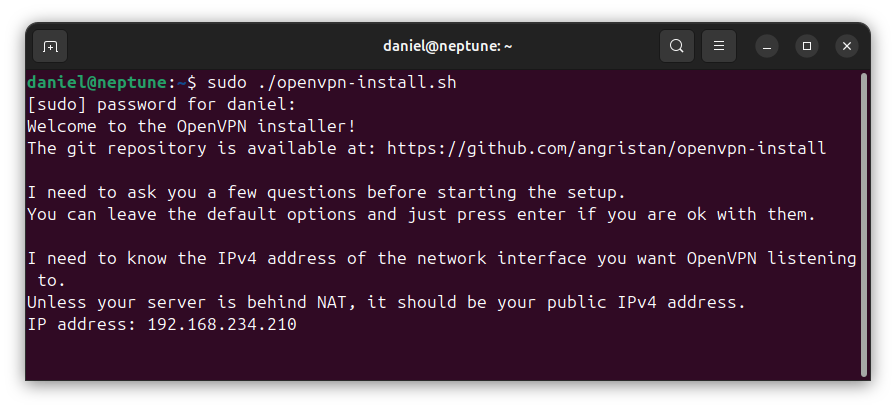
First, the script will scan your network interface to determine your public IP address. This will be displayed to you in the first question, such as seen in the following:

If the IP address is correct, press the [Enter] key on your keyboard to continue.
The installation assistant will continue with several questions which you will need to provide answers. For each question, it will suggest a default answer which, in most cases, will be the optimal response you will provide.
For majority of the questions, you can accept the suggested answers by pressing the [Enter] key on your keyboard.
Whiles providing responses to the questions, you should take note of your port and protocol responses. By default, the OpenVPN server uses port 1194 and UDP protocol. We will need these later to adjust the firewall. You should therefore keep note of the port number and protocol that you choose or specify.
When the install script has collected responses to all questions it needs, it will inform you that it is ready to set up the OpenVPN server, and that you will need to press any key to continue.

Go ahead! Press any key on your keyboard to continue.
The script will begin by downloading and installing dependency packages, and then continue with setting up your VPN server. It will also give you several information as it performs some configurations.
Behind the scene, the install script performs various tasks which includes the setting up of Public Key Infrastructure (PKI), Certificate Authority (CA), creation of Request Certificates, etc. For beginners, this may be tedious to do from scratch. The install script, however, lifts this burden off your shoulders without getting yourself involved in advanced configurations. A time saver, really.
Step 3: Add VPN Client
After setting up the VPN server, the install script will ask you to add your first VPN client:

Enter the name of the client that will connect to the installed OpenVPN server. When done, press [Enter] key on your keyboard to continue. Later, you will see how additional clients can be added to connect to the VPN server.
Next, you will be asked whether you will want to protect the client configuration with a password:

You can select the default suggested response, passwordless client, so that the client will be able to connect to the VPN server without a password.
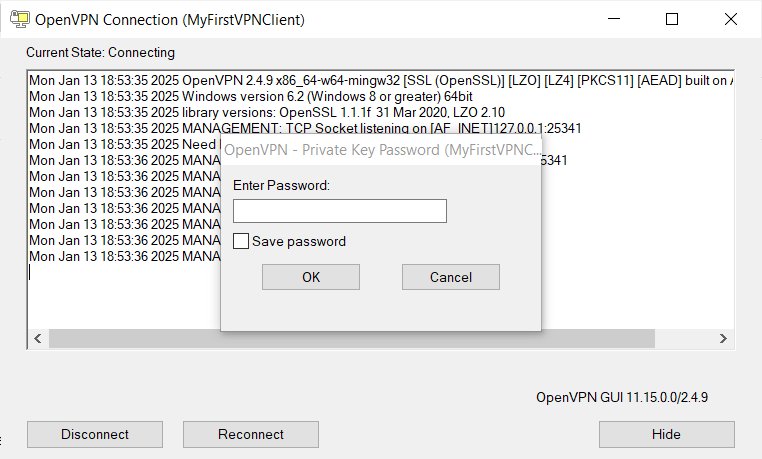
If you select the second option, you will be asked to enter a password that will be required when connecting from the client. For example, the following is an OpenVPN client connection attempt on Windows with a prompt for a password to establish connection:

You should select the option that best meets your requirement, either with a password or not. Press [Enter] to continue after making your selection.
The openvpn-install.sh assistant will create a configuration file for the client you specified. This file will be needed to connect to the VPN server from external devices. You will need to copy the client configuration file onto your desktop or client device and use it to connect to the OpenVPN server.
To copy the file, you will need to know where it was saved. The install script tells you where it saved the client configuration file:

Copy the configuration file to the client device from which connection to the OpenVPN server will be done.
Step 4: Allow Port in Firewall
In order to make a successful connection to the VPN server, the port which the OpenVPN server listens for connection must be allowed through the firewall. I assume you have ufw firewall installed and currently active.
Earlier, I indicated that you will need the port number and protocol that the OpenVPN server will use for communication. The port must be allowed in the firewall rules.
By default, OpenVPN server listens on port 1194 and uses the UDP protocol. If you used a different port number and protocol, you will need to replace the port number and protocol in the command that follows with yours.
Type and execute the following command to adjust the ufw firewall rules:
sudo ufw allow 1194/udpEverything is set now. You should be able to connect to the VPN server. If you have not already downloaded the client configuration file onto your client device, download it and connect to the VPN server using OpenVPN client software.
Performing Other Tasks
After installing the OpenVPN server, we can perform other tasks such as add new client, remove existing clients, and uninstall the VPN server.
If you need to perform any of these tasks, you will have to run the install script that was downloaded. It is therefore important to remember the location or directory in which the install script exists.
Suppose the script was saved in the home directory as openvpn-install.sh, we can run the script it by typing and executing the following from the command interface:
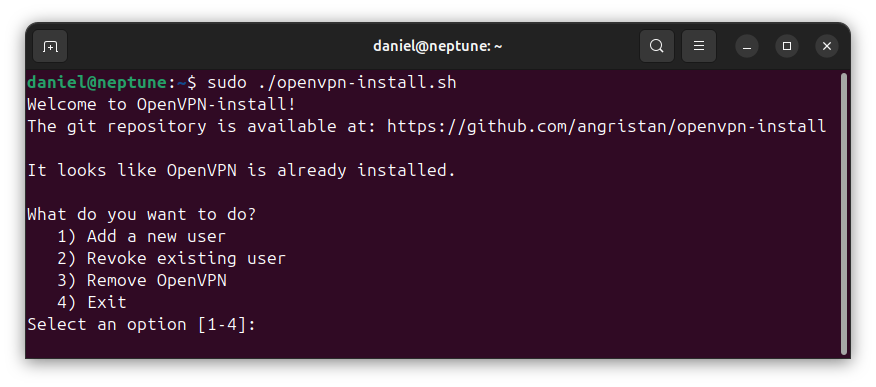
sudo ./openvpn-install.shThis will display a menu from which you can select the task to be performed:

Let us take brief look at each of these tasks in the next sections.
Add New Client
To add a new client, select option 1, Add a new user, from the tasks menu. You will be asked to enter the name of the client configuration to be created:

Enter a name for the client configuration, then press the [Enter] key. You will be asked whether to protect the configuration file with a password or not. Select the option that meets your requirement and continue.
The install assistant will inform you of the client configuration file and its location:

Copy the client configuration file onto your local or client device and use it to connect to the VPN server using OpenVPN client software.
Remove Existing Client
To remove an existing client, run the downloaded install script to launch the assistant:
sudo ./openvpn-install.shThis will display the tasks menu options:

Select option 2 to revoke existing user. This will display a list of client certificates that have been created. Enter the number against the client that you need to revoke access, then press the [Enter] key on your keyboard to continue.
After revoking the client certificate, connection from the client to the VPN server will fail.
Uninstall OpenVPN Server
If you need to uninstall the OpenVPN server from your Ubuntu system, you will run the downloaded install script to launch the assistant:
sudo ./openvpn-install.shFrom the tasks menu options, select option 3 to initiate the removal of the VPN server.
Managing the OpenVPN Server Process
There are a number of commands that we can execute to manage the OpenVPN server process. For example, we can execute commands to stop, start, and restart the installed VPN server.
Stopping the VPN Server
If the OpenVPN server is already running and you need to stop it, type and execute the following command:
sudo systemctl stop openvpn@server.serviceStarting the VPN Server
To start the OpenVPN server, type and execute the following command:
sudo systemctl stop openvpn@server.serviceRestarting the VPN Server
The OpenVPN server can be restarted with the following command:
sudo systemctl restart openvpn@server.serviceWrapping Up
In this guide, we have looked at how to install OpenVPN server on a Ubuntu Linux system using a script to simplify the installation process.
By running the downloaded script, we are also able to perform other tasks such as add new clients, revoke existing clients, and uninstall the VPN server.