Welcome to WordPress. This is your first post. Edit or delete it, then start writing!
Blog
-
Object Destructuring in Javascript
In javascript, objects are commonly used to store multiple data in a single variable. This provides a very compact and convenient way to operate on the data, especially, when passing the data to other parts of the application code. Javascript provides a very convenient means to extract the value of each data when needed.
In Javascript, we can use the object destructuring method to extract the values of multiple properties from an object in just a single statement. It eliminates the need to for multiple statements when accessing the values of multiple object properties. The object destructuring approach has less typing and saves time.
Javascript object destructuring can also be used to perform other object operations such as cloning, extending, updating, and merging other objects.
This post takes an in-depth look at ES6 Javascript object destructuring technique, with emphasis on clarity and working examples for better understanding.
Table of Contents
- Object Destructuring Assignment
- Object Destructuring Assignment Syntax
- Understanding Object Destructuring
- Mismatch Variable Name in Property Keys is undefined
- Setting Default Values
- Destructuring into Declared Variables
- Aliasing Declaration Variables
- Extracting Rest of Properties Into a Variable
- Using Spread Syntax in Object Destructuring
- Destructuring Function Parameters
- Destructuring Nested Objects
- Summary
Object Destructuring Assignment
In Javascript, object destructuring assignment is an expression that makes it possible to extract some or all properties of an object into specific variables. It was introduced in ES6 (ECMAScript 2015) as a means to simplify the extraction of properties from objects and arrays. It can also be used to destructure strings.
Before its introduction, we would extract the values of object properties by typing the name of the object variable followed by the dot (
.) operator, and then the property we want to access.For example, let’s suppose we have an object data that contains information about a user:
JavaScript// initialize object data const User = { name: 'Daniel', email: 'dan@mail.com', role: 'Developer' };We can access the values of the object properties using the dot (
.) notation:JavaScript// initialize object data const User = { name: 'Daniel', email: 'dan@mail.com', role: 'Developer' }; // extract values const name = User.name; const email = User.email; const role = User.role;Another approach involves specifying the property names as a string enclosed in square brackets,
[], following the property name:JavaScript// initialize object data const User = { name: 'Daniel', email: 'dan@mail.com', role: 'Developer' }; // extract values const name = User['name']; const email = User['name']; const role = User['name'];Both approaches, however, involve more typing to access property values. For example, each access to a property value requires its own statement. Additionally, we always need to type the object variable name, square brackets, and property name in each statement to access a property value. All these lead to more typing, especially when we have to access multiple object property values.
But ES6 Javascript has a better and compact approach to do this, called object destructuring. With ES6 Javascript object destructuring, we can extract all or some of the property values of the
Userobject in just a single statement:JavaScript// initialize object data const User = { name: 'Daniel', email: 'dan@mail.com', role: 'Developer' }; // extract values const { name, email, role } = User;Line 9 in listing 4 does the trick. It is called object destructuring assignment. In just a single statement, we have been able to extract all the property values that we need. We did not have to type multiple object variable name, square brackets, and property keys. This approach is much of less typing and saves time.
In the discussions that follow, we will delve deeper into Javascript object destructuing. Before that, we should look at the very basic syntax of Javascript object destructuring assignment.
Object Destructuring Assignment Syntax
In Javascript object destructuring assignment, an object from which we want to extract property values is assigned to declared variables. The declaration variables into which the values of the object properties are stored are enclosed in braces,
{}, on the left-hand side of the assignment operator.For example, in listing 4, the statement on line 9 is object destructuring assignment. In this assignment, the
Userobject is destructured into individual properties, and the values of these properties are assigned to the declaration variables enclosed in curly braces.Unlike in Javascript array destructuring, the order of the declaration variables is not important in object destructuring. Shortly, we will know how Javascript is able to tell which property values to store in each of the declaration variables.
Looking again at line 9 in listing 4, we can tell that an object destructuring assignment has the following basic syntax:
JavaScript// destructure object into variables let { var1, var2, var3 } = ObjectDataIn this assignment syntax,
var1,var2, andvar3are declaration variables into which the values of properties inObjectDatawill be stored. As seen, the declaration variables are enclosed in braces,{}. This is in contrast to array destructuring assignment syntax, which uses square brackets,[], to enclose declaration variables.We can even use the
constdeclaration keyword for the declaration variables:JavaScript// destructure object into variables const { var1, var2, var3 } = ObjectDataUnderstanding Object Destructuring
Javascript object destructuring is a programming technique that makes it possible to extract multiple object property values into variables a single statement. It eliminates the need for dedicated statements for each property value access, and has less typing than property access with the dot notation.
What makes this approach so handy is that we can declare multiple variables and use the object variable name only once in an assignment. Javascript does the job of extracting the property values into these declared variables.
Consider the code listing below:
JavaScript// initialize object data const User = { name: 'Daniel', email: 'dan@mail.com', role: 'Developer' };With Javascript ES6 / ECMAScript 2015, we can extract muiltiple properties into variables in just a single statement whiles using the
Userobject name only once in an assignment:JavaScript// initialize object data const User = { name: 'Daniel', email: 'dan@mail.com', role: 'Developer' }; // extract property values into variables const { name, email, role } = User; console.log(name); // output: Daniel console.log(email); // output: dan@mail.com console.log(role); // output: DeveloperThe order of the variables in the declaration does not matter. We can declare the target variables in any order:
JavaScript// extract property values into variables const { role, name, email } = User; console.log(name); // output: Daniel console.log(email); // output: dan@mail.com console.log(role); // output: DeveloperIf the order of the declaration variables does not matter, then how is Javascript able to map the declaration variables to the object properties and extract their values? The answer is simple. By default, Javascript expects the declaration variable names to match property keys in the object being destructured.
For example, in the object destructuring statement,
JavaScriptconst { name, email, role ] = User;the declared variable
name,email, androlematch property key names in theUserobject.JavaScriptconst User = { name: 'Daniel', email: 'dan@mail.com', role: 'Developer' };By this, Javascript is able to map the variable names to the object property keys and extract their values. Later, we will see how we can specify variable names that are not property keys in the object being destructured.
Remember from our discussion on destructuring assignmnent syntax that we use braces,
{}, to declare target variables when destructuring an object. By default, the variable names enclosed in the braces are the names of the properties that we want extract.If a variable name exists in the destructuring declaration but is not found as a property or key in the object being destructured, then the value for that variable will be
undefined. We delve more into this next.Mismatch Variable Name in Property Keys is
undefinedWe have indicated that, in object destructuring, the variable names in the destructuring declaration should match property keys in the the object that is being destructured. We have already seen this in listing 8.
But what if we type a declaration variable name which does not exist as a key in the properties of the object being destructured? Well, let’s see what happens.
JavaScript// initialize object data const User = { name: 'Daniel', email: 'dan@mail.com', role: 'Developer' }; const { username, email, role } = User; // log values console.log(username); // output: undefined console.log(email); // output: dan@mail.com console.log(role); // output: DeveloperOn line 8, the
usernamevariable in the declaration variables does not match any name in theUserobject property keys. The remaining declaration variable names,emailandrole, however have matching names in theUserobject property keys.Since
usernamedoes not match any property key in theUserobject, there will be no value to extract into theusernamevariable. Therefore its value will beundefined, as seen in its output on line 11.Thus, if variable name in the destructuring declaration is not found as a property key in the object being destructured, then the value of that variable will be
undefined.Setting Default Values
If there is a possibility for the value of a property to be
undefined, then we can set a default value that should be used. We do this by assigning the default value to the target variable in the destructuring statement. The following listing is an example:JavaScript// initialize object data const User = { name: 'Daniel', email: 'dan@mail.com', role: undefined }; const { name, email = 'user@mail.com', role = 'Data Analyst' } = User; // log values console.log(name); // output: Daniel console.log(email); // output: dan@mail.com console.log(role); // output: Data AnalystOn line 6, we have deliberately set the value of the
roleproperty toundefined. In the variables declaration online 8, we have set default values foremailandrole. After object destructuring, we can see from the log values that the default value forrolehas been used since the extracted value from theroleproperty in theUserobject isundefined.The default value for the variable
email, which isuser@mail.com, was not used since theemailproperty of theUserobject is notundefined. Thus, the default value is used when the value extracted from an object property isundefined.Destructuring Into Existing Variables
In the examples that we have covered so far, we have extracted the property values into newly declared variables:
JavaScript// delcare variables const { name, email, role } = User;The
constkeyword preceding the declaration variables is an indication that we are declaring new variables.If we have existing variables whose names match property key names in the object, then we can specify the existing variables in the destructuring statement. In this case, there will be no need to precede the destructuring statement with
constorlet. However, there is one more thing to take into account. We will need to enclose the whole statement in parenthesis before that will work:JavaScript// initialize object data const User = { name: 'Daniel', email: 'dan@mail.com', role: 'Developer' }; // variables declration let name, email, role; // destructure object into the existing variables ({ name, email, role } = User);The variables
name,email, androleare declared on line 9. Then on line 12, we specify these existing variables in the destructuring statement. You should observe that we have enclosed the destructuring assignment in parenthesis,(). Without the parenthesis, an error will be generated.For example, the following statement destructures the User object into existing variables without the statement being enclosed in parenthesis:
JavaScript// destructure object into the existing variables { name, email, role } = User;Destructuring an object into existing variables without the statement being enclosed in parenthesis, like on line 2, will generate the following error:

If we intend to destructure an object into already declared variables, we will need to enclose the destructuring assignment expression in parenthesis,
().Aliasing Declaration Variable Names
In listing 8, we understood that, by default, we are compelled to declare variables with names that match object property key names when destructuring an object. If a variable name in the declaration does not match a property key in the object being destructured, its value will be
undefined.But what if the object property keys are not descriptive enough to be used as variables in the current scope? Or what if we prefer a different name for the variable?
Consider the following object data:
JavaScript// object declaration const User = { n: 'Daniel', e: 'dan@mail.com', r: 'Developer' }Some applications that transmit data through networks use shortened names rather than descriptive and long property key names. The aim may be to reduce the size of data transmitted over the network.
If we are to destructure an object with non-destructive property keys, such as in listing 16, by default, we will be compelled to use these non-descriptive property keys as variables in the application.
JavaScript// initialize object data const User = { n: 'Daniel', e: 'dan@mail.com', r: 'Developer' }; const { r, e, r } = User; // log values console.log(name); // output: Daniel console.log(email); // output: dan@mail.com console.log(role); // output: DeveloperLuckily, ES6 Javascript allows us to specify alias names for object property keys. We can use these alias names to refer to the properties in the object being destructured.
To specify an alias name when destructuring an object, we separate the declaration variable name and the alias name with a colon,
:. For example:JavaScript// initialize object data const User = { n: 'Daniel', e: 'dan@mail.com', r: 'Developer' }; const { n: name, e: email, r: role } = User; // log values console.log(name); // output: Daniel console.log(email); // output: dan@mail.com console.log(role); // output: DeveloperOnce an alias name is specified, we cannot use the actual variable name in the application logic. For example, the following will generate an error:
JavaScriptconsole.log(n);This produces a
ReferenceError. Since we have specified an alias name for the variablen, we can no longer use it in the application scope where it is declared. To Javascript, such variable does not exist:
A problem arises if a property that needs to be extracted has the same name as a variable already declared in the current scope. Consider the following code listing:
JavaScript// email variable declration let email = 'default@mail.com'; // initialize object data const User = { name: 'Daniel', email: 'dan@mail.com', role: 'Developer' }; // extract values from the User object const { name, email, role } = User;This code listing will generate a syntax error when run. A sample error can be seen below:

The
Userobject contains a property with the keyemail. Meanwhile, in the destructuring assignment on line 12, the declaration attempts to create variables, includingemail, Butemailis an existing variable declared on line 2. This generates the syntax error since a variable with nameemailalready exists.The solution to such problem depends on whether we can overwrite the value in the existing variable,
email, or not.If we do not want to overwrite the value in the existing variable, then we will need to provide an alias name for the
emailproperty:JavaScript// extract values from the User object const { name, email: userEmail, role } = User; // log values console.log(email); // output: default@mail.com console.log(userEmail); // output: dan@mail.comHowever, if we wish to overwrite the value in the existing variable,
email, then we will need two statements to extract the values: one to declare the new variables for assignment, and the other to assign to the existing variable:JavaScript// extract into existing variable ({ email } = User); // extract into new variables const { name, role } = User;Since
emailis already declared, we only perform the assignment by enclosing the statement in parentheses. However,nameandroleare new variables and therefore we declare them with theconstkeyword. We could also have usedletorvarto accomplish same.Extracting Rest of Properties into a Variable
Sometimes, we may wish to extract the values of some properties into specific variables and then pack the rest, or remaining properties into another variable. ES6 Javascript provides the rest operator to do this.
The rest operator is a three consecutive dot (
...) operator that is used to precede a declaration variable name to signify that the remaining properties that have not been extracted yet, should all be extracted and packed into the variable preceded by the rest operator.For example, if we want to extract the
nameproperty into a variable and extract the remaining properties into another variable, we will have to use the following destructuring statement:JavaScript// initialize object data const User = { name: 'Daniel', email: 'dan@mail.com', role: 'Developer' }; const { name, ...theRest} = User; console.log(name); // output: Daniel console.log(theRest); // output: { email: 'dan@mail.com', role: 'Developer' }On line 8, the value of the
nameproperty of theUserobject is extracted into thenamedeclaration variable. The rest operator, (...), precedingtheRestvariable implies that, the remaining properties which have not been extracted yet should all be extracted and packed intotheRestvariable.With the rest operator preceding
theRestvariable, Javascript packs the remaining properties into the variable for us. One important thing to note is that the variable preceded with the rest operator must be the last element in the declaration variables. The following statement is wrong and will generate a syntax error:JavaScriptconst { ...theRest, name } = User;The following syntax error will be generated since the rest operator is applied to a variable element which is not the last:

Another important thing to note is that, the variable into which the properties are packed is always an object. This is so even if there is only one property packed into it. Let’s see an example below:
JavaScript// initialize object data const User = { name: 'Daniel', email: 'dan@mail.com', role: 'Developer' }; const { name, email, ...theRest} = User; // log value of theRest console.log(theRest); // output: { role: 'Developer' }On line 8, we apply the rest operator to
theRestvariable. At this point, thenameandemailhave already been extracted, with onlyroleremaining and packed intotheRest. The log on line 11 reveals thattheRestis actually anobject, although only one property was extracted into it. Thus, if we precede a declaration variable with the rest operator, then thetypeof the variable is always anobject.Using Spread Syntax in Object Destructuring
The spread syntax is ES6 Javascript expression that expands the properties of an object into individual parts. Like the rest syntax, the spread syntax is a three consecutive dot
(...) operator preceding an object variable that expands the properties of the object.The spread syntax can be used to perform operations such as merging multiple objects, cloning, updating, and extending an object.
Cloning Objects
The ES6 Javascript spread syntax can be used to make a shallow clone of an object so that an update to one object reference does not affect the other object.
Suppose we have the following object data:
JavaScript// initialize object data const User = { name: 'Daniel', email: 'dan@mail.com', role: 'Developer' };If we assign the
Userto another variable, both variables will have the same reference to the object data.JavaScript// assign the User object to another variable const anotherUser = User; console.log(anotherUser === User); // output: trueIn this case, an update to the data using one variable will affect the other variable. To make a shallow clone of the
Userobject so that they will have the same data but different references, we will need to clone theUserobject.With ES6 Javascript, we can use the spread syntax to clone the
Userobject.JavaScript// make a copy of the User object const anotherUser = {...User};The spread operator expands the properties of the
Userobject and places them between the braces,{}. This creates a new object with a different reference, and the newly created object is assigned toanotherUser.Although
UserandanotherUserhave the same data values, they have different references, and an update to one does not affect the other. Thus, we can use the ES6 Javascript spread syntax to clone an object.Extending Objects
We can use the ES6 Javascript spread syntax to extend an object. This is particularly helpful if there are multiple properties to be added to an existing object data.
In the pre-ES6 era, we could do this by using the dot (
.) notation to extend an object with new properties, or useObject.assign()to add new properties:JavaScript// initialize an object let data = { name: 'Daniel' }; // add new properties data.email = 'dan@mail.com'; data.role = 'Developer';The following code listing uses the spread syntax to extend an existing object:
JavaScript// initialize an object let data = {}; // add new properties data = { ...data, email: 'dan@mail.com', role: 'Developer' };Line 5 initializes a new object by spreading or expanding the current properties of
data, and then includesemailandroleproperties in the new object. In this example, we assign the newly initialized object todata. Sometimes, we may need to assign the newly initialized object to a different variable.Updating Objects
Although we can use the dot (
.) notation to update object property values, if we need to update multiple values, we will need multiple statements to do this:JavaScript// initialize object data let User = { name: 'Daniel', email: 'dan@mail.com', role: 'Developer' }; // update property values with dot notation User.name = 'Emmanuel'; User.email = 'emma@mail.com';Before ES6 Javascript, we could also achieve this in a single statement using
Object.assign()method. However, we can use the spread syntax to achieve the same in just a single statement:JavaScript// initialize object data let User = { name: 'Daniel', email: 'dan@mail.com', role: 'Developer' }; // update property values with dot notation User = { ...User, name: 'Emmanuel', email: 'emma@mail.com' }; console.log(User); // output: { name: 'Emmanuel', email: 'emma@mail.com', role: 'Developer' }Merging Objects
If we have multiple objects that we need to merge into one object, we can easily do so using the Javascript spread syntax. To do this, we will need to initialize a new object and spread the properties of the objects that we need to merge in the initializer object.
For example, suppose we have the following objects,
AandB:JavaScript// Object A const A = { name: 'Daniel', email: 'dan@mail.com' }; // object B const B = { role: 'Developer', address: { city: 'Kumasi', region: 'Ashanti' } }We can merge objects
AandBinto another object using the spread syntax. To do this, we spread the properties of objectsAandBin a new object that we initialize:JavaScript// merge A and B into a new object const User = { ...A, ...B }; // log User object console.log(User);From the log output below, we can see that the
Userobject contains all the properties of objectsAandB:
The properties of objects
AanBwere merged into theUserobject.Destructuring Function Parameters
ES6 Javascript provides a very convenient way to destructure object parameters in a function. That is, we can destructure function parameters that are objects.
Before ES6 Javascript, we would access object properties from function parameters such as in the following code listing:
JavaScriptfunction showUser(userParam) { let name = userParam.name; let email = userParam.email; let role = userParam.role; // log values console.log(name); // output: Daniel console.log(email); // output: dan@mai.com console.log(role); // output: Developer }Rather than access the property values into new variables, we can destructure and bind the parameter object properties into new variables directly in the function header: To understand this better, we should understand that when we pass a value to a function, the argument value is assigned to the function parameter.
Given the
Userobject used in earlier examples, we can pass it to theshowUserInfo()function as follows:JavaScriptshowUserInfo(User);As indicated earlier, passing a value to a called function assigns the function argument to the function parameter, as if we have done the following:
JavaScriptuserParam = User;userParamis the parameter variable in the function header, andUseris the object passed as argument. But sinceUseris an object, we can destructure it into defined variables, as we have already been doing, as follows:JavaScript{ name, email, role } = User;With ES6 Javascript, we can replace
userParamin the function header with the declaration variables{ name, email, role }. Thus, we can rewrite theshowUserInfo()function as follows:JavaScriptfunction showUserInfo({ name, email, user }) { // log values console.log(name); // output: Daniel console.log(email); // output: dan@mai.com console.log(role); // output: Developer }As can be seen, destructuring object parameters in function headers has less typing and saves time.
Destructuring Nested Objects
We can extend the understanding gained so far in Javascript object destructuring to destructure objects nested within an object. Destructuring nested objects is simple, although it may seem challenging at first.
Let’s revisit our
Userobject data which we have used for the examples in previous discussions:JavaScript// initialize object data const User = { name: 'Daniel', email: 'dan@mail.com', role: 'Developer' };We will extend this
Userobject by adding anaddressproperty:JavaScript// initialize object data const User = { name: 'Daniel', email: 'dan@mail.com', role: 'Developer', address: { city: 'Kumasi', region: 'Ashanti' } };We can identify that the value of the
addressproperty is an object. Thus, we have an object within an object. Let’s suppose that we want to extractcity, andregioninto variables.In the pre-ES6 Javascript era, we could extract the
cityandregionfrom theaddressproperty using the dot notation, such as in the following code listing:JavaScript// extract city and region let city = User.address.city; let region = User.address.state;With ES6 Javascript object destructuring, we can extract these values into variables in just a single statement. We will take step by step approach to better understand nested object destructuring.
When destructuring a nested object, we need to specify the property key name followed by colon,
:, then the declaration variables enclosed in braces:JavaScriptconst { nestedObjectProperty: { DECLARATION_VARIABLES }};Think of the specification of the property key name as directing Javascript to the nested object which we want to destructure.
For example, in our
Userobject in listing 41, the nested object has the property key nameaddress, hence we will specify this property key name, followed by colon, (:), then the declaration variables:JavaScriptconst { address: { DECLARATION_VARIABLES }} = User;One key trick in destructuring nested objects is to isolate the nested object to be destructured, whiles taking note of its property key name. In our example, the value of the
addressproperty is an object, and we can isolate theaddressobject as follows:JavaScriptaddress = { city: 'Kumasi', state: 'Ashanti' }Given this
addressobject, we can use our normal destructuring technique to extract the values ofcityandregioninto variables as follows:JavaScriptconst { city, region } = address;As can be seen, destructuring the
addressproperty in isolation gives us{ city, region }, which we can use to replace{ DECLARATION_VARIABLES }in listing 41.JavaScriptconst { address: { city, region }} = User;That is really simple, isn’t it?. The only extra typing here is the specification of the
addressproperty key name. It is however important since this is a clue to Javascript to know which specific nested object to look and extract property values.The following code listing is a working example of what we just covered:
JavaScript// initialize object data const User = { name: 'Daniel', email: 'dan@mail.com', role: 'Developer', address: { city: 'Kumasi', region: 'Ashanti' } }; // extract city and region from User object const { address: { city, region }} = User; console.log(city); // output: Kumasi console.log(state); // output: AshantiIn another example, we will attempt to extract
name,email, andcityfrom theUserobject. We should remember thatcityis found in a nested object with property nameaddress, which is found inUserobject.The following statement extracts
name,email, andcityfrom theUserobject.JavaScript// extract name, email, and city const { name, email, address: { city }} = User;Since
nameandemailare not properties in nested object, we do not precede their declaration variables with property key names. However,cityis a property found in a nested object, hence we precede the declaration variable withaddress:. As indicated earlier, this a hint to Javascript to know where to perform the nested object destructuring.Let us consider another example that is also simple to do, but maybe a bit challenging. We will introduce a
locationobject, nested in theaddressobject, which is also nested in theUserobject.JavaScript// initialize object data const User = { name: 'Daniel', email: 'dan@mail.com', role: 'Developer', address: { city: 'Kumasi', region: 'Ashanti', location: { street: 'XYZ Avenue', house: 'P8 BLK5' } } };We have added a
locationobject, spanning from line 9 to line 12, to theaddressobject which is also nested in theUserobject. If we need to extract the values ofname,city, andstreetproperties, the following statement will do:JavaScript// extract name, city, and street const { name, address: { city, location: { street }}} = User; // log values console.log(name); // output: Daniel console.log(city); // output: Kumasi console.log(street); // output: XYZ AvenueLet’s break down the object destructuring statement on line 2 to have a better understanding.
We can identify from the
Userobject in listing 50 that, the value ofnameproperty is basic type, string in this case. Since this is not a nested object, we can extract its value directly without preceding it with a property name:JavaScript// extract name, city, and street const { name, ... } = User;cityis a property found in a nested object with property nameaddress. To extract its value, we need to specify the property key nameaddress, and separating the declaration variable with a colon (:):JavaScript// extract name, city, and street const { name, address: { city } } = User;Lastly, we can identify that the
streetproperty is found in thelocationobject. Sincelocationis a nested object, we will specify its name and the declaration variable as:location: { street }.But
locationis nested inaddressobject. We will therefore need to include it in the declaration for theaddressproperty. Thus, we will have the following destructuring statement:JavaScript// extract name, city, and street from User const { name, address: { city, location: { street }}} = User; // log values console.log(name); // output: Daniel console.log(city); // output: Kumasi console.log(street); // output: XYZ AvenueThe destructuring statement on line 2 extracts
name,city, andstreetfromUser.Summary
Javascript object destructuring is a programming expression that extracts the values of object properties into declared variables. It can be used to extract the values of multiple object properties into variables in a single statement.
JavaScriptconst Student = { id: 1, name: 'Emmanuel', email: 'emma@mail.com' } // extract property values in a single statement const { id, name, email } = Student;By default, Javascript expects the declaration variable names to exist as property keys in the object being destructured. If a declaration variable name does not exist as a property key in the object being destructured, then the value of the variable will be undefined:
JavaScriptconst Student = { id: 1, name: 'Emmanuel', email: 'emma@mail.com' } // extract property values in a single statement const { stdId, name, email } = Student; // log stdId console.log(stdId); // outut: undefinedAs can be seen, the first declaration variable has the name
stdId. However, theStudentobject does not contain a property key with this name. Therefore, the value ofstdIdwill beundefinedsince it does not have a matching property key name in theStudentobject.If we wish to use a different name as variable than the property key name in the object, then we can provide an alias name to be used:
JavaScriptconst Student = { id: 1, name: 'Emmanuel', email: 'emma@mail.com' } // extract property values in a single statement const { id: stdId, name, email } = Student; // log stdId console.log(stdId); // output: 1On line 8, we specify an alias name,
stdId, for theidproperty inStudentobject. The value of theidproperty is extracted intostdId. When we set an alias name, we cannot use the property key as a variable for the same value: An attempt to do this leads to aReferenceError:JavaScript// log id console.log(id); // ReferenceError: id is not definedWhen destructuring an object, we can set default values for variables into which extracted values are saved. The default values are used if the value of the variables are
undefinedafter destructuring.Consider the following code listing:
JavaScriptconst Student = { id: 1, name: 'Emmanuel', email: 'emma@mail.com' } // extract property values in a single statement const { id, name, email, programme } = Student; console.log(programme); // output: undefinedObserve that the fourth declaration variable,
programme, does not exist as a property key in theStudentobject. As we have already indicated, the value ofprogrammewill beundefined. We can specify a default value that should be used rather thanundefinedby assigning the default value to the variable in the destructuring statement:JavaScriptconst Student = { id: 1, name: 'Emmanuel', email: 'emma@mail.com' } // extract property values in a single statement const { id, name, email, programme = 'Pharmacy' } = Student; console.log(programme); // output: PharmacyWe can also apply object destructuring to destructure object parameters in function headers:
JavaScriptfunction show({ id, name, email }) { console.log(name); console.log(email); } show({ id: 1, name: 'Emmanuel', email: 'emma@mail.com' });Other operations that can be performed with Javascript object destructuring include the use of spread syntax to extend, merge, clone, and update objects, as well as pack multiple properties into a single variable with the rest operator.
We can also apply object destructuring technique to destructure nested objects.
-
Array Destructuring in Javascript
Javascript array destructuring, introduced in ES6 Javascript, is a programming technque that makes it possible to extract values from data such as arrays, objects, and strings, into variables. It provides a very concise way to extract multiple values from an array into variables and avoids repetitive array indexing.
Given an array data, we can extract the values of specific array elements and ignore those that we do not need. In addition, we can use array destructuring to easily swap the values of two variables without the need to declare a temporal variable.
In this post, we will demystify Javascript array destructuring and understand how it simplifies array operations such as array concatenation, array cloning, extraction of values from nested arrays, etc.
Table of Contents
- Destructuring Assignment
- Destructuring Assignment Syntax
- Array Destructuring
- Separating Variable Declarations from Assignment
- Variables Unmapped to Initializer Array Elements Are undefined
- Setting Default Values for Variables
- Skipping to Selectively Extract Needed Values
- Swapping Values of Two Variables
- Using Rest Syntax to Assign Remaining Values
- Using Spread Syntax to Expand Array Elements
- Destructuring Array in Function Parameters
- Destructuring Nested Arrays
- Wrapping Up
Destructuring Assignment
In javascript, destructuring assignment is an expression that makes it possible to selectively extract all or part of an array or object data and store them in specific variables in a single statement. In other words, destructuring assignment is an expression that allows for the unpacking of array and object data into variables.
Destructuring assignment was introduced in ES6 (ECMAScript 2015) Javascript. Before its introduction, we normally access the elements of an array by typing the name of the array followed by the index of the element enclosed in square brackets.
For example, let’s suppose we have an array of programming languages, as shown below:
JavaScriptlet languages = ['Javascript', 'PHP', 'Python', 'Java'];In the pre-ES6 era, if we need to extract the array elements into variables, we will need to use array indexing to get the specific elements and store them in variables:
JavaScriptlet languages = ['Javascript', 'PHP', 'Python', 'Java']; // extract array elements into defined variables let var1 = languages[0]; // will contain Javascript let var2 = languages[1]; // will contain PHP let var3 = languages[2]; // will contain Python let var4 = languages[2]; // will contain Java // log values console.log(var1, var2, var3, var4); // output: Javascript PHP Python JavaIn our attempts to extract the array elements into variables, we used array indexing to extract the array items from the array and saved them in variables:
var1,var2,var3, andvar4. This technique is very common and works very well. However, ES6 Javascript has a better way of handling such assignments.The ES6 Javascript introduces a very compact way of assigning array elements to variables without repetitive array indexing. With this approach, we can extract array elements and assign them to variables, all in just a single expression or statement. Consider the following code listing:
JavaScriptlet languages = ['Javascript', 'PHP', 'Python', 'Java']; // extract array elements into defined variables let [var1, var2, var3, var4] = languages; // log values console.log(var1, var2, var3, var4); // output: Javascript PHP Python JavaThe expression
[var1, var2, var3, var4] = languageson line 4 is called destructuring assignment. The expression declares multiple variables and maps them to the elements in thelanguagesarray in the same order.Think of the destructuring assignment as simultaneously declaring multiple variables,
var1,var2,var3, andvar4, and then unpacking the elements of thelanguagesarray into these variables. During unpacking, the values of thelanguagesarray elements are extracted into the declaration variables in the same array indexing order.For example, since
var1has index0, it will correspond withlanguages[0], and therefore its value will beJavascript. Sincevar2has index1, it will correspond withlanguages[1]and therefore its value will bePHP, andvar3, with index2, will have the valuePython, and so on..Now compare listing 3 to listing 2. If you are not already familiar with destructuring assignment in Javascript, then I bet you are beginning to love this programming construct, considering its compactness and the cleaner code it offers.
But that is not all. There are a lot that can be done with array destructuring, and we will cover them in this post. For example, destructuring assignment enables us to selectively extract specific elements of an array into variables and ignore those we do not need.
Destructuring Assignment Syntax
Before we dive deeper into array destructuring, it is important to understand the basic syntax for destructuring assignment. We will consider this basic syntax for both arrays and objects. The discussion on object destructuring is extensiviely discussed in a separate post, and can be accessed at Javascript Object Destructuring.
When extracting data from an array, the destructuring declaration variables need to be enclosed in square brackets:
[]. For example:JavaScript// In array destructuring, declaration // variables are enclosed in brackets: [] let [var1, var2, var3] = ArrayData;The names enclosed in brackets are variables into which we want to store the extracted values from the array. Therefore, these names must conform to Javacript variable naming considerations.
If we need to destructure values from an object, we use braces (square brackets),
{}, to enclose the declaration variables into which we store the extracted values:JavaScript// In object destructuring, declaration // variables are enclosed in braces: {} let {var1, var2, var3} = ObjectData;From the discussions so far, we can identify that the general syntax for destructuring arrays and objects are very similar, as shown below:
JavaScriptlet [] = ArrayData; let {} = ObjectData;Thus, when destructuring an array, we use brackets,
[]to enclose the variables in the destructuring declaration expression. For object destructuring, we use braces,{}, to enclose the declaration variables.In the discussions that follow, we will delve deeper into array destructuring. We consider javascript object destructuring in a separate post.
Array Destructuring
The ES6 Specification introduces array destructuring assignment through which we can assign the elements of an array to multiple variables in just a single statement. This eleminates the need to index the array elements one at a time in order to get the element values we need, as done in listing 2.
For example, given that we have an array of countries as shown below:
JavaScript// array declaration const countries = ['Ghana', 'Canada', 'United States', 'Germany']; const var1 = countries[0]; const var2 = countries[1]; const var3 = countries[2]; const var4 = countries[3];Using array destructuring statement, we can rewrite listing 7 as the following:
JavaScript// array declaration const countries = ['Ghana', 'Canada', 'United States', 'Germany']; // extract individual array elements into variables const [var1, var2, var3, var4] = countries;Line 5 is an array destructuring statement. This statement declares the variables
var1,var2,var3,andvar4, and then initializes them to the elements of the initializer array,countries. The elements in the initializer array are assigned to the variables by mapping each variable in the destructuring declaration to an element in the initializer array in the same order.To understand this better, think of the destructuring declaration
[var1, var2, var3, var4]as an array. Then variablevar1has index0and so maps tocountries[0],var2has index1and so maps tocountries[1],var3has index2and so maps tocountries[2], and so on; These mappings and extraction of values are done by Javascript so that we do not need to assign the elements in thecountriesarray one at a time with array indexing. With destructuring assignment, we are able to do all at once.Separating Variable Declarations from Assignment
In destructuring assignment, we are not mandated to always declare new variables for the assignment. Existing variables can be used in the destructuring declaration to assign values from the initializer array. An example is shown in the following code listing:
JavaScript// array declaration const countries = ['Ghana', 'Canada', 'United States', 'Germany']; // declare target variables let var1, var2, var3, var4; // extract individual array elements into variables [var1, var2, var3, var4] = countries; // log the values console.log(var1); // var1: Ghana console.log(var2); // var2: Canada console.log(var3); // var3: United States console.log(var4); // var4: GermanyThe variables
var1,var2,var3, andvar4are declared separately on line 5. Then on line 8, we use array destructuring statement to assign the initializer array elements to the already declared variables.As can be seen, we group the variables that we want to assign values in brackets, and then assign them to the initializer array. Javascript will automatically map the variables to the initializer array in order, and extract the values from the initializer array elements into the variables.
Variables Unmapped to Initializer Array Elements Are
undefinedWe have indicated that in an array destructuring statement, Javascript maps each item in the destructuring declaration array to items in the initializer array. However, if an item in the declaration array does not map to an item in the initializer array, then the value of that variable is
undefined. This happens when the number of variables in the destructuring declaration array is more than the number of items in the initializer array.Consider the following code listing:
JavaScript// array declaration const languages = ['PHP', 'Java', 'Javascript']; // destructure the array into variables const [var1, var2, var3, var4] = languages; // log value of var4 console.log(var4); // output: undefinedObserve that there are four destructuring declaration variables:
var1,var2,var3, andvar4. However, The initializer array,languages, has only three items.In destructuring the initializer array,
var1maps tolanguages[0],var2maps tolanguages[1], andvar3maps tolanguages[2]. However,var4does not map to any element in thelanguagesarray. The result is thatvar4is declared as a variable without an initializing value, similar to a variable declaration like the following which will haveundefinedas its value:JavaScript// declaration of variable without initializing value const var4;Thus, the value of a variable in the declaration array which is not mapped to an element in the initializer array will be
undefined.Setting Default Values for Variables
When destructuring an array into variables, we can set default values to be used when the value of a variable is
undefined.For example, in the previous section, we indicated that if a variable in the destructuring declaration array is not mapped to an element in the initializer array, then its value will be
undefined.If we like, we can provide a default value which should be used if the value of a variable is
undefinedafter the array destructuring. To do this, we assign the default value to the variable in the declaration array:JavaScript// array declaration const languages = ['PHP', 'Java', 'Javascript']; // destructure the array into variables const [var1, var2, var3, var4 = 'Python'] = languages; // log value of var4 console.log(var4); // output: PythonIn the destructuring of the array on line 5,
var4does not map to any item in thelanguagesarray and therefore should have its value to beundefined. However, on this same line, we assign a default value tovar4. The default value will be used if the value ofvar4isundefinedafter destructuring.Default values can be assigned to multiple variables in the destructuring declaration array. However, these default values are only used if the value extracted from the initializer array is
undefinedor when the variable has no mapping in the initializer array. For example:JavaScript// array declaration const languages = ['PHP', 'Java', 'Javascript']; // destructuring declaration array const [var1 = 'C#', var2 = 'C++', var3 = 'C', var4 = 'Python'] = languages; // log values console.log(var1); // output: PHP console.log(var2); // output: Java console.log(var3); // output: Javascript console.log(var4); // output: PythonOn line 5, we have set default values for all the variables in the destructuring declaration array. When mapped to the initializer array, we can observe that the values that will be extracted from the
languagesarray forvar1,var2, andvar3are notundefined. Therefore, the corresponding values in the initializer array are used rather than the default values.var4which is not mapped to an element in the initializer array, and expected to beundefined, will use the default value set in the declaration array.Let’s deliberately change the vaue of the first element in
languagesarray toundefined:JavaScript// array declaration const languages = [undefined, 'Java', 'Javascript']; // destructuing declaration array const [var1 = 'C#', var2 = 'C++', var3 = 'C', var4 = 'Python'] = languages; // log value of rust variable console.log(var1); // output: C# console.log(var2); // output: Java console.log(var3); // output: Javascript console.log(var4); // output: PythonAfter re-running the code, we should expect the value of
var1to be the default value set in the destructuring declaration array. This is becausevar1, which maps tolanguages[0], will have its value beingundefined, and therefore the default value instead gets assigned tovar1.Skipping to Selectively Extract Values
Sometimes, we may not need all the data that is contained in a given array. We may need the value of only one or a few of the array elements. If the array elements that we need aren’t contiguous, especially not at the beginning, then that will imply that we skip those that we do not need and extract those that we need.
Consider an initial array data below:
JavaScript// array declaration const countries = ['Ghana', 'Canada', 'United States', 'Germany'];Let’s suppose we are only interested in getting the values of the second, third and fourth array elements. In the pre-ES6 era, we will use array indexing to access the values, such as in the following code listing:
JavaScript// array declaration const countries = ['Ghana', 'Canada', 'United States', 'Germany']; const var1 = countries[1]; const var2 = countries[2]; const var3 = countries[3];With ES6 array destructuring, we can skip values by omitting variables names in the declaration array. To skip the first array item in the initializer array, we will omit the variable name from the declaration array. The comma is however important. It is an indication that we intend to ignore extraction of the value at that index.
JavaScript// array declaration const countries = ['Ghana', 'Canada', 'United States', 'Germany']; // ignore first item, and extract the rest const [, var2, var3, var4] = countries;Take a careful look at line 5. In the destructuring declaration array, there is no variable name specified before the first comma. We can identify that the position of the first item in the declaration array is blank, signalling that we intend to skip the mapping of the first array element in the initializer array.
Let’s again suppose we intend to extract only the second and fourth elements from
countriesarray. Since we want to ignore the first array element (index0), and the third array element (index2), we will not provide any variable names at the indexes we intend to ignore in the declaration array:JavaScript// array declaration const countries = ['Ghana', 'Canada', 'United States', 'Germany']; // ignore first and third items, and extract second and fourth const [, var2, , var4] = countries; // log values console.log(var2); // output: Canada console.log(var4); // output: GermanyNow what if we intend to extract only the last element from
countries? Again, we will not provide variable names at the indexes we intend to ignore:JavaScript// array declaration const countries = ['Ghana', 'Canada', 'United States', 'Germany']; // ignore first three items, and extract the last const [, , , var4] = countries; // log values console.log(var4); // output: GermanyOn line 5, the first comma skips the first element in
countries, the second comma skips the second element incountries, and the third comma skips the third element incountries.var4, then, maps tocountries[3].Swapping Values of Two Variables
Javascript array destructuring construct enables us to easily swap the values of two variables without the need to explicitly declare a third variable.
Before array destructuring was introduced in ES6 Javascript, you will declare a third variable as a temporary storage space in order to swap the values of two variables. The following code listing is a reminder of how it used to be done:
JavaScript// variables declaration let var1 = 50; let var2 = 80; // we need a temporal variable to store one of them const temp = var1; // swap values of var1 and var2 var1 = var2; var2 = temp; // log variables console.log(`var1=${var1}`); // output: var1=80 console.log(`var2=${var2}`); // output: var2=50With array destructuring, we can swap the values of two variables in just a single statement. This is done by changing the order of the variables in the declaration array and the initializer array. The following code listing is an example:
JavaScript// variables declaration let var1 = 50; let var2 = 80; // swap values of var1 and var2, [var1, var2] = [var2, var1]; // log variables console.log(`var1=${var1}`); // output: var1=80 console.log(`var2=${var2}`); // output: var2=50Observe line 9 carefully. We use the two variables that we want to swap their values in the declaration array and the initializer array. You should notice that the order of the declaration array items and the initializer array items are in opposite order.
In the declaration array,
var1is declared as the first item followed byvar2. Then in the initializer array,var2appears beforevar1. This means that we have interchanged the order ofvar1andvar2in the declaration array and the initializer array. In fact, this is the only single statement we need in order to swap their values, nothing more. After running the code, you should see that the values of these two variables have been swapped.Using Rest Syntax to Assign Remaining Values
Sometimes, we may need to extract specific elements into separate variables and then extract the remaining elements into some other variable. We can achieve this by using the rest operator introduced in ES6 javascript.
The rest operator is a three consecutive dots, (
...), operator, which precedes a variable in a destructuring declaration. It used to pack the rest, or remaining values of an iterable, such as an array, into the variable preceded with the rest operator.Consider the following code listing:
JavaScript// array declaration const countries = ['Ghana', 'Spain', 'France', 'Germany']; // extract first item into africa, then pack the remaining into europe const [africa, ...europe] = countries; // log values console.log(africa); // output: Ghana console.log(europe); // output: ['Spain', 'France', 'Germany']On line 5, the variable
africamaps tocountries[0]. The rest operator,..., preceding the variableeurope, that is,...europe, means that the rest of the elements, starting from the index mapping of where the rest operator is used, should all be packed into the variable preceded with the rest (...) operator.Thus, after destructuring,
europewill be an array containing the rest of the elements of thecountries, starting from the indexing mapping ofeurope(countries[1]) to the initializer array,countries.Considering another example, we can decide to extract the first two items and pack the rest in a different variable:
JavaScript// array declaration const countries = ['Ghana', 'Spain', 'France', 'Germany']; // extract first and second, then pack the rest in different variable const [ghana, spain, ...rest] = countries; // log values console.log(ghana); // output: Ghana console.log(spain); // output: Spain console.log(rest); // output: ['France', 'Germany']Using Spread Syntax to Expand Array Elements
The Javascript spread syntax is an expression that expands an iterable data, such as array, string, or object, into individual elements separated by commas. Like the rest syntax, the spread syntax also uses three consecutive dots, (
...), preceding an iterable variable to expand the iterable data into individual elements separated with commas.For example, to spread the elements of an array, we precede the array variable name with the spread operator, (
...). An example is shown in the following code listing:JavaScript// array definition const data = [1, 2, 3, 4, 5]; // spread the array items console.log(...data);On line 5, we precede the array variable name,
data, with three consecutive dots (...). This expands the array into individual items separated by commas. The effect is that line 5 expands to the following call:JavaScript// ...data expands the array elements, separated by commas console.log(1, 2, 3, 4, 5);It is important to understand that passing an array as argument to a function call and spreading an array as argument to a function call are not the same. Hence, in the following code listing, the calls to the
logmethod of theconsoleobject are not the same:JavaScript// array definition const data = [1, 2, 3, 4, 5]; console.log(data); // output: [1, 2, 3, 4, 5] console.log(...data); // output: 1 2 3 4 5On line 4, we pass the array as argument to the
logmethod without preceding it with the spread operator. In this case, we are passing only one argument to thelogmethod. This, logsdataas array in the console.On line 5, we precede the array with the spread operator. This expands the array by spreading and separating the individual array elements with commas. Thus, after spreading the array, we are actually passing five arguments to the
logmethod.With the basic understanding gained so far, we should look at other code logic in which the spread syntax can be used.
Cloning An Array Using Spread Syntax
When we assign an array to another variable, the two variables become arrays pointing to the same array data. For example:
JavaScript// initialise array let A = [1, 2, 3, 4]; // assign A to new variable B let B = A; // log values console.log('A = ', A); console.log('B = ', B);As expected, both
AandBwill have the same values.
However, if we modify an element in
A, it will affect the values inB:JavaScript// initialise array let A = [1, 2, 3, 4]; // assign A to new variable B let B = A; // modify fourth element in A A[3] = 10; // log values console.log('A = ', A); console.log('B = ', B);On line 8, we modify the value of the fourth element in
A. However, this also updates the value of the fourth element inB, as shown below:
This happens because
AandBhave the same reference to the array data.We can use the ES6 Javascript spread syntax to easily clone the values of one array into another so that they will not reference the same array data. Rather than assign
AtoB, as we did on line 5 in listing 29, we will spread the elements ofAto initialize a new array which will be assigned toB:JavaScript// initialise array let A = [1, 2, 3, 4]; // assign A to new variable B let B = [...A]; // modify an element in A A[3] = 10; // log values console.log('A = ', A); console.log('B = ', B);On line 5, we set B to a new array that we initialize by spreading the elements
Awithin brackets,[]. This makes A and B have different references to array data, although they have the same values. An update to arrayAon line 8 does not affect arrayB, as shown in the following log output:
Thus, array
Ais a clone of arrayB. It should however be noted that this approach only creates a shallow copy of the source array.Concatenating Arrays
The spread syntax can also be used to concatenate two arrays. Before ES6, it was common to use the concat method of an array to concatenate two arrays. With ES6, we can use the spread syntax to achieve same.
Suppose we have two arrays, given in the following code listing:
JavaScript// array declarations const A = [1, 2, 3, 4]; const B = [5, 6, 7, 8]; // concatenate A and B const C = [...A, ...B]; console.log(C); // output: [1, 2, 3, 4, 5, 6, 7, 8]On line 6, we use the spread syntax to expand arrays
AandB. The effect is that a new array is initialized with its content being the values of both arraysAandB, and assign the generated array toC.Destructuring Array in Function Arguments
If a function accepts arguments in its call, and we have the values to be passed to the function in an array, there is no need to use array indexing to set the argument values. If the ordering of the array elements correctly map to the function parameters, we can use the spread syntax to spread the argument values.
For example, suppose we have the following function which has three parameters:
JavaScript// function definition function getVolume(width, length, height) { return width * length * height; }Suppose also that we have the values to be passed to the function in an array with correct mapping of the array elements to the parameters:
JavaScript// object shape data [width, length, height] const data = [3, 5, 4];Without array destructuring, we will pass the values to the function by indexing the array:
JavaScript// object shape data [width, length, height] const data = [3, 5, 4]; // calculate object volume let volume = gettVolume(data[0], data[1], data[2]);With array destructuring, we can spread the array elements when calling the function:
JavaScript// object shape data [width, length, height] const data = [3, 5, 4]; // calculate object volume let volume = getVolume(...data);As can be seen, using the
spreadsyntax involves less typing when compared to accessing the values with array indexing.Destructuring Array in Function Parameters
Traditionally, when an array is passed as argument to a function, we access the values of the array in the function by using array indexing to retrieve the individual array elements. For example, suppose we have a function that calculates the volume of an object based on values passed to it as array:
JavaScriptfunction getVolume(arrData) { const width = arrData[0]; const length = arrData[1]; const height = arrData[2]; // calculate and return volume return width * length * height; }Rather than use array indexing to retrieve the values into variables, we can use ES6 array destructuring construct to destructure the array parameter into individual variables without the need to access the values with array indexing. But before we see how this is done, let’s understand what happens when we pass a value as argument to a function.
Suppose we have a function that accepts a value in its call, such as the following:
JavaScriptfunction someFunction(PARAM) { return PARAM * 2; }As we know, we will call the function by passing a value to it as an argument:
JavaScript// call the function someFunction(ARG);When the function is called, the value of
ARGis assigned to the variablePARAMdeclared in the function’s signature. This implies that the function call leads to assignment ofARGTOPARAM:JavaScriptPARAM = ARGNow suppose ARG is an array,
[1, 2, 3], and we pass it as argument to the function, this results in the assignment of the array toPARAMdeclared in the function signature:JavaScriptPARAM = [1, 2, 3];But in our early discussions on array destructuring, we indicated that we can destructure an array into different variables, such as the following:
JavaScript[width, length, height] = [1, 2, 3];With this understanding, we can rewrite
arrDataingetVolume()function by replacing it with destructuring declaration variables:JavaScriptfunction getVolume([width, length, height]) { // calculate and return volume return width * length * height; }Thus, if a function accepts an array as an argument, then we can destructure the array parameter into declaration variables directly in the function header without the need for array indexing to retrieve the individual values into separately declared variables.
Destructuring Nested Arrays
We can apply our understanding of array destructuring so far to destructure an array within an array. As we will soon see, that is a very easy task, though it may seem daunting at first encounter. We will take step by step approach to better your understanding of nested array destructuring.
First, let’s assume we have the following nested array:
JavaScriptconst numbers = [0, [1, 2, 3]];We can identify that the array
numbershas two elements. The first element,numbers[0], has the value0, and the second element,numbers[1]has an array, which is[1, 2, 3].Our task is to extract all the numerical values into variables. We will name the variables after the number we want to retrieve, such as
one,two,three, etc. Let’s see how we can do this with array destructuring.First, let’s observe again that the
numbersarray has two elements. Suppose we destructure the array into two variables,AandB:JavaScriptconst numbers = [0, [1, 2, 3]]; // destructure into variables const [A, B] = numbers;In this code listing,
Amaps tonumbers[0]which has the value0, andBmaps tonumbers[1]which is an array:[1, 2, 3]. SinceBis an array, we can further destructure it into additional declaration variables. But since we already know thatAhas the value0, lets replace it with variable namezerowhich is its numerical value that we extract, and then continue from there:JavaScriptconst numbers = [0, [1, 2, 3]]; // destructure into variables const [zero, B] = numbers;Recall that
Bmaps tonumbers[1], which is an array:[1, 2, 3]:JavaScriptB = [1, 2, 3];We can now destructure
Binto additional declaration variables with the names of the values in the array:JavaScriptconst [one, two, three] = BWe can replace
Bwith the declaration variables:[one, two, three]. Hence, on line 4 in listing 45, we can substitute[one, two, three]in place ofB:JavaScriptconst numbers = [0, [1, 2, 3]]; // destructure into variables const [zero, [one, two, three]] = numbers; // log the values console.log(zero, one, two three); // output: 0 1 2 3Using array destructuring syntax, we have been able to destructure both the outer array and the inner array of
numbersinto distinct variables.Let’s further test our understanding of nested array destructuring with another challenge by updating the
numbersarray to the following:JavaScriptconst numbers = [0, [1, 2, [3, 4]]];We can identify that the
numbersarray has two elements. The first item,numbers[0], has the value0. The second item,numbers[1], has its value to be an array, which is[1, 2, [3, 4]]. Further, we can identify thatnumbers[1][2]also contains an array which is[3, 4].Going by the approach discussed earlier, we can destructure the values in the
numbersarray into variables as shown in the following code listing:JavaScriptconst numbers = [0, [1, 2, [3, 4]]]; // destructure into variables const [zero, [one, two, [three, four]]] = numbers; // log the values console.log(zero, one, two, three, four); // output: 0 1 2 3 4Javascript array destructuring syntax is not only elegant but also a time-saving approach. In just a single statement, we have been able to extract values of array elements, event nested ones, into distinct variables.
Wrapping Up
Javascript array destructuring is a programme technique introduced in ES6 Javascript which makes it possible to unpack an array and store the individual elements into variables. This can be done in just a single statement without the need to index the array to extract the values.
For example, given the following array:
JavaScript// array declaration const numbers = [1, 2, 3, 4];We can use array destructuring assignment syntax to extract all the values from the array in just a single statement:
JavaScript// array declaration const numbers = [1, 2, 3, 4]; // extract values const [one, two, three, four] = numbers;The declaration assignment syntax on
line 5declares variablesone,two,three, andfour, and then maps each variable to thenumbersarray in order. In this case,onemaps tonumbers[0],twomaps tonumbers[1],threemaps tonumbers[2], andfourmaps tonumbers[3].If we do not need all the values from the initializer array, then we can skip specific values in the initializer array by ommiting variable names that should map to the elements we want to skip. For example, if we want to skip the first element in
numbers, then we will not provide any variable name in the declaration array:JavaScript// array declaration const numbers = [1, 2, 3, 4]; // ignore first element const [, two, three, four] = numbers;Observe that there is variable name before the first comma, indicating that we want to skip this mapping into the
numbersarray.If we want to skip the first and second elements, then following will do:
JavaScript// array declaration const numbers = [1, 2, 3, 4]; // ignore first and second elements const [, , three, four] = numbers;Sometimes, we may choose to extract specific value and pack the remaining ones into another variable. We can pack the remaining elements into a variable using the rest operator, (
...). For example:JavaScript// array declaration const numbers = [1, 2, 3, 4]; // extract first element, and pack the remaining into different variable const [one, ...others] = numbers; console.log(one); // output: 1 console.log(rest); // output: [2, 3, 4]In this code listing,
onemaps tonumbers[0]. The rest operator in frot ofothersimplies that starting from the current mapping, the remaining ones should all be packed intoothersvariable.We can even use array destructuring syntax to swap values of two variables. For example:
JavaScriptlet first = 10, second = 20; // swap their values [first, second] = [second, first]; // log the values console.log(first); // output: 20 console.log(second); // output: 10We can extend array destructuring syntax to destructure array parameters in functions:
JavaScriptfunction getTotal([var1, var2, var3]) { return var1 + var2 + var3; } const data = [10, 20, 30]; // get total let total = getTotal(data);Other operations that can performed with Javascript array destructuring include concatenation and shallow cloning of arrays. It can also be used to simplify extraction of values from nested arrays.
-
Understanding React useRef Hook
React
useRefis a hook that allows a function component to create a reference to a value and track its state between component re-renders. This is made possible because arefobject is able to persist its value so that it will not lose track of the value it references during component re-render. The reference can also be used to update the value that is being tracked.In addition to preserving values between re-renders, the
useRefhook is also used to create references to DOM elements and access their values or perform manipulations on them. For example, we can create reference to form input elements and extract their values after the user submits the form.In contrast to state variables,
refobjects are mutable. This implies that we can directly modify the values tracked by arefobject without the need for a special function. Updates torefvalues do not trigger a re-render of the containing function component, making them very efficient.In this post, we will demistify React
useRefhook with clear examples to better understand its capabilities and usage.Table of Contents
What is the use of useRef Hook?
Basically, React
useRefhook is used to create a reference to a value and preserve its state so that the value will not be lost when the function component re-renders. Additionally, it can be used to keep reference to a DOM element and retrieve or manipulate its properties such as content, appearance, etc.To better understand what we mean by preserving the state of a variable, lets’ look at the general design of a javascript function.
Traditionally, creating a value in a javascript function involves a variable declaration statement such as the following:
JavaScriptfunction logCallsCount() { // initialise counter variable let callsCount = 0; }Any updates to values initialised within the function, such as the value of
callsCountin listing 1, are retained as long as the function is still running. In other words, the function will remember the state of all variables declared within it as long as it has not exited:Consider the following code listing:
JavaScriptfunction logCallsCount() { // initialise counter variable let callsCount = 0; console.log(`Calls count is: ${count}`) // update calls counter callsCount += 1; console.log(`Calls count is: ${count}`) } // call the function to log calls count logCallsCount();A single call to
logCallsCount()online 12will produce the following in the console, which is exactly what we expect:
A general design of javascript functions, and in most programming languages, is that when a function completes its task and exits, the values of its variables are lost. Subsequent function calls will not remember the values of the variables in the previous calls. The values of the variables are reset when the function is called again and begins execution.
The following code listing calls
logCallsCount()twice.JavaScript// call the function to log calls count logCallsCount(); logCallsCount();The output of the code is shown below:

In the first call to
logCallsCount(), the value ofcallsCountwas1before the function exited. When the second call tologCallsCount()begins execution, it does not remember that the value ofcallsCountwas1when the first call tologCallsCount()exited. Therefore,callsCountis reset to the value0before being incremented by1. Hence, in each call tologCallsCount(), the same values are logged to the console.In modern React applications development, function components are widely used. When part of the application UI needs to be updated, React calls the function component to refresh and update the UI, a process commonly referred to as re-render. Thus, a function component can be called multiple times to perform UI update. This re-render of components causes local variables to be reset to initial values, losing any values they contained before the re-render, as demonstrated earlier.
To address this challenge, React uses hooks such as
useState,useReducer, anduseRefhooks to create a reference to a value and track its state so that its value will not be lost when the function component re-renders. In this post, we will focus on how to preserve values and access DOM elements withuseRefhook. The section on understanding useState hook tackles how to preserve and update values withuseStatehook.Creating a Reference with useRef
To create a reference to a value that can be preserved between component re-renders, or access a DOM element, we first need to import
useReffrom React:JavaScriptimport { useRef } from 'react';Once imported, we can create a reference variable by calling
useRef():JavaScriptlet clicksCount = useRef();In the above code listing, we declare
clicksCountas a reference variable and initialize it with a call touseRef(). As indicated earlier, this givesclicksCountthe ability to preserve the value it references so that when the function component in which it is defined re-renders,clicksCountcan remember its state from the previous render.useRefis a hook and therefore its usage must comply with the rules of hooks in React. For example, initialization of arefobject withuseRef()must be done at the beginning of the body of the function component.Mostly, it is appropriate to set an initial value when we declare a variable. For example:
JavaScriptlet clicksCount = 0;We can similarly set an initial value when we declare a
refvariable in React application. To do this, we pass the intial value as an argument touseRef():JavaScriptlet clicksCount = useRef(0);Just as we can assign values of any javascript type to a variable, we can also assign any value such as
number,string,array,object, etc by passing it touseRef():JavaScriptlet numberRef = useRef(20); let stringRef = useRef('Hello React'); let arrayRef = useRef( ['React', 'Javascript'] ); let objectref = useRef( {library: 'React', language: 'Javascript'} ); let undefinedRef = useRef(undefined); let nullRef = useRef(null);If we do not pass an initial value to
useRef(), then the value of the reference variable will beundefined.Now that we know how to initialize a reference variable, let’s compare a regular javascript variable declaration with a React reference variable declaration:
JavaScript// declaration of regular javascript variable let callsCount = 5; // declaration of React reference variable let clicksCount = useRef(5);As can be seen, creating a
refvariable in React isn’t much of a pain. We only need to set therefvariable touseRef(), while passing an optional initial value as argument touseRef(). Other than this, the two declarations are syntactically close.Ref Variables are Objects
A
refvariable is actually an object which contains a single property namedcurrent. This is because a call touseRef()returns an object, with the optional initial value set as value to thecurrentproperty:JavaScript{ current: initialValue }Whereas we can access the value of regular javascript variable directly, we can only access the value of a
refvariable through itscurrentproperty:JavaScript// declaration of a ref variable let clicksCount = useRef(0); // access the value tracked by the ref variable console.log(clicksCount.current);As can be seen, we are able to access the value referenced by the
refobject through thecurrentproperty.Ref Objects are Mutable
Unlike state variables initialized with useState() which must be treated as immutable,
refvariables are mutable. This implies that we can directly modify arefobject without the need for a special function, or set them to a newly initialized object data. Therefore, we can update the value of therefobject by directly setting the new value to thecurrentproperty:JavaScriptimport React, { useRef } from 'react'; const ClicksCounter = () => { // declaration of a ref variable let clicksCount = useRef(0); // update the value of the ref object clicksCount.current = 5; clicksCount.current += 1; // access the value tracked by the ref variable console.log(clicksCount.current); // will output 6 return <></> } export default ClicksCounter;Observe that on lines 8 and 9, we modified the value referenced by the
refobject through thecurrentproperty.Ref Updates Do Not Re-render
When the value referenced by a
refobject is updated, React does not call the function component to re-render and update the application UI. Due to this, arefobject value is not suitable in UI code. This is because the application view will not be updated to reflect current values ofrefobjects until an update to a state variable has been done to trigger a re-render. Thus,refobjects are not expected to be used in JSX code.In some cases, using
refobjects in JSX may work, but this may lead to unexpected application behaviour. For best practices, we should avoidrefobjects in JSX. If we need values that need to be preserved and also be used in the UI, then we need to initialize the values withuseState().Preserving Values with useRef
As indicated earlier, one of the uses of
useRefhook is to preserve some values so that the values can be recoverd when the function component re-renders. It is ideal for storing values that should not trigger a re-render when the values are updated. This is in contrast to state variables which trigger a re-render when updated.Consider the following code listing which defines a
refvariable and a regular javascript variable. The code demonstrates how a regular javascript variable differs from arefvariable.To confirm that a
refobject persists its value when a component re-renders, we will introduce a state variable which wie will intentionally update in order to trigger a component re-render.JavaScriptimport React, { useRef, useState } from "react"; const ClicksCounter = () => { const [count, setCount] = useState(0); let refCounter = useRef(0); // ref variable let nonRefCounter = 0; // regular variable console.log(`Ref count is: ${refCounter.current}`); console.log(`Non-ref count is: ${nonRefCounter}`); const onBtnClick = () => { refCounter.current += 1; nonRefCounter += 1; // To trigger a re-render, we intentionally // update a state variable setCount(refCounter.current); } return ( <div style={{width: '50%', margin: '20px auto'}}> <button onClick={onBtnClick}>Click Me</button> </div> ) } export default ClicksCounter;On lines 5 and 6, we declare a
refvariable and a regular javascript variable respectively. The intent is to demonstrate that a regular javascript variable will lose track of its value whiles arefvariable will remember its previous value during component re-render.When the
buttonis clicked, we update bothrefCounterandnonRefCounterin theonBtnClickevent handler. To confirm that arefobject persists its value when a component re-render occurs, we intentionally update the state variable, in this casecount, in order to trigger a re-render. The updated values are then logged to the console. We can see the result below:
As can be seen, React calls the
ClicksCountercomponent to re-render when the button is clicked. That is because we perform an update to a state variable in the event handler.You should notice from the log that
refCounterpersists its previous value and uses it during re-render. It is therefore able to increment its value when the button is clicked. However,nonRefCounter, which is a regular javascript variable, is not able to persist its value and recall it during re-render. Hence,nonRefCounteralways resets to the initial value, outputting the value0.We have said that an update to the value referenced by a
refobject does not trigger a re-render. In the previous example, a re-render of the component occurs because we intentionally did so by updating a state variable.To prove that an update to a
refobject does not cause a component re-render, remove or comment out line 17 in listing 13. This time, there will be no log output when the button is clicked. TheClicksCountercomponent isn’t called to re-render, hence line 8 and line 9 aren’t executed again.Accessing DOM Elements
At this point, we have a very firm understanding of the use of
useRefhook in React applications development. It is used to store a value, or object, so that the value it references will not be lost when a function component in which it is defined re-renders.In addition to persisting values between component re-renders, React
useRefhook can be used to create a reference to a DOM element, eliminating the need for javascript libraries such as jQuery. Although it is possible to use jQuery in React applications, if its requirement is basically for the purpose of referencing and or manipulating the DOM, then jQuery isn’t needed. ReactuseRefhook does the job well. It can be used to reference DOM elements and manipulate their contents.Let’s consider a very simple React function component that displays an
inputcontrol and abutton: We will enter a name in theinputcontrol and click on thebutton.JavaScriptimport React, { useRef } from "react"; const MyName = () => { return ( <div style={{width: '60%', margin: '20px auto', textAlign: 'center'}}> <input type='text' placeholder="Enter your name" /> <button>Submit</button> </div> ) } export default MyName;A preview of the
MyNamecomponent, when rendered in the browser, should look similar to the following:
What we intend to do is to get and display the text entry after the
Submitbutton is clicked. To do this, we will need a way to reference theinputcontrol so that we can retrieve itsvalueafter the button is clicked.If you have worked with the DOM API before, then you know that we will need to get a reference to the
inputcontrol. In the non-react way, it is done by specifying anidattribute on the element:HTML<input type='text' id='myName' />To get a reference to the
inputcontrol dynamically, we calldocument.getElementById(), or usejQueryjavascript library to return it:JavaScript// get reference to the input control using DOM api let myNameInput = document.getElementById('myName'); // get reference to the input control using jQuery let myNameInput2 = $('#myName');Although these methods will work in React, they require that we run codes like these in an effect function using React useEffect hook. For detailed coverage of React
useEffecthook, read on the concise discussion on understanding react useEffect hook.To reference a DOM element in the React way, we need to add
refattribute to the element of concern, and then initialize arefobject withuseRef(). Rather than specify anidattribute on the DOM element, we will specify arefattribute and set its value to therefobject that we initialized.JavaScriptimport React, { useRef } from "react"; const MyName = () => { // initialize a ref object with useRef const myNameRef = useRef(); return ( <div style={{width: '60%', margin: '20px auto', textAlign: 'center'}}> <input type='text' placeholder="Enter your name" ref={myNameRef} /> <button>Submit</button> </div> ) } export default MyName;As can be seen, we initialize
refvariable,myNameRef, on line 5 withuseRef(). Then on line 9, we have specified arefattribute rather thanidattribute on theinputelement. We have also set the value of therefattribute tomyNameRefwhich we initialized on line 5.Recall what a
refvariable or object does. It can track or preserve the value it references, even when the function component in which it is defined re-renders. This means thatmyNameRefwill always remember that it references theinputelement. It will not lose track of the element that it references.The following code listing gets and displays the value of the
inputcontrol after the button is clicked:JavaScriptimport React, { useRef } from "react"; const MyName = () => { // initialize a ref object with useRef const myNameRef = useRef(); // event handler for button click const onBtnClick = () => { alert(`Your name is ${myNameRef.current.value}`); } return ( <div style={{width: '60%', margin: '20px auto', textAlign: 'center'}}> <input type='text' placeholder="Enter your name" ref={myNameRef} /> <button type='submit' onClick={onBtnClick}>Submit</button> </div> ) } export default MyName;Remember that the value referenced by a
refobject can be accessed through itscurrentproperty. Hence, thecurrentproperty ofmyNameRefreferences theinputelement. As seen on line 14, we setmyNameRefas value to therefattribute. In the DOM API, the inputelement is actually an object ofHTMLInputElement.Since
myNameRef.currentreferences anHTMLInputElement, we obtain the text entered by the user through thevalueproperty. If we wanted to save the text entered by the user, we would simply assign thevalueproperty of the element to another variable:JavaScript// save the text entered by the user const name = myNameRef.current.value;One thing you should realize is that we are able to reference DOM elements for dynamic data retrieval without the need for DOM API functions like
document.getElementById(),document.getElementsByClassName(), ordocument.querySelector(). Also, there is no need to use jQuery library. For DOM API or jQuery, we would need to specify anidattribute on HTML element, and then retrieve the value in auseEffect hookfunction, such as in the following:JavaScriptuseEffect(() => { // get reference to input and retrieve value with DOM API const inputElem = document.getElementById('myName'); const name = inputElem.value; // alternatively with jQuery // get reference to input and retrieve value with jQuery const inputElem2 = $('#myName'); const name2 = $(inputElem2).val(); }, []);However, when using
useRefto reference elements, we rather need to specify arefattribute and set its value to arefobject initialized withuseRef(). In this case, there will be no need for anidattribute on the element.Manipulating DOM Elements
Sometimes, we may need to dynamically manipulate DOM elements, such as update their content or apply styles to them. In such cases, we may need to get a reference to the DOM elements that need to be updated dynamically.
Luckily for us, we have already covered the initial part of manipulating DOM elements: getting a reference to DOM elements. The previous section on Referencing DOM Elements, which is a precursor to the discussion in this section, already dealt with this first part.
In listing 18, we displayed the name entered by the user with the javascript
alert()function. Let’s consider an alternative approach in which we dynamically update a DOM element to display the name in the document page.JavaScriptimport React, { useRef } from "react"; const MyName = () => { // initialize a ref object with useRef const nameInputRef = useRef(); const nameRef = useRef(''); // event handler for button click const onBtnClick = () => { nameRef.current.innerText = `Your name is ${nameInputRef.current.value}`; } return ( <div style={{width: '60%', margin: '20px auto', textAlign: 'center'}}> <input type='text' placeholder="Enter your name" ref={nameInputRef} /> <button type='submit' onClick={onBtnClick}>Submit</button> <p ref={nameRef}></p> </div> ) } export default MyName;On line 17, we introduce a
<p></p>tag which will be used to display information about the name entered by the user. The content of this<p></p>tag is blank, hence no text is initially displayed. To be able to reference it after render, we set itsrefattribute tonameRef, arefobject initialized on line 6 withuseRef().The following is a rendered view and usage of
MyNamecomponent in listing 21:
We have said that when a
refobject is set as value to arefattribute of a DOM element, itscurrentproperty references the DOM element. FornameRef, it references the<p></p>tag, and we can, for example, dynamically set its content withinnerTextproperty. We do this on line 10 in theonBtnClickevent handler, as shown below:JavaScriptnameRef.current.innerText = `Your name is ${nameInputRef.current.value}`;If you are used to working with the DOM API, you can use
refobjects to access DOM objects for manipulating the document. For example, knowing thatnameRefreferences DOM elementpin listing 21, we can change its font style with the following code:JavaScriptnameRef.current.style.fontStyle = 'italic';You will rarely see code such as this in React applications. We are only demonstrating that
refobject can be used as a reference to a DOM element, which eliminates the need for DOM API calls likedocument.getElementById(),document.querySelector(), etc.For instance, rather than set the content of the DOM element
pwithinnerTextproperty, we can use ReactuseStatehook to update its content. The following code listing is an example:JavaScriptimport React, { useRef, useState } from "react"; const MyName = () => { // initialize a ref object with useRef const nameInputRef = useRef(); const [nameInfo, setNameInfo] = useState(''); // event handler for button click const onBtnClick = () => { setNameInfo(`Your name is ${nameInputRef.current.value}`); } return ( <div style={{width: '60%', margin: '20px auto', textAlign: 'center'}}> <input type='text' placeholder="Enter your name" ref={nameInputRef} /> <button type='submit' onClick={onBtnClick}>Submit</button> <p>{nameInfo}</p> </div> ) } export default MyName;It is not recommended to use the value of a
refobject directly in JSX code. For example, replcacing line 17 of listing 24 with the following isn’t recommended:JavaScript<p>{nameInputRef.current.value}</p>We should try as much as possible to avoid using the value of
refobjects in application UI code.When to use useRef
In this section, we outline some of the use cases of React
useRefhook.- Persist Values Without Re-render: The
useRefhook should be used when there is the need to preserve some values between re-renders and when at the same time, we do not want to trigger a component re-render after we update the value. If there is the need to trigger a component re-render for the updated value to be visible in the UI, thenuseRefisn’t the right hook. In this case,useStatehas to be used. - Access DOM Element Values: The
useRefhook can be used to dynamically retrieve values from DOM elements. For example, after a user clicks on the submit button of a form, the user’s input can be retrieved through references to each form input. For form inputs, usinguseRefto retrieve the values can be very efficient. IfuseStateis used, it will trigger a re-render for every character the user types. - Manipulate DOM Element: As demonstrated in listing 21, DOM elements can be manipulated with the use of the
useRefhook, for example their content or styles. However, the content of DOM elements are commonly updated with state variables initialized withuseStatehook.
Key Considerations
When working with the
useRefhook, there are some factors that need to be considered. Complying with ensure best performance and reliability of React applications and also conform to best programming practices.Avoid Refs in JSX
For React best practices, it is highly recommended to avoid the use of
refobject values directly in JSX. If there is the need to display variables in the application UI, then state variables have to be used.For example, the following code isn’t recommended:
JavaScriptimport React, { useRef } from 'react'; const MyComponent = () => { const refObject = useRef(10); return ( <div>You are {refObject.current} years old.</div> ) } export default MyComponent;On line 7 a
refobject value is directly used in the JSX code. This practice isn’t recommended. If there is the need to use variables in JSX, then the recommended approach is to use state variables in the UI code.Avoid Recreating Initial Values
When initializing a
refobject withuseRef(), it is important to avoid passing functions that perform resource intensive tasks as argument to theuseRef()call. For example:JavaScriptconst refObject = useRef(getInitialValue());Keep in mind that the initial value passed to
useRef()is used and an assigned to therefobject’scurrentproperty only in the first render of the component. For re-render, the initial value is not used. It is rather the value that was persisted before the re-render which is used.If we pass a function to
useRef(), the function will be called on every re-render. However, its return value will not be used when the component re-renders. This becomes a waste of processing time and resource if the function performs expensive task.If we need to call a function to get the initial value at the first render, we can pass
nulltouseRef(), and then use conditional logic to determine if the initial value was initially set or not:JavaScriptconst refObject = useRef(null); // Check to see if current property is null, // then we call the function. If not null, then // it means the initial value was previously set if (refObject.current === null) { refObject.current = getInitialValue(); }Reading and Writing Refs
We have earlier indicated that
refobject values need not be used in the JSX code. It is highly recommended that we read or write torefobjects in event handlers and or effect handlers.For example, in listing 13, we updated
refCounterin a button click event handler:JavaScriptconst onBtnClick = () => { refCounter.current += 1; nonRefCounter += 1; }Once the application UI is rendered, it is best to ensure that interactions with
refobject values are done in response to events that occur in the application or when processing side effects.Summary
React
useRefis a hook that allows a function component to create a reference to a value and track it between component re-renders. It can also be used to reference DOM elements and retrieve their values or manipulate them.Updates to ref objects to do trigger a re-render of the component. Hence, they are typically used for storing values that are not expected to be visible in the application UI. They are used internally to keep reference to values.
Since
useRefis a hook, its usage must comply with the Rules of Hooks in React. Notably,useRefhas to be used in the top level of the function component. - Persist Values Without Re-render: The
-
Understanding React useState Hook
React
useStateis a hook that allows function components to manage the state of their variables. It enables function components to keep track of the values of their variables between multiple calls. It is one of state management hooks provided by React.When the value of a state variable initialised with
useState()is updated, React automatically calls the function component to re-render the application view. This implies that theuseStatehook is crucial for keeping track of values that are rendered in the application view, and which we will want the UI to automatically update when the state values change.In this post, we will learn to understand the React
useStatehook and how to correctly update state data initialised withuseState().Table of Contents
Stateless vs Stateful Functions
To better understand React
useStatehook and why we may need it, it will be helpful to understand the difference between stateless and stateful functions.Stateless Functions
When we say a function is stateless, we imply that the function does not remember the state of data it contained between multiple calls. That is, if the function is called and completes its task, the state of any data that it contained are lost. If we make another call to the same function after an earlier call, it will not be able to remember or retrieve the state of the variables defined in the function. In other words, the data contained in the variables defined in the function in the previous call are lost.
Consider code listing 1 below:
JavaScriptfunction addToList(number) { // define variable and assign default value let list = []; // append number to array list.push(number); // log the total value console.log(list); } // call function multiple times with values addToList(50); addToList(70); addToList(100);In listing 1, the
addToList()function creates an array online 3. Online 6, the function adds the number passed as argument to the list of items. Fromline 13toline 15, we calladdToList()to add numbers the list.If we run the javascript code in listing1, we will observe that the log of the array for the second and third calls to
addToList()do not contain the previous values added. The following is a sample run in the browser: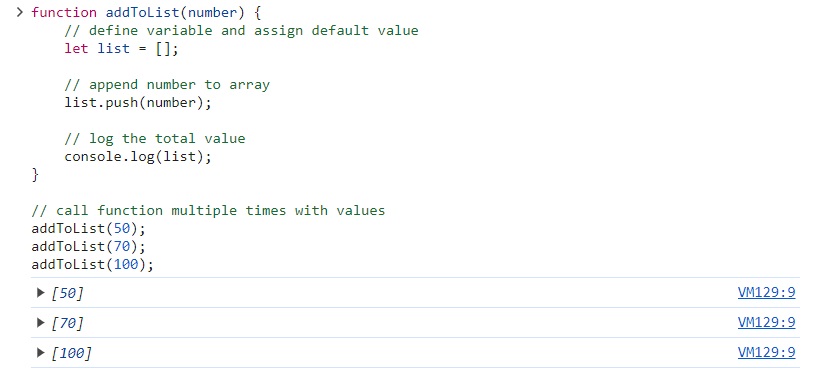
The first call to
addToList()with the value50is seen in the output as[50], thuslistarray contains a single item. This is what we expect. However, when the second call toaddToList()is made with the value70, we see from the second output that the array still contains a single item,[70]. The previous item,50, has been lost. The same applies to the third call toaddToList(), as seen in the third output,[100].What happens is that when the function completes its task, it loses track of the state of the data it contained. Hence, as subsequent calls are made, the function is not able to remember the state of its previous data.
Functions that are not able to track the state of their data between multiple calls, as seen in listing 1, are stateless functions. This is the default behaviour of javascript functions, and is also the default in almost all programming languages.
Stateful Functions
Contrary to stateless functions, stateful functions remember the state of their data between multiple calls. If subsequent calls are made, a stateful function can remember the state of its data in the previous call and continue to work with the data in the current call.
In the past years, React apps were developed using ES6 classes. Classed-based React components made it simple to keep the state of data in objects. In modern React apps development, functions are used to create components. This shift has been necessitated by the introduction of hooks in React 16.8.
The shift to function components implies that, for components that need to track the state of their data, there should be a way to create stateful function components that can track the state of data between multiple function calls. This is what React
useStateaddresses. ReactuseStatemakes it possible for function components to recall the state of variables in previous calls into current calls.Another React feature that makes a function component stateful is the
useRefhook. One difference betweenuseStateanduseRefhooks is that when a state variable returned from auseState()is updated, it causes a re-render for the UI to update. However, an update to a state variable returned fromuseRef()hook does not cause a re-render.Another difference between
useState()anduseRef()hooks is that a state variable fromuseState()is updated by calling a special setter function which sets the new state value whiles a state variable fromuseRef()hook can be updated by directly setting it to the new value. The discussion on understanding useRef hooks delves deeper into how useRef works.Let’s take an extensive look at how to make a function component stateful with
useState.useState Makes Function Component Stateful
React
useStateis a hook that allows a function component to track its data, or variables, between multiple calls (render and re-renders). This means thatuseStatemakes a function component stateful. It makes the function component remember state variables between multiple renders. When a state variable intialised withuseStateis updated, the component re-renders for the UI to update.When React needs to render or update a component, it makes a call to the function component. For components that may be re-rendered, it implies that multiple calls to the function component are made. In these updates (re-renders), in which the function component is called multiple times, a stateful function component can remember the content of state variables in the previous call and use them in the current call..
How to use
useStateHookAs we have indicated, React
useStatehook makes a function component stateful. It enables a function component to keep track of some or all of its data variables.It must be emphasised that React hooks are used in function components only. They are not used in class components. Additionally, the use of hooks in function components is governed by some rules. For instance, Hooks must be used at the top of the body of the function component. We will go by the Rules of Hooks in the rest of this discussion.
To use React
useStatehook in a function component, we first need to importuseStatefrom React. This has to be done at the top of the function component file:JavaScriptimport { useState } from 'react';Within the body of the function component, we initialise a state variable that needs to be tracked in a function component. We initialise a state variable with
useState()call.useState()accepts a default value that will be set to the state variable that gets created:JavaScriptconst state_var = useState('Initial Value');What we pass to
useState()call depends on the type of the data that we want to create:JavaScriptconst numericStateData = useState(40); // numeric state data const booleanStateData = useState(true); // boolean state data const stringStateData = useState('Sample Text'); // string state data const arrayStateData = useState([]); // array state data const objectStateData = useState({}); // object state dataWe can even initialise state variables to
nullorundefinedwithuseState():JavaScript// state data initially set to null const someStateData = useState(null); // state data initially set to undefined const anotherStateData = useState(undefined);Remember that what we pass to
useState()is just an initial value we want to set to the state variable that gets created. We can update the value in the state variable later with a special function thatuseState()creates for us. We will see how this is done shortly.useState Returns an Array
There is more that we need to know about
useState()initialisations which I did not mention listing 4 and listing 5 above. It is the reason I did not show the earlieruseState()initialisations in a function component. Now is the right time to know more about the data returned fromuseState()initialisation calls.A call to
useState()returns an array that contains two items: the state variable and a state setter function. The setter function is used to update the data stored in the state variable. We can access the state variable at index0, whiles the state setter function is at index1:JavaScriptimport React, { useState } from 'react'; const App = () => { // initialise state data and set initial value to zero (0) const stateData = useState(0); // variables for state data and setter function const count = stateData[0]; // the state variable const setCount = stateData[1]; // the state setter function }Rather than use array indexing to refer to the state variable and setter function, we can use array destructuring to get the state variable and the setter function from the
useState()initialisation, all in just a single line:JavaScriptimport React, { useState } from 'react'; const App = () => { // variables for state data and setter function const [count, setCount] = useState(0); }The array destructuring approach, used in listing 7, enables us to assign names to the array elements returned from
useState()in just a single call. Due to its simplicity and elegancy, we will be using this approach in the rest of the discussion.You are at your own liberty to choose names that you will assign to the state variable and the setter function returned by
useState(), The names should however obey the variable and function naming restrictions in javascript. A very common practice is to precede the state setter function name withset, combined with the name assigned to the state variable. The following code listing has some examples:JavaScriptimport React, { useState } from 'react'; const App = () => { const [count, setCount] = useState(0); const [age, setAge] = useState(0); const [names, setNames] = useState([]); }When updating the value of a state variable initialised with
useState(), it is inappropriate to directly set the value using an assignment statement. For example, it is wrong to setcountto a new value as demonstrated in the following code listing:JavaScriptconst [count, setCount] = useState(0); // This update to state variable is wrong count = 10If we need to update a state variable, for example
countto a new value, we need to call the state setter function. In this case, we will callsetCount()to set the new value ofcount.The following code shows the correct way to update the value of a state variable returned by
useState(). The update is done using the state setter function:JavaScriptconst [count, setCount] = useState(0); // set the state variable, count, to a new value setCount(10);As seen in this code listing, we set a new value to the
countvariable using the state setter functionsetCount(). This is the correct way to update a state variable initialised withuseState()hook. We will see working examples shortly.Working with useState Hook
To put what we have covered so far into practice, we will consider a very simple function component that updates a heading text. As we enter text in an
inputcontrol, the heading will be updated using a state setter function returned fromuseState()initialisation.JavaScriptimport React, { useState } from "react"; // default heading text const DEFAULT_HEADING = 'Heading'; const Heading = () => { // initialise state data for heading const [heading, setHeading] = useState(DEFAULT_HEADING); return ( <div style={{textAlign: 'center'}}> <h1>{heading}</h1> <input type='text' onChange={(e) => { const value = e.target.value; setHeading(value.length ? value : DEFAULT_HEADING); }} /> </div> ) } export default Heading;From listing 11,
useState()is called to initialise and return a state variable and a setter function online 8. In the JSX returned from the function component, theh1element is set to theheadingstate variable. In theonChangeevent handler for theinputelement, we callsetHeading()to update theheadingstate variable to the entered text.A sample run in the browser is shown below:
As the
inputtext changes,setHeading()is called to updateheadingstate variable.State Update Triggers Re-Render
In listing 11, we update the state variable
headingby callingsetHeading(). This occurs whenever the text entry in theinputcontrol changes. Updates to the text entry immediately updates the heading text.What actually happens is that when the state variable updates, the UI component, in this case
Heading, is automatically called to re-render. In other words, the function component gets called to update its UI. This is the behaviour of updates to a state variable initialised with auseState()call. If the state variable is updated, the function component containing the state variable is automatically called to re-render.But is there really a way to prevent a re-render when we update a state variable?, Yes, there is. If we do not want a component to be called automatically to update the UI when a state variable updates, then the state variable should not be initialised with
useState(). In this case, we will rather initialise the state variable withuseRef().An update to a state variable initialised with
useRef()will not automatically cause a re-render of the component. We discuss useRef hook in a separate post covering understanding of React useRef hook.A Look at State Setter Functions
A state setter function, which is needed to update state variables, accepts either the new value or a function that needs to be called to return the new value. After updating a state variable with a state setter function, the function component will be called to re-render for the UI to be updated.
A state setter function has the following signature:
JavaScriptsetFunction(new_value | () => { return new_value});As can be seen, we can pass a new value, or a function that will return a new value, to the state setter function. If a value or an expression that results in a value is specified, the new value will replace the current value of the state variable. For example:
JavaScriptconst [count, setCount] = useState(0); // set state variable to already known value setCount(20); // set state variable to result of an expression setCount(20 * Math.PI);On the other hand, if a function is specified as argument to the state setter function, then the specified function will be called to return the new value. Consider the following code listing:
JavaScriptconst [count, setCount] = useState(0); // set state variable to a function that will // detemine and return the new value setCount(() => { return 20; });In listing 14, we pass to
setCount()an anonymous function that will determine and return the new value of the state variable. The value that is returned from the function will be used to update the state variable.Sometimes, we may need the previous value in order to determine the new value that has to be returned. For example, think of a counter variable that calculates the new value by adding
1to the currently existing value. In this case, we will need to have the current value in order to calculate the new value to be set.When we pass a function to the state setter function, the current value of the state variable is passed as argument. If the new value to be returned depends on the current value, then this becomes a great opportunity. We can determine the new value based on the current value of the state variable that is passed:
JavaScript// set state variable to a function that will detemine the new value setCount((currValue) => { return currValue + 1; });Observe that the current value is passed to the anonymous function that returns the new value. We return the new value by adding
1to the current value of the state variable.In fact, we can even rewrite listing 15 as the following code listing which will yield the same result:
JavaScript// set state variable to a function that will detemine the new value setCount((currValue) => currValue + 1);The following is a working example of a component that updates state data:
JavaScriptimport React, { useState } from 'react'; const ClicksCounter = () => { // initialise a state variable const [count, setCount] = useState(0); return ( <div style={{textAlign: 'center'}}> <h2>Button Clicks Counter</h2> <hr /> <p>You clicked {count} time{count == 1 ? '' : 's'}.</p> <button onClick={() => setCount((currCount) => currCount + 1)}> Click to Count </button> </div> ) } export default ClicksCounter;The
onClickhandler of thebuttoncalls the state setter functionsetCount()to update the number of times the button has been clicked. We pass an anonymous function that receives the current value ofcountascurrCountand add1to it.A sample run of listing 17 in the browser is shown below:

Updating State Data
We have already emphasised that the initial value for a state variable is specified as argument to
useState()initialisation call. Any other call to set a new value to a state variable is actually an update. We have also said that all updates to a state variable must be done using the state setter function returned fromuseState().For example, In listing 10, we demonstrated how to update state variable. However, there is more that we need to know. We need to have an in-depth look at setter functions that upate state variables. Understanding how to correctly update state variables is key to developing an interactive and more dynamic React application.
Updating State with Setter Function
To update state data, we need to call the state setter function returned by
useState()and pass the new value as argument. If we set the state variable to a new value directly, our function component will not be called to re-render and update the UI. To demonstrate this, let’s consider the following code listing:JavaScriptimport React, { useState } from 'react'; const ClicksCounter = () => { // initialise a state variable let [count, setCount] = useState(0); return ( <div style={{textAlign: 'center'}}> <h2>Button Clicks Counter</h2> <hr /> <p>You clicked {count} time{count == 1 ? '' : 's'}.</p> <button onClick={() => setCount((curVal) => curVal + 1)}> Click to Count </button> </div> ) } export default ClicksCounter;Listing 18 above is a minor modification to listing 17 The only difference is that we have changed the state data declaration on
line 5fromconsttolet. We have done this because we want to be able to set a new value tocount.constdeclaration will not allow us to do this. Although not recommended, we are usingletbecause we only want to demonstrate that setting state variable directly will not lead to component update.If we run the code in listing 18, the result should be the same as in listing 17.
Now, on
line 13, let’s update the code to set thecountstate variable directly:JavaScript<button onClick={() => count = count + 1}>Click to Count</button>Observe that we are setting the
countstate variable directly rather than callingsetCount(). If we run the application, we will notice that clicking on the button does not updateh2element forcount:
Because we directly set a new value to
countwithout using the state setter function, our function component is not automatically called to re-render and update the UI.If we change
line 13back to set the new value withsetCount(), then the application should be working as expected. The understanding here is clear: we should only update state variables using the state setter function returned fromuseState().Updating Array Data
When updating state data that is an array, we need to treat the data as immutable. By this, we imply that once we have initialised the array data, we should treat it as one that we cannot modify directly, although we can. If we need to update the array data, we will have to initialise the array variable to a new array data.
To better understand it, let’s consider the following code in which we create an array data:
JavaScript// initialise array data let names = ['Daniel', 'Joe'];In classic javascript, we can update the
namesarray, for instance add or remove items, by callingpush()orpop()methods respectivley. For example:JavaScript// initialise array data let names = ['Daniel', 'Joe']; // add new item names.push('Emmanuel');However, when developing React applications, we need to treat array state variables, such as
names, as immutable. We do not need to directly modify the array data as was done in listing 21.With data immutability, the recommended approach is to initialise the array state variable, in this case
names, to a new array data. There are several ways to do this but the newest and friendier way is the use of the javascript spread syntax:JavaScript// initialise array data let names = ['Daniel', 'Joe']; // add new item and assign to same variable names = [...names, 'Emmanuel']; // add new item and assign to new variable const updatedNames = [...names, 'Joyce'];On lines
2,5, and8, the expressions on the right side of the assignment operator create a new array, and a reference to these new array are assigned to the variables on the left of the assignment operator. The variables on the left side of the assignment operator are actually references to the array data that are created. Anytime we need to modify an array data, we need to create a new one rather than modify the existing array data.The following code listing is an example React component that demonstrates the update of array state data. We create a new array rather than modify the current state of the array data.
JavaScriptimport React, { useState } from "react"; const Names = () => { // state variables for name entry and names list const [names, setNames] = useState([]); const [name, setName] = useState(''); // called when form needs to be submitted const onFormSubmit = (e) => { // prevent form submit e.preventDefault(); // add to names list if name entered name.length > 0 ? setNames((currNames) => [...currNames, name]) : ''; // reset input text to empty string setName(''); } return ( <div> <form onSubmit={onFormSubmit}> <input type='text' value={name} placeholder='Enter Name' onChange={(e) => setName(e.target.value)} /> <button type='submit'>Add Name</button> </form> <hr /> <ul> { names.map((name, idx) => <li key={idx}>{name}</li>) } </ul> </div> ) } export default Names;On
line 5, we initialise the state variablenamesto an empty array in theuseState()call. In addition to thenamesstate variable,useState()returns a state setter function which we use to update thenamesstate data, in this case an array.In the JSX returnd from the component, an
onChangehandler for theinputsets the text entered to thenamestate variable. When the form is submitted, theonFormSubmithandler updates thenamesstate data by creating a new array and setting it to the state setter functionsetNames(), as seen online 14in listing 23:JavaScript// add to names list if name entered name.length > 0 ? setNames((currNames) => [...currNames, name]) : '';From the above code listing, we pass an anonymous function to
setNames(). This anonymous function receives the current names list ascurrNamesparameter, and then creates and returns a new array by addingnameto thecurrNamesstate array. In this example, we use the javascript spread syntax to add the new name:JavaScriptsetNames((currNames) => [...currNames, name])You may be tempted to use the
namesstate variable with the javascript spread syntax to create the new array such as in the following:JavaScript// add to names list if name entered setNames([...names, name])I must say that this will likely work for you in most cases. However, it must be noted that React queues calls to state setter functions. If several calls to a state setter function are so fast that a component is not able to update quickly, then you may be passing a state value which isn’t updated yet to the state setter function. The result will be that the UI may not correctly update to reflect expected data.
Remember what we talked about earlier: if the new state value depends on the current value of the state variable, then it is a good practice to pass a function to the state setter function and receive the current state value.
In the example discussed earlier, we added a new name to the
namesstate variable. This implies that the new array that we create depends on the currentnamesarray data. Therefore, we pass a function to the state setter function and receive the current state of thenamesarray, which we use to create and return a new array data:JavaScriptsetNames((currNames) => [...currNames, name])A sample run of listing 23 is shown below:
Updating Object Data
Similarly to array state data, object state data must also be treated as immutable. If we need to update a state data that is an object, we do not need to modify it directly. We rather need to create a new one. We do this by making a copy of the current object data and perform the update in the new object that is being created:
Suppose we have the following object data:
JavaScript// create an object data let Person = { name: 'Daniel', role: 'Full Stack Developer' };Let’s also suppose that we want to perform an update to the
nameproperty. In classic javascript, we can modify thePersonobject directly by setting thenameproperty to a new name:JavaScript// create an object data let Person = { name: 'Daniel', role: 'Full Stack Developer' }; // update the name Person.name = 'Emmanuel';In React, we have to treat state data that are objects as immutable. Rather than modify the
Personobject by setting the new name directly, we have to initialise a new object data as a copy of the one we want to modify, and then perform the update in the new object initialisation:JavaScript// create an object data let Person = { name: 'Daniel', role: 'Full Stack Developer' }; // update and set to same object reference Person = {...Person, name: 'Emmanuel'}; // update and set to a new object reference let updatedPerson = {...Person, name: 'Emmanuel'}Let’s consider an example in which we will update an object data. Let’s suppose we have the following component that displays the profile of a developer:
JavaScriptimport React from "react"; const Profile = (props) => { return ( <table> <tbody> <tr> <td>Name:</td> <td><strong>{props.profile.name}</strong></td> </tr> <tr> <td>Email:</td> <td><strong>{props.profile.email}</strong></td> </tr> <tr> <td>Role:</td> <td><strong>{props.profile.role}</strong></td> </tr> </tbody> </table> ) } export default Profile;To be able to update the developer profile, we will also consider the following component which will display a form to collect new information about the developer:
JavaScriptimport React, { useState } from "react"; const ProfileEditor = (props) => { const [name, setName] = useState(''); const [email, setEmail] = useState(''); const [role, setRole] = useState(''); const onSubmit = () => { props.onUpdate({name, email, role}); } const disableUpdateBtn = () => { return role === '' || name == '' || email == ''; } return ( <div style={{margin: '20px 0'}}> <form onSubmit={onSubmit}> <div style={{marginBottom: '10px'}}> <input type='text' value={name} placeholder="Enter name" onChange={(e) => setName(e.target.value)} style={{minWidth: '90%', marginBottom: '10px'}} /> <input type='email' value={email} placeholder="Enter email" onChange={(e) => setEmail(e.target.value)} style={{minWidth: '90%', marginBottom: '10px'}} /> <select value={role} onChange={(e) => { // get selected index const selectedIdx = e.target.selectedIndex; setRole(e.target.options[selectedIdx].value)} } style={{minWidth: '90%'}} > <option value=''> --Select role --</option> <option value='Back-End Developer'> Back-End Developer </option> <option value='Front-End Developer'> Front-End Developer </option> <option value='Full Stack Developer'> Full Stack Developer </option> </select> </div> <button type='submit' disabled={disableUpdateBtn()}> Update </button> <button type='button' onClick={() => props.onClose()}> Close </button> </form> </div> ) } export default ProfileEditor;The code listing for our final component which uses the
ProfileandProfileEditorcomponents, and within which we will update the state variable for the profile, is shown below:JavaScriptimport React, { useState } from "react"; import Profile from "./Profile"; import ProfileEditor from "./ProfileEditor"; const Developer = () => { const [profile, setProfile] = useState({name: '', email: '', role: ''}); const [edit, setEdit] = useState(false); const onUpdate = (data) => { // update profile by initialising a new object setProfile({ name: data.name, email: data.email, role: data.role }); } const hideEditor = () => { setEdit(false); } return ( <div style={{width: '40%', margin: '0 auto'}}> <div> <h1 style={{display: 'inline'}}>Developer Profile</h1> {!edit && ( <span> <a href='#' onClick={() => setEdit(true)}>Edit</a> </span> )} </div> <hr /> {edit && (<ProfileEditor onUpdate={onUpdate} onClose={hideEditor} /> )} <Profile profile={profile} /> </div> ) } export default Developer;The key area to consider in listing 33 is the implementation of the
onUpdate()function:JavaScriptconst onUpdate = (data) => { // update profile by initialising a new object setProfile({ name: data.name, email: data.email, role: data.role }); }As can be seen, we pass a new object that contains the new profile information to
setProfile()setter function. If we initialise state data withuseState(), then we should treat the data as immutable. We do not need to modify the data directly but rather initialise a new data as a modified copy of the initial data and pass to the state setter function for update.A sample run of listing 33 in the browser is shown below:
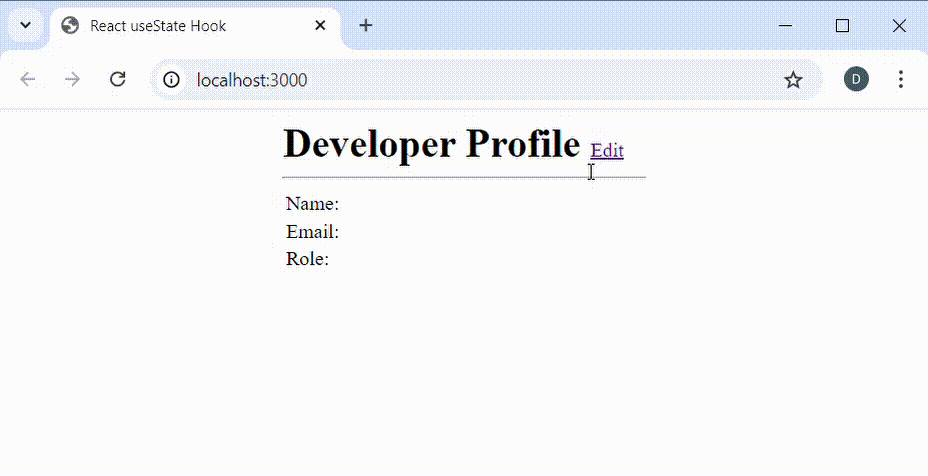
When the application first launches, the profile
Name,Email, andRoleare all set to empty text as seen online 6in listing 33.JavaScriptconst [profile, setProfile] = useState({name: '', email: '', role: ''});To update the profile object, we first display the profile editor form to enter name, email, and select developer role. When the form is submitted, the form data is received in the
onUpdate()function defined in theDevelopercomponent. The important thing to notice is that we pass a new object data which contains the new state information for the profile object. In passing the new profile information tosetProfile(), we did not modify the profile object directly.What if We Mutate Array and Object State Data?
We have said that state data which are arrays or objects must be treated as immutable. We should not modify them for update but rather make a copy of them and then perform the update during initialisation of the new data. So what happens if we mutate the array or object data directly? The result will be unexpected application behaviour and or bugs.
To demonstrate unexpected behaviour of mutating state data that are arrays or objects, we will use a code listing we have already seen. To avoid scrolling back and forth, we will reproduce listing 23 below:
JavaScriptimport React, { useState } from "react"; const Names = () => { // state variables for name entry and names list const [names, setNames] = useState([]); const [name, setName] = useState(''); // called when form needs to be submitted const onFormSubmit = (e) => { // prevent form submit e.preventDefault(); // add to names list if name entered name.length > 0 ? setNames((currNames) => [...currNames, name]) : ''; // reset input text to empty string setName(''); } return ( <div> <form onSubmit={onFormSubmit}> <input type='text' value={name} placeholder='Enter Name' onChange={(e) => setName(e.target.value)} /> <button type='submit'>Add Name</button> </form> <hr /> <ul> { names.map((name, idx) => <li key={idx}>{name}</li>) } </ul> </div> ) } export default Names;Now let’s consider the implementation of the
onFormSubmitevent handler:JavaScript// called when form needs to be submitted const onFormSubmit = (e) => { // prevent form submit e.preventDefault(); // add to names list if name entered name.length ? setNames((currNames) => [...currNames, name]) : ''; // reset input text to empty string setName(''); }Let’s also comment the call to
setName()online 10and updateline 7to use thenamesarray as argument tosetNames()setter function. We will also use thepush()method of thenamesarray to add the new name.The code in the
onFormSubmithandler should look similar to the following:JavaScript// called when form needs to be submitted const onFormSubmit = (e) => { // prevent form submit e.preventDefault(); // add new name names.push(name); // add to names list if name entered name.length ? setNames(names) : ''; // reset input text to empty string // setName(''); }On
line 7, we mutate the state data referenced bynamesarray by callingpush()to add the new name:JavaScriptnames.push(name)Then on
line 10, we pass the samenamesarray tosetNames()rather than create a new array data:JavaScript// add to names list if name entered setNames(names)Because we did not create a new array but rather mutated the
namesarray directly before setting as argument tosetNames(), the result will be unexpected. If we run the application, we will notice that the UI does not update to show the names list when we click on theAdd Namebutton: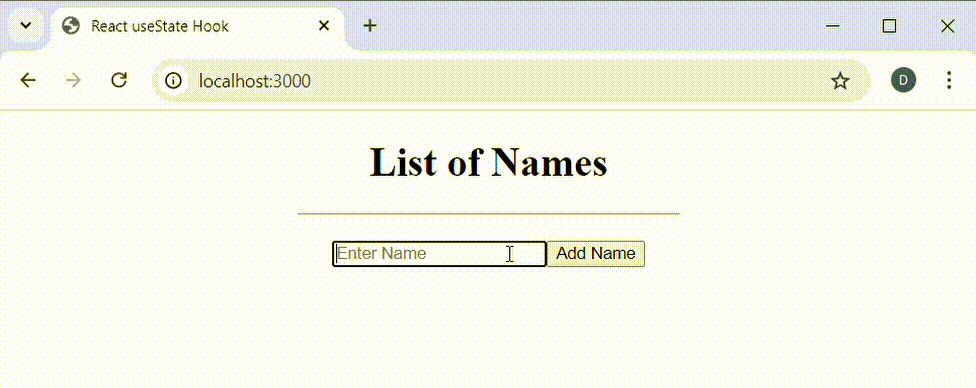
In listing 23, the names list was populated after clicking on the
Add Namebutton. However, in this example, the list of names is not populated after clicking theAdd Namebutton. The reason is that when we do not create a new object or array but rather modify and set the same data reference, the function component will not be called to re-render and update the UI.So, if the UI does not update, does the internal code update the state data? To know the answer, continue to type in the
inputcontrol. You should now see the list populated with with names.
But why is the list not populated when we click on the
Add Namebutton but rather when we type in theinputcontrol? Well, the component is called to update the UI at this time because theonChangehandler of theinputcontrol calls the state setter functionsetName()which triggers a re-render., otherwise we would not see the list of names.One thing is clear: if we mutate an array or object data rather than initialise a modified copy, then the component will not be called to update the UI. Therefore, we should always treat state data that we want to be automcatically updated in UI as immutable and initialise modified copies to be set as new state data.
There may be situations when we may want to track and recall the values of a state data but wouldn’t necessarily want the component to be re-rendered after we update the state data. In such cases, we will need to initialise the state data with
useRef().Like
useState(), theuseRef()hook also creates a state variable which can maintain state data between component re-renders. The major difference is that updates to state data initialised withuseRef()do not trigger a re-render of the component. The discussion on understanding useRef hook delves deeper into this.Key Considerations for Updating State
- We should only update state variables with state setter functions
- We should always consider state variables immutable. If we need to update state variables, we need to return a new variable
Summary
React
useStateis a hook that is used to make function components stateful so that they can maintain the state of their data when called multiple times to update the UI.To initialise a state data, we call the
useState()hook and pass the initial value that should be set the the state data which will be created.The
useState()initialisation call returns an array which contains two items. The first item at index0is the state data which needs to be tracked. The second item at index1is a state setter function which is called to update the state data. We can use javascripts array destructuring to obtain the state data and the setter function.JavaScript// initialise state data const [count, setCount] = useState(0);When performing an update to a state data, we need to call the state setter function and pass to it the new value.
JavaScript// initialise state data const [count, setCount] = useState(0); // set count to new value setCount(40);If the new value has to be determined from the current state data, then we need to pass a function to the state setter function. In this case, the function passed to the state setter function will receive the current state data so that we can determine or calculate the new value from the current state data:
JavaScript// initialise state data for count const [count, setCount] = useState(0); // set new count value based on the current value setCount((currCount) => currCount + 1);To trigger a component re-render when a state data changes, we need to treat a state data as immutable and pass a modified copy to the state setter function for update. If we modify the same state data and pass for update, we will have an unexpected result.
-
How to use DataTables in React Application
DataTables is a powerful javascript library that is used to generate and manipulate HTML table data in web applications. It has amazing features like paging, sorting, ordering, searching, and filtering abilities. The library has been extensively used in web applications.
DataTables has commonly been used with jQuery in the past few years. However, it can also be used in front-end javascript libraries like React. Although jQuery can be used in React applications, its use in React applications is highly discouraged, unless it becomes inevitable.
In this post, we will examine how we can use DataTables library to generate table data in a React application. We will soon observe that DataTables library can be used in React applications without directly using jQuery. Afterall, the React community frowns on the use of jQuery in React applications. We will also see how we can dynamically manipulate table data with a powerful API that the DataTables library exposes.
Setting Up
In our path to demonstrate the use of DataTables library in a React application, we will first create a starter react application. We will build on this application by installing DataTables package with
npm. Although DataTables has its own CSS styling, it has support for other CSS styling frameworks like Bootstrap and Foundation. In this starter application, we will use the Bootstrap styling for the table that we generate.To facilitate a quick setup and get going, we will use create-react-app to quickly generate a starter react application. I assume you already have create-react-app package installed. If you prefer to roll your own without using create-react-app, you can read through the extensive discussion on how to create a react application from scratch without using create-react-app tool.
Install DataTables Package
Although you can use any text editor to get along with the discussions in this post, I will be using Visual Studio Code for source code views in discussions that follow.
If you are using VS Code, click on the Terminal menu, then on New Terminal dropdown menu item. If you aren’t using VS code, you can open a terminal window from your working environment.
Before we issue the initial command, recall that we will be using Bootstrap 5 CSS styling for the table we intend to generate. You should run the following command to install the DataTables package with Bootstrap 5 CSS styling:
Bashnpm install datatables.net-bs5 bootstrap@5.3.3If you do not want to use Boostrap 5 styling but rather use the default CSS styling for the DataTables library, then you should run the following command:
Bashnpm install datatables.netAs indicated earlier, we will not need jQuery with DataTables package, hence we did not explicitly install jQuery. However, you may see jQuery in your node_modules directory after running the above command. Even if it exists, we will not use it in our implementation code.
Create DataTable Component
In react applications development, it is a good practice to create a components directory to house our own components. However, because this is very small application, we will break that customary rule and create a
DataTablereact component in the same directory that contains ourApp.jscomponent.In the src directory, or your directory that contains your App.js component, create another file for the
DataTablecomponent. You can give it the name DataTable.js, or any name of your choosing such as ReactDataTable.js. In my case, I will name the file DataTable.js. After creating the file, the application directory structure should look similar to the following:
Click on DataTable.js file, and in the file editor section, enter or paste the following code:
JavaScriptimport React, { useEffect, useRef } from "react"; import DataTables from "datatables.net-bs5"; // A component to generate table const DataTable = (props) => { // This will reference the table element const tableRef = useRef(null); // return UI for this component return ( <div className="table-responsive" style={{padding: '12px'}}> <table className="table table-bordered table-hover no-wrap" ref={tableRef} style={{width: '100%'}} > </table> </div> ) } export default DataTable;From line 1, we have imported
useRefanduseEffecthooks from react.useRefto Reference<table></table>TagSince the HTML
tablewill be initialised after React has mounted ourDataTablecomponent, we need a reference to the<table></table>tag on line 12. Later, we will use it to initialise with DataTables library. As can be seen, we have arefprop to the<table></table>tag and have setrefto thetableRefvariable that we have initialised withuseRefon line 7. When the component has mounted, we will usetableRef, which references the<table></table>tag, to initialise the table.useEffectfor Table InitialisationIn addition to the
useRefhook, we have also imported the ReactuseEffecthook on line 1.useEffecthook is used to call a function to be executed after a React component has been mounted.DataTables library requires the table element to be in the browser DOM for initialisation. Hence, after React has mounted our
DataTablecomponent, the<table></table>tag will be available in the browser DOM, and we will need to call a function to initialise the table with DataTables library. ReactuseEffecthook does exactly that. When used in a component,useEffectwill run the function that we pass to it as argument after the component has been rendered.Table Initialisation
To generate our table with DataTables library, we need to call a function to perform the initialisation. The following code extends the previous code by using
useEffecthook to call a function to initialise the table:JavaScriptimport React, { useEffect, useRef } from "react"; import DataTables from "datatables.net-bs5"; // A component to generate table const DataTable = (props) => { // a reference to the table element const tableRef = useRef(null); // After component is mounted, initialise the table useEffect(initTable); function initTable() { // initialise table with DataTables library and return API const tableApi = new DataTables(tableRef, {...props}); } // return UI for this component return ( <div className="table-responsive" style={{padding: '12px'}}> <table className="table table-bordered table-hover no-wrap" ref={tableRef} style={{width: '100%'}} > </table> </div> ) } export default DataTable;Listing 2 defines
initTable()function which spans from line 12 to line 15.initTable()initialises the table with DataTables library by passingtableRef, which references the<table></table>tag as first argument, and the table options passed aspropsto the component as second argument. On line 10, we calluseEffecthook by passinginitTableas the function to be run when the component is mounted.Since we will not make a call to
initTable()in any other part of the component, we can pass an anonymous function touseEffecthook to perform the table initialisation. The following code is a refinement to listing 2:JavaScriptimport Reat, { useEffect, useRef } from "react"; import DataTables from "datatables.net-bs5"; // A component to generate table const DataTable = (props) => { // a reference to the table element const tableRef = useRef(null); // After component is mounted, initialise the table useEffect(() => { // initialise table with DataTables library and return API const tableApi = new DataTables(tableRef, {...props}); }); // return UI for this component return ( <div className="table-responsive" style={{padding: '12px'}}> <table className="table table-bordered table-hover no-wrap" ref={tableRef} style={{width: '100%'}} > </table> </div> ) } export default DataTable;From listing 3, the function that is called to initialise the table is passed as an anonymous function to
useEffecthook. This is a common practice withuseEffecthook usage.If you are in haste to see a working table in your project, I will advise that you read along for a while. This is because listing 3 has some limitations which we need to address, although it will be able to generate a table for you.
Preventing Re-Initialisation
Recall that after a react component is rendered, a
useEffectcall in the component will execute a function passed as argument. By default, this will happen anytime the component is re-rendered. This means that the table will always be initialised again and again for every re-render of theDataTablecomponent. This wouldn’t be ideal, especially when table data is loaded from an external server. If the table loads data from an external server, the table will always attempt to connect to the server and load the data again on every re-render ofDataTablecomponent.It will be best if we initialise the table only when the
DataTablecomponent is first mounted. Then, on subsequent re-rendering of theDataTablecomponent, we will want to prevent the table data from being reloaded. To do this, we will need to pass an empty array as the second argument touseEffecthook call. This is shown in the following code:JavaScriptimport React, { useEffect, useRef } from "react"; import DataTables from "datatables.net-bs5"; // A component to generate table const DataTable = (props) => { // a reference to the table element const tableRef = useRef(null); // After component is mounted, initialise the table useEffect(() => { // initialise table with DataTables library and return API const tableApi = new DataTables(tableRef, {...props}); }, []); // return UI for this component return ( <div className="table-responsive" style={{padding: '12px'}}> <table className="table table-bordered table-hover no-wrap" ref={tableRef} style={{width: '100%'}} > </table> </div> ) } export default DataTable;On line 13, in listing 4, we provide an empty array as the second argument to the
useEffecthook call. This will prevent the table from being initialised again anytime theDataTablecomponent is re-rendered. To understand more about the theuseEffecthook and its conditional execution, you can take a look at the discussion on understanding useEffect hook.Performing Cleanup
If you remember how we initialised our table with
useEffecthook, you will agree that our table was generated outside the realm of React library. We waited for React to mount theDataTablecomponent, after which we explicitly generated the table without React. In this sense, we should undo any initialisations we performed when React is about to unmount our component.Just as
useEffecthook runs a function after a component is mounted, it can also run another function when the component is about to be unmounted from the DOM. This is the time we perform cleanups.To inform React about the function that needs to be called for side effects cleanup, we specify the function as the return value in the
useEffecthook call. The following code extends listing 4 to include a side effects cleanup function:JavaScriptimport React, { useEffect, useRef } from "react"; import DataTables from "datatables.net-bs5"; // A component to generate table const DataTable = (props) => { // a reference to the table element const tableRef = useRef(null); // After component is mounted, initialise the table useEffect(() => { // initialise table with DataTables library and return API const tableApi = new DataTables(tableRef, {...props}); // return the function that needs to be called to // perform clean-up before the component unmounts return () => tableApi.destroy(); }, []); // return UI for this component return ( <div className="table-responsive" style={{padding: '12px'}}> <table className="table table-bordered table-hover no-wrap" ref={tableRef} style={{width: '100%'}} > </table> </div> ) } export default DataTable;Observe from
line 16 that the return value in theuseEffecthook call is an anonymous function. This function will be called before theDataTablecomponent unmounts from the browser DOM. When called, the function will free up resources with a call todestroy()method of the DataTables library API object.We now have a component that we can use to generate a table in react application. There is one last addition we will do to the DataTable component to make it complete. For now, we will leave
DataTable component as it is and come back to make a final addition.Using the DataTable Component
We are now ready to see a working example of our
DataTablecomponent. To generate the table, we will need to define the table columns as well as the data to be populated. We will populate the table with static data, although we can configure it to load data from an external server. If you have worked with DataTables library before, then you know we will need table options data.From the file explorer pane, click on App.js file. If you used create-react-app to generate the starter application files, then the content of App.js file should read similar to the following:
We do not need most parts of the content of App.js file generated by create-react-app. Delete the code inside the return parenthesis, that is, from line 6 to line 21. Also you should delete the existing imports from line 1 to line 2. The content of App.js file should read similar to the following code listing:
JavaScriptfunction App() { return ( ) } export default App;We should now import our
DataTablecomponent in App.js file. If you installed DataTables package with Bootstrap 5 styling, then you will need to import Bootstrap CSS files as well.. The following code listing is our updated App.js file:JavaScriptimport React from 'react'; import DataTable from './DataTable'; // import bootstrap CSS file if DataTables for // Bootstrap package (datatables.net-bs5) was installed. import 'bootstrap/dist/css/bootstrap.min.css'; function App() { return ( <div className='container'> <div className='row mt-5 mb-3'> <div className='col-12'> <h2>Using DataTables in React Application</h2> </div> </div> <hr /> </div> ) } export default App;Although Listing 7 imports our
DataTablecomponent, it does not use it yet. We need to define table options which will be passed aspropsto our table component. In this simple example, we will define data for thecolumnsanddataoptions of the DataTable library. It will be helpful if we create a new file from which we will import the table options data.Create a new javascript file in the src directory and name it tableOptions.js. Click on the tableOptions.js file you created, and from the editor view, type or paste the following:
JavaScript// define columns for the table export const tableColumns = [ {data: 'fname', title: 'First Name', className: 'first-name'}, {data: 'lname', title: 'Last Name', className: 'last-name'}, {data: 'email', title: 'Email Address', className: 'email'}, {data: 'gender', title: 'Gender', className: 'gender'} ]; // define static data for the rows export const tableData = [ { 'fname': 'Daniel', 'lname': 'Oppong', 'email': 'dan@mail.com', 'gender': 'Male' }, { 'fname': 'Sheila', 'lname': 'Appiah', 'email': 'sheila@mail.com', 'gender': 'Female' }, { 'fname': 'Emelia', 'lname': 'Cage', 'email': 'cage@email.com', 'gender': 'Female' } ];We are only keeping our table data separate from the
Appcomponent code. To maketableColumnsandtableDatavariables available to ourAppcomponent code, we precede their declarations with theexportkeyword.With our table options data ready, we should import them into our
Appcomponent code and generate the table.JavaScriptimport React from 'react'; import DataTable from './DataTable'; // import bootstrap CSS file import 'bootstrap/dist/css/bootstrap.min.css'; // import the table options data import { tableColumns, tableData } from './tableOptions'; function App() { return ( <div className='container'> <div className='row mt-5 mb-3'> <div className='col-12'> <h2>Using DataTables in React Application</h2> </div> </div> <hr /> <DataTable ordering={true} columns={tableColumns} data={tableData} /> </div> ) } export default App;Line 8 imports
tableColumnsandtableDatafrom tableOptions.js file. If you are already familiar with DataTables library, then you know there are various ways to specify the source of the table data. In this case, we use static table data.We see the use of our
DataTablecomponent from line 20 to line 24 and passtableColumnsandtableDataas values tocolumnsanddataprops respectively. We have also includedorderingoption of DataTables library as prop and set its value totrue..To test it, run the application with
npm startcommand. This should produce the following in your browser window:
Working with DataTables API
Sometimes, it becomes necessary to perform manipulations to the generated table data. For example, we may wish to add, delete, or update some row data. Such operations require that we get a reference to the DataTables API object and use it to perform these operations.
In
DataTablereact component, we called an anonymouns function in theuseEffecthook with following code:JavaScriptuseEffect(() => { // initialise table with DataTables library and return API const tableApi = new DataTables(tableRef, {...props}); });The variable
tableApiis a reference to the DataTables API. To later work with the generated table data, we need access to this DataTables API object. When using ourDataTablereact component, we can pass a function that needs to be called with this API object as aprop.Suppose our
DataTablereact component has a prop namedonInitset to a callback function that should be passed the DataTables API object. We can call the callback function with thetableApivariable as demonstrated in the following code:JavaScriptimport React, { useEffect, useRef } from "react"; import DataTables from "datatables.net-bs5"; // A component to generate table const DataTable = (props) => { // a reference to the table element const tableRef = useRef(null); // After component is mounted, initialise the table useEffect(() => { // initialise table with DataTables library and return API const tableApi = new DataTables(tableRef, {...props}); // check if function is specicified to receive table API if (props.onInit && typeof props.onInit == 'function') { props.onInit(tableApi); } // return the function that needs to be called to // perform clean-up before the component unmounts return () => tableApi.destroy(); }, []); // return UI for this component return ( <div className="table-responsive" style={{padding: '12px'}}> <table className="table table-bordered table-hover no-wrap" ref={tableRef} style={{width: '100%'}} > </table> </div> ) } export default DataTable;On line 16, we pass
tableApito the callback function after checking if it was specified as a prop.In App.js file, let’s define a variable for the DataTables API object as well as a prop function to be passed the table API.
JavaScriptimport React from 'react'; import DataTable from './DataTable'; // import bootstrap CSS file import 'bootstrap/dist/css/bootstrap.min.css'; // import the table options data import { tableColumns, tableData } from './tableOptions'; // variable to reference the table API object let tableApi = null; function App() { return ( <div className='container'> <div className='row mt-5 mb-3'> <div className='col-12'> <h2>Using DataTables in React Application</h2> </div> </div> <hr /> <DataTable ordering={true} columns={tableColumns} data={tableData} onInit={(api) => { // save reference to the datatable API tableApi = api; }} /> </div> ) } export default App;On line 11, we declare a
tableApivariable which will later reference the DataTables library API after initialisation. On line 27, we set anonInitprop to an anonymous function which will be called when the table is initialised. This anonymous function will be passed the DataTables API object.Now that we have access to the DataTables API object, let’s see an example of how we can perform update to data in the generated table.
Updating Row Data
There are so many things that can be done to generated table data. But let’s consider a very simple example. For each row, we will want to toggle first and last names between upper and normal casing. We will provide a button which, when clicked, toggles the text casing of the names.
First, we need to import
useStateanduseEffecthooks from react in ourAppcomponent:JavaScriptimport React, {useState, useEffect} from 'react';Just above the return statement of
Appcomponent, include the following code:JavaScriptfunction App() { const [capitalize, setCapitalize] = useState(false); // Toggle names casing whenever capitalize state variable changes useEffect(() => { if (tableApi) { // iterate over each row in the table tableApi.rows().every(function() { const data = this.data(); const tdFirstName = this.node().querySelector('td.first-name'); const tdLastName = this.node().querySelector('td.last-name'); tdFirstName.innerText = capitalize ? data.fname.toUpperCase() : data.fname; tdLastName.innerText = capitalize ? data.lname.toUpperCase() : data.lname; }); } }, [capitalize]); // return statement here }From the above code listing, we define a boolean state variable that will indicate whether we need to capitalize the names or not. Then on line 5, the useEffect hook will be executed whenever the
capitalizestate variable changes. The useEffect hook will be executed when capitalize changes because we have set it as a dependency on line 17.To be able to toggle the names casing, let’s include a button as part of the returned JSX. Just after the
<hr />tag and above theDataTablecustom element, type or paste the following code for the button:JavaScriptfunction App() { // ... code here intentionally left out return ( <div className='container'> <div className='row mt-5 mb-3'> <div className='col-12'> <h2>Using DataTables in React Application</h2> </div> </div> <hr /> <div className='row'> <div className='col-12'> <button type='button' className='btn btn-primary' onClick={() => { // change casing setCapitalize((prevState) => !prevState); }} > {capitalize ? 'Normalize' : 'Capitalize'} </button> </div> </div> <DataTable ordering={true} columns={columns} data={data} onInit={(api) => { // save reference to the datatable API tableApi = api; }} /> </div> ) }Line 13 to line 26 introduces the button that will be clicked to toggle the
capitalizestate variable.The following code listing is the complete content of
App.jsfile.JavaScriptimport React, {useState, useEffect} from 'react'; import DataTable from './DataTable'; // import bootstrap CSS file import 'bootstrap/dist/css/bootstrap.min.css'; // import the table options data import { tableColumns, tableData } from './tableOptions'; // variable to reference the table API object let tableApi = null; function App() { const [capitalize, setCapitalize] = useState(false); // Toggle names casing when state changes useEffect(() => { if (tableApi) { // iterate over each row in the table tableApi.rows().every(function() { const data = this.data(); const tdFirstName = this.node().querySelector('td.first-name'); const tdLastName = this.node().querySelector('td.last-name'); tdFirstName.innerText = capitalize ? data.fname.toUpperCase() : data.fname; tdLastName.innerText = capitalize ? data.lname.toUpperCase() : data.lname; }); } }, [capitalize]); return ( <div className='container'> <div className='row mt-5 mb-3'> <div className='col-12'> <h2>Using DataTables in React Application</h2> </div> </div> <hr /> {/* JSX for the button */} <div className='row'> <div className='col-12'> <button type='button' className='btn btn-primary' onClick={() => { // change casing setCapitalize((prevState) => !prevState); }} > {capitalize ? 'Normalize' : 'Capitalize'} </button> </div> </div> <DataTable ordering={true} columns={tableColumns} data={tableData} onInit={(api) => { // save reference to the datatable API tableApi = api; }} /> </div> ) } export default App;To see it working, execute the
npm startcommand for a live view in your browser window. In repeated attempts, click on the button and notice how the first and last names toggle from upper case to normal case.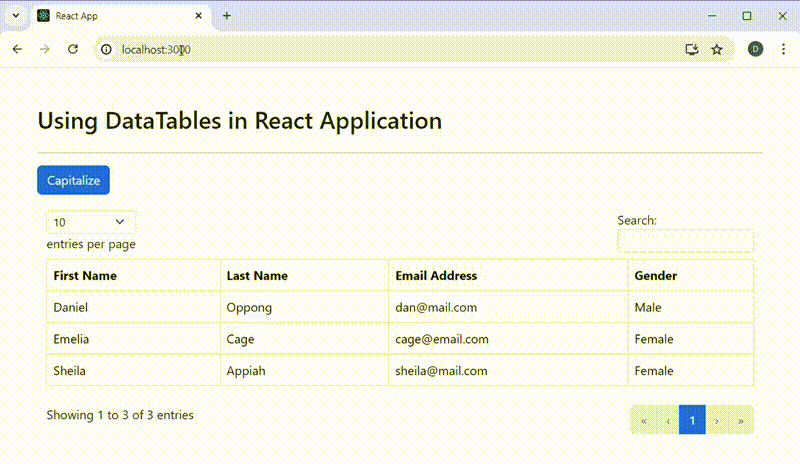
As seen from the demonstration so far, we have been able to use DataTables library in React application. Although DataTables library is widely used with jQuery, our implementation in React application was devoid of jQuery. We have also been able to dynamically manipulate the generated table data using the API object that DataTables library exposes.
-
Understanding React useEffect Hook
In React applications development, there are times when we may want some piece of code to be executed after a component has been rendered. For example, we may want some configuration settings loaded after the application starts execution. In another example, we may want to run some piece of code in response to a change in a specific state variable.
To execute some code logic outside React’s virtual DOM, we need to wait until React has rendered the component, and then invoke
useEffecthook to run a function that executes the side effect code.In this post, we will examine side effects, and the need to invoke useEffect hook to asynchronously run a function to execute a side effect code. We will also consider how we can control the execution of side effect code with dependencies.
Table of Contents
- What are Side Effects?
- useEffect Runs Side Effect Function
- Parts of Side Effect Function
- When Does useEffect Execute?
- Summary
What are Side Effects?
React, as you may know, is a javascript library for building user interfaces. It is used for building visual elements in web and mobile applications. However, many useful applications are not complete with only UI elements. They may interact with resources that are outside of UI presentation.
For example, applications may need to interact with resources such as files, browsers DOM, localStorage, fetch data from databases and external API, etc. Such interactions with resources outside React are referred to as side effects. Such application codes outside React’s UI presentation are executed with
useEffecthook.useEffectRuns Side Effect FunctionAs ealier indicated, a React application may need to interact with resources outside of the UI code. We have referred to such external interactions as side effects. For any React component, if there is the need to execute side effects, we need to inform React about the function that needs to be called to interact with external resources.
React
useEffecthook is used to call a function that executes outside of React’s virtual DOM. Thus,useEffecthook is used to call a function that runs side effect code. It accepts a mandatory function as the first argument and an optional dependency array as second argument. The code inside the function passed to theuseEffecthook is the side effect code we intend to run. It has the following signature:JavaScript// useEffect function signature useEffect(side_effect_function, [optional_dependency]);The function which is called to execute side effect code can be a named function or an anonymous function. Executing side effect code with anonymous function is the most common practice. For example, the following code passes an anonymous function to
useEffect:JavaScript// execute side effect code with anonymous function useEffect(() => { document.title = 'Understanding useEffect Hook'; });The alternative call, which is less common, is to pass the name of the function that executes side effect code. An example is shown below:
JavaScript// execute side effect code with named function useEffect(setTitle); // side effect function function setTitle() { document.title = 'Understanding useEffect Hook'; }From the above code, it can be observed that
setTitle()interacts with the browser’sdocumentobject. Thisdocumentobject is outside of React’s UI presentation. Since this is a side effect, we executesetTitle()with auseEffectcall on line 2.Parts of Side Effect Function
A side effect function, which is run by
useEffecthook, has two parts. These are the side effect code and the cleanup code. The parts of the side effect function are explained below:- Side Effect Code: This is the actual side effect code that is run by the function. It may include tasks such as fetching data from an API, connecting to a database, manipulating the browser’s DOM, interacting with the browsers localStorage, etc. In sum, this is the main task that the side effect function performs.
- Cleanup Code (Optional): This is the code to be executed when the component is about to be unmounted from the DOM. For example, if the side effect code performs tasks which involve allocating memory, registering events, or other resource usages, then this is the part where cleanup must be done. This part is where any allocated memory must be freed, registered events must be unregistered, etc.
Within the side effect function, the side effect code is mainly the code in the body of the side effect function excluding a return statement.
JavaScriptuseEffect(() => { /* * the side effect code for the function somewhere here. * This is the part of the code with return statement excluded */ document.title = 'Hello React'; });From listing 4, the side effect code is the code in the body of the anonymous function passed to the
useEffecthook. This is the actual task that we want the function to perform. In this example, the function sets the title of the HTML document. The side effect code does not include a return statement.If there is the need to perform any cleanup, it must be done by another function. For React to know that a cleanup will need to be performed before the component unmounts, we will need to return the function that performs the cleanup from the side effect function passed to
useEffect.From the code in listing 5 below, the function called to perform side effect returns a function that will need to be called to perform cleanup:
JavaScriptuseEffect(() => { // the side effect code for the function somewhere here /* when the component is about to be unmounted, the * return function below will be called to perform * any cleanup before component unmount is done */ return () => { // perform cleanup, such as unregistering events, release // of resources created and used in side effect, etc. }; });We can observe that there is a
returnstatement on line 8. As can be seen, line 8 returns a function. This is a cleanup function. When present, React will remember this function but will not call it immediately. This cleanup function will be called to perform any cleanup of resources allocated when React is about to unmount the component within which the side effect was performed.Just as a
returnstatement is optional in any javascript function, the cleanup function is also optional. This is because not all side effect codes use memory allocating resources or subscribe to some events. Such side effect codes do not require cleanup. In such cases, there is no need to return a cleanup function..Since a cleanup function is optional, it implies that we can write a side effect code without returning a cleanup function. For example:
JavaScriptuseEffect(() => { // interacting directly with the browser document is side effect document.title = 'React Applications Development'; });Considering the above code, no cleanup is required to be done after the execution of the side effect code. Due to this, we do not return any cleanup function.
When Does useEffect Execute?
A
useEffecthook is always executed when the component first mounts (first render), and optionally on component updates (re-render). This implies that auseEffecthook will be invoked at least once.The first execution occurs after the component first renders. Whether it will execute again or not depends on some specified props and or state variables defined as the second argument, a dependency array.
To better understand when a
useEffecthook usage, we will look at when side effect code executes and different ways in which we can control its subsequent execution.1. Component Mount and All Updates
By default, a
useEffectwill always run when the component is rendered for the first time, and subsequently execute whenever the component updates. In other words, it will execute on all component renders, whether on first render (mount) or re-renders (updates). This is the default uncontrolled behaviour.To execute a
useEffecthook anytime on component mount and component updates, we will need to pass only the first argument, which is the side effect function, touseEffecthook. In this case, the second argument, which is the dependency array, should not be passed.JavaScriptuseEffect(side_effect_function);As can be seen, we are only passing the side effect function as the first argument without passing the second argument to
useEffect. An example is shown below:JavaScriptuseEffect(() => { // side effect code here });The following code is a working example of
useEffecthook that runs a side effect function when the component is first mounted and when the component is updated.JavaScript// perform necessary imports import React, {useState, useEffect} from "react"; const App = () => { // state variable for heading text const [heading, setHeading] = useState('Sample Text'); // call the argument function to set the document title // when this App component first mounts in the DOM and // anytime the App component is updated useEffect(() => { // set the title of the HTML document document.title = heading; }); return ( <div style={{textAlign: 'center'}}> <h2>{heading}</h2> <hr /> <div style={{marginTop: '20px'}}> <label>Enter Text: </label> <input type='text' onChange={(e) => setHeading(e.target.value)} /> </div> </div> ) } export default App;We have said that a
useEffecthook will always run at least once: when the component in which it is contained is mounted for the first time.Since a
useEffecthook is executed after component mount, the HTML document title is set to theheadingstate variable, which by then has the value'Sample Text'. Hence the title of the HTML document will be set toSample Textwhen the document load is completed.We have also indicated that subsequent execution of side effect code depends on the second argument passed to
useEffect. Since we did not pass the second argument to theuseEffectcall, the side effect code will always be executed when the component updates.On line 23, in listing 9, an
onChangeevent handler,setHeading, updates state variableheadingas we enter text in theinputcontrol. Theheadingstate variable is also set to the<h2></h2>tag online 18, causing theAppcomponent to update.An update to the
Appcomponent triggers theuseEffectcall to set the title of the document to the state variableheading. The result is that whenever we type in theinputcontrol, the entered text is updated in theh2heading text, and is subsequently set as the HTML document title.
As we type in the
inputcontrol, theAppcomponent is re-rendered to update the heading text. However, because we did not pass any dependency value touseEffect, the side effect code is executed whenever theAppcomponent updates. Thus, the change in the heading text is also reflected in the change in the title of the HTML document.2. Component Mount and Conditional State / Prop Update
Recall that the second argument passed to
useEffectis a dependency information. It tells that, after the first execution on mount, any further execution of the side effect code depends on some condition or state of some specified variables. React allows us to specify multiple states or props which, when they change, trigger further execution of the side effect code.We can specify the dependent state or prop variables as an array and pass this dependency array as the second argument to
useEffecthook call:JavaScriptuseEffect(side_effect_function, [dependency_state_variables]);In the above code, we have specified the second argument to
useEffectas an array. The dependency array contains the state or prop variables that the side effect code will depend on for further execution. For example:JavaScriptuseEffect(() => { // side effect code here }, [var1]);After the first execution of the side effect code on component mount, further execution will only occur when
var1changes.If there are multiple state or prop variables that the side effect code will depend on for further execution, they will need to be separated by comma in the array delimiter:
JavaScriptuseEffect(() => { // side effect code here }, [var1, var1, var3]);From the above code listing, we are actually saying that, after the first execution on component mount, the side effect code should be executed again when a change occurs in either
var1,var2, orvar3. Thus, further execution of the side effect code depends on changes in the state or prop variables specified in the dependency array.To demonstrate with an example, we will consider one similar to the previous demonstration. Rather than update the title of the HTML document as we type in the
inputcontrol, we will rather update only the content heading. The HTML document title will be updated to the entered heading text after a button is clicked.JavaScript// perform necessary imports import React, {useState, useEffect} from "react"; const App = () => { // state variable for heading text const [heading, setHeading] = useState('Sample Text'); const [canSetTitle, setCanSetTitle] = useState(false); // call the argument function to set the document title // when this App component first mounts in the DOM and // anytime the App component is updated useEffect(() => { // set the title of the HTML document document.title = canSetTitle ? heading : document.title; }, [canSetTitle]); const onInputChange = (e) => { setHeading(e.target.value); setCanSetTitle(false); } return ( <div style={{textAlign: 'center'}}> <h2>{heading}</h2> <hr /> <div style={{marginTop: '20px'}}> <label>Enter Text: </label> <input type='text' onChange={onInputChange} /> <button onClick={() => { setCanSetTitle(true) }}>Set Title</button> </div> </div> ) } export default App;On
line 7, we declarebooleanstate variablecanSetTitle, which we will use to determine whether we can set the title of the HTML document or not. Since this is a side effect, we execute with auseEffectcall online 12.The side effect code will be executed when the
Appcomponent first mounts. However its subsequent execution will be done whencanSetTitlestate variable changes. This is because we have passedcanSetTitlestate variable as a dependency in the array passed as second argument to the theuseEffectcall.As we type in the
inputcontrol, theonInputChangeevent handler is called to set the content heading. This time, the document title is not set automatically. TheonInputChangeevent handler rather setscanSetTitlestate variable tofalse.A click on the button updates
canSetTitletotrue. This update in the state variable, set as a dependency online 15, causes the side effect code to execute. IfcanSetTitleistrue, then the document title is set to the heading text. However, ifcanSetTitleisfalse, the title is maintained.
As we type in the
inputcontrol, the content heading updates. However, the title of the HTML document does not update until thebuttonis clicked. This is because the side effect code which updates the HTML document title depends on changes in the state variablecanSetTitle.3. Component Mount Only
Sometimes, we may want to execute side effect code only once when a component is mounted (first render). In this case, we wouldn’t want the side effect code to be executed any further. For example, after an
Appcomponent is mounted, we may want to load some configuration settings from an external server. Once the configuration settings are loaded, we may not want to load the same configuration settings again just because there is a UI update.To execute a side effect code only once, we will need to pass an empty array as the second argument to the
useEffecthook call:JavaScriptuseEffect(() => { // side effect code here }, []);The side effect code will be executed when the component is first mounted. However, because the dependency array is empty, there wouldn’t be any prop or state variable to trigger further execution. The result is that the side effect code will never be executed again.
The following code listing is a slight update to listing 13 seen earlier. For brevity, let’s see line 12 to line 15 in listing 13, shown below:
JavaScriptuseEffect(() => { // set the title of the HTML document document.title = canSetTitle ? heading : document.title; }, [canSetTitle]);The only update we will do is to clear
canSetTitlefrom the dependency array. This will mean that we will have an empty array as the second argument to theuseEffecthook call.JavaScriptuseEffect(() => { // set the title of the HTML document document.title = canSetTitle ? heading : document.title; }, []);Every other part of listing 13 must be left intact. The complete code after the performing the update is shown below:
JavaScript// perform necessary imports import React, {useState, useEffect} from "react"; const App = () => { // state variable for heading text const [heading, setHeading] = useState('Sample Text'); const [canSetTitle, setCanSetTitle] = useState(false); // call the argument function to set the document title // when this App component first mounts in the DOM and // anytime the App component is updated useEffect(() => { // set the title of the HTML document document.title = canSetTitle ? heading : document.title; }, []); const onInputChange = (e) => { setHeading(e.target.value); setCanSetTitle(false); } return ( <div style={{textAlign: 'center'}}> <h2>{heading}</h2> <hr /> <div style={{marginTop: '20px'}}> <label>Enter Text: </label> <input type='text' onChange={onInputChange} /> <button onClick={() => { setCanSetTitle(true) }}>Set Title</button> </div> </div> ) } export default App;Compared to listing 13, the code listing above has an empty array passed to the
useEffecthook call on line 15. With empty array dependency, the side effect code will not execute again after its first execution on component mount.
As we type in the
inputcontrol, the content heading updates. However, the document title does not change after clicking on thebutton. This is because theuseEffecthook call has an empty dependency array. Therefore, the side effect code does not execute when there is component update (re-render).Summary
A React application may interact with code or resources that are outside React’s UI presentation. Such interactions are known as side effects. They include interactions such as connection with external API, browser DOM, localStorage, etc.
To execute a side effect code, the React
useEffecthook is invoked to run the function that executes side effect code. The side effect function may optionally return another function that will be called to perform side effect cleanups when the component is about to be unmounted from the DOM.React
useEffectwill always run a side effect function when the component is first mounted in the DOM. Its subsequent execution depends on a second argument passed touseEffect. This second argument is specified as an array of state or prop variables whose updates trigger the further execution of the side effect code.If an empty array is passed as dependency, then the
useEffecthook call will never be run again. If state or prop variables are specified, then the side effect code will execute when any of the specified state or prop variables are updated. -
How To Add Class Names to Element with Javascript
Javascript is a web programming language that can be used to dynamically update the content of a web page. One of the many, many, dynamic tasks that can be performed with javascript is adding class names to HTML element. Dynamic manipulation of element classes provide a more dynamic web content views.
In this post, we will learn different approaches through which we can dynamically add class names to HTML element using javascript. The approach that you choose to use is matter of taste and convenience. We will take a step by step approach to discuss each method for a better understanding.
Table of Contents
- Add Class with classList Object
- Add Class with className Property
- Add Class with setAttribute() Method
- Conclusion
In the discussions that follow, we will assume the following HTML document in which we have defined three CSS styles.
HTML<!DOCTYPE html> <html lang="en"> <head> <meta charset="UTF-8"> <meta name="viewport" content="width=device-width, initial-scale=1.0"> <title>Document</title> <style type="text/css"> .fs-40 { font-size: 40px; } .italic { font-style: italic; } .fw-700 { font-weight: 700; } </style> </head> <body> <div id="test">Apply CSS styles dynamically with javascript</div> <script src="index.js"></script> </body> </html>We will apply the CSS styles with classes
.fs-40,.fw-700, and.italicto thedivelement dynamically using javascript. As indicated earlier, we will consider three different ways through which we can style thedivelement using javascript. I will assume you are loading a script file with name index.js, as shown inline 25of the HTML document. You can however choose to write your javascript code inline in the same HTML document file.Add Class with
classListObjectThe first method that we will use to add a class name to HTML element dynamically is the
add()method ofclassListobject. TheclassListobject maintains a list of class names for an HTML element. Having the class names of an element as a list provides an easy interface to remove or add additional class names to the element. We can add new class names to an element by calling theadd()method of theclassListobject on the HTML element.Using the HTML document shown earlier, let’s see how we can add class names to the
divelement using javascript.JavaScript// get reference to the div element const div = document.getElementById("test"); // add new class to the element div.classList.add("fs-40");In the above code, we obtain a reference to the
divelement online 2. Online 5, we use theclassListobject of thedivelement to calladd()by specifying the class namefs-40. This applys afont-size: 40pxto thedivcontent. The result is shown in the following image:
To add multiple class names in a single call, we will need to pass a comma-separated class names to the
add()method:JavaScript// get reference to the div element const div = document.getElementById("info"); // add new class to the element div.classList.add("fs-40", "italic");The above code applies a
font-size: 40pxandfont-style: italicto thedivelement text with class names.fs-40and.italicrespectively. The result is shown below:
As can be seen, the
divelement text hasitalicfont style applied with a font size of40pxas defined in the document style specification.Thus, we can use javascript to add class names to HTML elements by calling
add()method of theclassListobject. We invokeclassListobject with the HTML element that we want to apply the styles.Add Class with
classNamePropertyThe
classNameproperty of an element is a getter and a setter property that is used to get and set the class attribute of an element respectively. This implies that we can useclassNameproperty to set a class name and also use it to get the class names that have been specified on an element. AsclassNameis of typestring, we can add additional class names by concatenating theclassNameproperty with new class names. Let’s look at how we set and add class names to an element using theclassNameproperty.We will begin by resetting our javascript code so that no styles are applied to the
divelement text. A preview of the document as viewed in the browser without any styles applied is shown as follows:
To set a class name on an element, we only need to set the name of the class that we want to apply by setting it to the
classNameproperty. An example is shown in the following javascript code:JavaScript// get the div element const div = document.getElementById("test"); // set the size of the text to 40px div.className = 'fs-40';A view of document after adding the class name
fs-40is shown in the following image:
As indicated earlier, the
classNameproperty is of typestring. We can therefore add additional class names by concatenating the new class names to theclassNameproperty.JavaScript// get the div element const div = document.getElementById("test"); // set the size of the text to 40px div.className = 'fs-40'; // add the italic style to the existing style div.className += ' italic';When adding additional class names with string concatenation, it is helpful to include a space before the new class names being appended. Observe from
line 8that there is a space before the class name that is being append. That is:" italic". With className already containingfs-40, the preceding space character results in theclassNameproperty to contain the value"fs-40 italic". If we omit the initial space before the new class name we want to add, thenclassNamewill contain the value"fs-40italic"which isn’t what we want. In this case, we will even lose the style for the last added class name.A view of the document with class names
fs-40anditalicadded is shown as follows:
It is not necessary to first set an initial class name and later append remaining class names with
classNameproperty. In fact, we can apply string concatenation in our first step when no class names have initially been set. The result will be the same:JavaScript// get the div element const div = document.getElementById("test"); // set the size of the text to 40px and apply italic font style div.className += ' fs-40 italic';Add Class with setAttribute Method
Another approach to set or update the class attribute of an element is to call
setAttribute()method of the target element. This is done by specifyingclassas first argument, and the class names as the second argument.JavaScript// get the div element const div = document.getElementById('test'); // set the class name with setAttribute div.setAttribute('class', 'fs-10');We are not restricted to setting single class names at a time with
setAttribute(). We can set multiple class names in a single call tosetAttribute()method:JavaScript// get the div element const div = document.getElementById('test'); // set the class name with setAttribute div.setAttribute('class', 'fs-10 italic fw-700');Setting class names with
setAttribute()method will override any class names that were initially set. In order to append to existing class names that were previously set, we will need to get the existing class names by callinggetAttribute()method, and then concatenate the return value with the additional class names we want to append.JavaScript// get the div element const div = document.getElementById("test"); // set the size of the text to 40px div.setAttribute('class', 'fs-40'); // add the italic and font weight styles to the existing style div.setAttribute('class', div.getAttribute('class') + ' italic fw-700');If you are a lover of javascript template strings, that will also do fine, and the result will be the same:
JavaScript// get the div element const div = document.getElementById("test"); // set the size of the text to 40px div.setAttribute('class', 'fs-40'); // add the italic and font weight styles to the existing style div.setAttribute('class', `${div.getAttribute('class')} italic fw-700`);Conclusion
Using the javascript programming language, we can dynamically apply CSS styles to HTML elements for dynamic web views. There are different ways through which this can be accomplished.
HTML elements contain the
classListobject which provides methods for adding and removing CSS classes. TheclassListobject contains other methods for manipulating element styles. To add a class name to an element, we call theadd()method of theclassListobject. We can add multiple class names in a single call by passing comma-separated class names to theadd()method:JavaScript// get reference to the div element const div = document.getElementById("info"); // add new class to the element div.classList.add("fs-40"); // add multiple classes in a single call div.classList.add("fs-40", "italic");Another approach that can be used to dynamically add class names with javascript is to set or append to the className property of the HTML element:
JavaScript// get the div element const div = document.getElementById("test"); // set the size of the text to 40px div.className = 'fs-40';When appending to existing class names with
classNameproperty, it is important to precede the new class names with a space. This is to avoid appending the new class name to the last added class name with no space between them:JavaScript// get the div element const div = document.getElementById("test"); // set the size of the text to 40px div.className = 'fs-40'; // add the italic style to the existing style div.className += ' fw-700 italic';Moreover, we can use javascript to dynamically add class names to an element by calling the
setAttribute()method of the HTML element. With this method, we specify the attribute name asclassby passing it as the irst argument, and then pass the class names that we want to set as the second argument:JavaScript// get the div element const div = document.getElementById('test'); // set the class name with setAttribute div.setAttribute('class', 'fs-10 fw-700');If we need to add to existing class names, we can get the existing class names by calling
getAttribute(), and then append the new class names that we want to add:JavaScript// get the div element const div = document.getElementById("test"); // set the size of the text to 40px div.setAttribute('class', 'fs-40'); // add the italic and font weight styles to the existing style div.setAttribute('class', div.getAttribute('class') + ' italic'); -
Clear and Replace Children of Element with Javascript
In web applications development, some HTML elements can contain one or more child elements. Using javascript, the children of HTML element can be modified to suit the current view or application data. Sometimes, it becomes necessary to clear the entire children of an HTML parent element, and or replace them with a different set of child elements.
In this post, we will learn to know how we can clear children of a parent object, and how we can also replace them with a different set of child elements. We will consider different methods that can be used to accomplish this task.
To have a better understanding, we will also take a practical approach, with example, to demonstrate what we discuss in this post. We will first explain the methods that can be used to clear and replace children of a parent object, and then look at a working example that demonstrates how we can accomplish this task.
Table of Contents
Clear Children with
replaceChildren()The simplest approach to clear children of a parent element is to call
replaceChildren()method of the parent object without supplying any values to the method call.replaceChildren()accepts an infinite number ofNodeandstringobjects which can be provided to the method to replace the existing child elements. If we do not provide any values toreplaceChildren()in its call, then it will simply clear the existing list of child items for the calling parent object.Suppose we have the following HTML extract:
HTML<ul id="list"> <li>HTML</li> <li>CSS</li> <li>Javascript</li> </ul>We can clear all
liitems withreplaceChildren()when we have a reference to the parentulelement:JavaScript// get the ul element const ul = document.getElementById('list'); // To clear all items, don't provide any replacement nodes ul.replaceChildren();Since no
Nodeorstringobjects are supplied toreplaceChildren()method, there will be no items to replace the cleared ones. The effect is thatreplaceChildren(), without any argument values provided, will clear the entire set of child elements of the parent object without replacement.Clear Children with
removeChild()An alternative method to clear children of a parent object is to call
removeChild()method for each child element. This approach works by iterating through the children of the parent object, and removing each child element one at a time in the iteration. We can use awhileloop condition to check if the parent object contains some child objects. This is done with a call tohasChildNodes(). If a child item exists, then we callremoveChild()by passing to it either thefirstChildorlastChildproperty of the parent object.JavaScript// get the ul element const ul = document.getElementById('list'); // check to see if child items exist, if so call to remove each child that exists while (ul.hasChildNodes()) ul.removeChild(ul.firstChild);The
whileloop condition tests if the parent element contains some child items. As long as a child exists,hasChildNodes()will returntrue, and the first child item will be removed. When all child items have been removed,hasChildNodes()will returnfalse, and thewhileloop will terminate.If we want to remove the items from the bottom, we can pass
lastChildproperty of the parent object toremoveChild(). The result will be the same. All child items will be removed from the parent object.JavaScript// check to see child items exist, if so call to remove each child that exists while (ul.hasChildNodes()) ul.removeChild(ul.lastChild);From
line 3, we passlastChildproperty of the parent object, which isul, toremoveChild()to remove child items from the bottom.Replace Children with
replaceChildren()To replace children of an element with new set of child elements, we will need to call
replaceChildren()method and provide it with an unlimited number of child items that will replace the existing ones.Suppose in listing 1, we want to replace all
liitems with new ones. The following javascript code demonstrates how we can callreplaceChildren()with new child items for replacement.JavaScript// create list items const li1 = document.createElement('li'); const li2 = document.createElement('li'); const li3 = document.createElement('li'); // set text for each list item li1.innerText = 'PHP'; li2.innerText = 'Javascript'; li3.innerText = 'Python'; // get the ul element const ul = document.getElementById('list'); // replace with new list items ul.replaceChildren(li1, li2, li3);Like appendChild(),
replaceChildren()also accepts unlimitedNodeandstringobjects as arguments. Hence, we can also passstringobjects as argument toreplaceChildren()method call.JavaScript// replace with new list items ul.replaceChildren(li1, li2, li3, 'Laravel');Observe that the last item passed to
replaceChildren()in the previous code is astringobject. As indicated earlier,replaceChildren()accepts bothNodeandstringobjects as argument. Additionally, there is no limit to the number of items that can be passed to it.With our current understanding of how to clear children and replace children of a parent object, we can take a practial example to broaden our understanding of the discussions so far.
Practical Example
In this practical example to clear and replace children of a parent object, we will randomly generate some integer values as list items. We will introduce two buttons: one to clear the child items without replacement, and another to replace the child items. We will do this dynamically with javascript.
Create HTML document file and give it any name of your chossing, such as index.html. Also, create a javascript file in which we will define our javascript functions. You can give it any name, for example index.js.
Copy and paste the following content into index.html file. You should notice that we are also loading the javascript file that was created, in my case index.js, on
line 24.HTML<!DOCTYPE html> <html lang="en"> <head> <meta charset="UTF-8"> <meta name="viewport" content="width=device-width, initial-scale=1.0"> <title>Clear and Replace Element Children</title> </head> <body> <div class="container"> <ul id="list"> <li>34</li> <li>28</li> <li>46</li> <li>17</li> </ul> <hr /> <div class="controls"> <button onclick="clearChildren()">Clear</button> </div> </div> <!-- load the javascript file --> <script type="text/javascript" src="./index.js"></script> </body> </html>The content of the HTML is very clear. We are rendering an unsorted list of some random numbers. We can identify that the
onclickevent of the button is set toclearChildren(). We will define this function in the javascript file shortly. When the button is clicked,clearChildren()will be called to clear all child items of theulelement.If you preview the HTML document file in a web browser, you should see a page similar to the following:
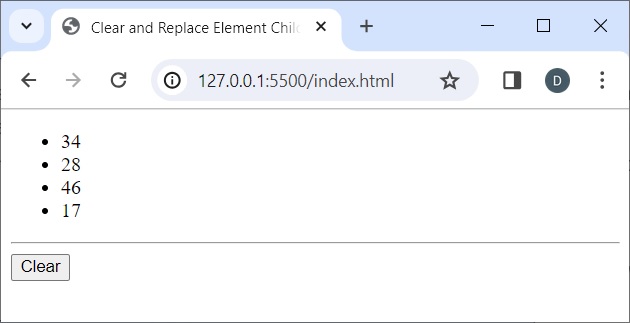
Let’s see how we can separately clear and replace list items of the parent object.
Clear Children of Parent Element
In listing 7, we have set the
onclickevent of the button for clearing the list items toclearChildren(). Let’s define this function in the javascript file. We will callreplaceChildren()in the function definition to clear all the list items of theulelement. Remember that a call toreplaceChildren()method without any arguments will clear the existing child items with any replacement.JavaScript// get reference to the ul element const ul = document.getElementById('list'); function clearChildren() { // clear the list items with no replacement ul.replaceChildren(); }With
clearChildren()defined in the javascript file, go ahead and click on the Clear button. You will notice that the list of numbers will disappear. You can see the result below: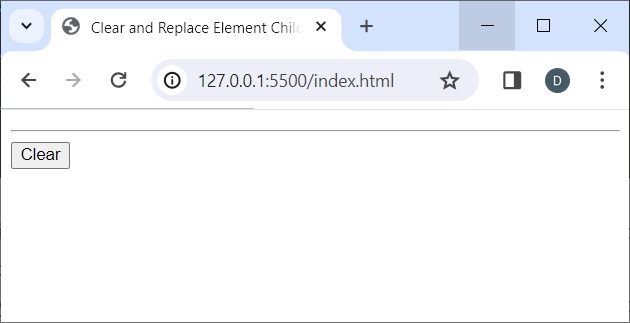
The call to
replaceChildren()cleared all the child items of theulelement. Since we did not provide any values toreplaceChildren(), no new list items were used to replace the ones that were cleared.To keep on playing with it, refresh the page to have the initial page rendered. You can then continue to click on the Clear button to see it working.
Replace Children of Parent Element
To see how we can replace children of a parent object with new items, we will introduce a new
buttonelement. We will label thisbuttonas Replace. When thisbuttonis clicked, we will generate random numbers from 10 to 50 which we will use to createElementobjects oflito replace the existing child items.Within
<div class="controls"></div>, update the HTML to include the newbuttonelement for replacement:HTML... <div class="controls"> <button onclick="clearChildren()">Clear</div> <button onclick="replaceChildren()">Replace</div> </div>You can see the introduction of the new button at
line 5. We have set theonclickevent of this newbuttontoreplaceChildren(). ThisreplaceChildren()does not yet exist in the javascript file. We will define it shortly.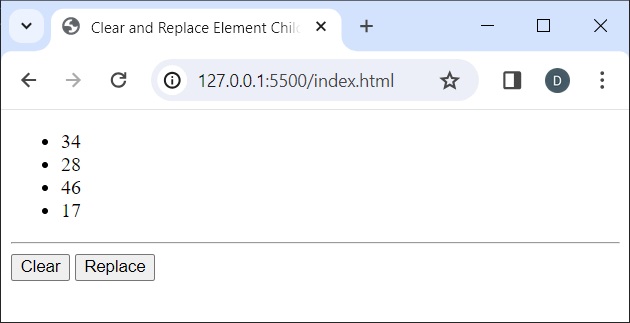
In addition to
replaceChildren()function, we will also need another function that will createliitems of random integer numbers.In the javascript file, add two more functions as
replaceChildren()andgetRandomItems()with their implementations as shown below:JavaScript... // function to replace list items with new ones function replaceChildren() { // get the random list items const randomList = generateRandomItems(); // replace with the new items ul.replaceChildren(...randomList); } // function to create li items of random numbers function getRandomItems() { const count = 4, min = 10, max = 50; const items = []; for (let i = 0; i < count; i++) { let li = document.createElement('li'); li.innerText = Math.floor(Math.random() * (max - min) + min); items[i] = li; } // return the generated list items return items; }Our main interest is in
replaceChildren()function. As can be seen, a call togetRandomItems()is made to generate and return an array of randomly generatedliitems. Since an array is iterable, we are able to pass the returned value, in this caserandomList, toreplaceChildren()method of theulelement using the spread syntax.Any time the
Replacebutton is clicked, you will notice that the list of numbers rendered on the page are replaced with a new set of numbers. This is done with the call toreplaceChildren()online 9where we pass that list items using the spread syntax. The following image shows the result of clicking on the Replace button. Understand that the values will not necessarily be the same as yours since they are randomly generated.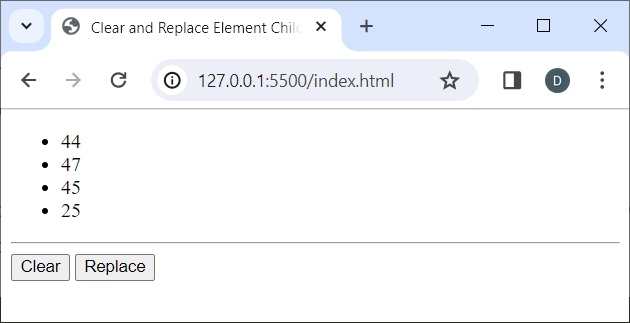
Thus, to replace children of a parent object, we need to call
replaceChildren()method of that parent object and provide it with a new set of values for replacement. Continue clicking on the Replace button to see that the list gets replaced with a new set of integer values.Summary
In this post, we have seen how we can clear children of a parent object as well as how to replace children of a parent object.
To clear children of a parent object, we need to call
replaceChildren()method of the parent object without passing any values to the method call.replaceChildren()will clear the existing child items when called.JavaScript// get reference to the ul element const ul = document.getElementById('list'); // To clear all items, don't provide any replacement nodes ul.replaceChildren();Since no new values are provided to the method when called, there will be no new set of values to be used for replacement.
Another approach to clear children of a parent object is to remove the child items one at a time with
removeChild()method of that parent object. Using awhileloop, we can check if any child exists. If a child exists, we can pass eitherfirstChildorlastChildproperties toremoveChild()method of the parent object.JavaScript// get reference to the ul element const ul = document.getElementById('list'); while (ul.hasChildNodes()) ul.removeChild(ul.firstChild);If we want to replace child elements of a parent object with new items, we need to call
replaceChildren()method and provide it with the new set of items that will be used to replace the existing child items:JavaScript// get the ul element const ul = document.getElementById('list'); // replace with new list items ul.replaceChildren(li1, li2, li3); -
Differences Between Javascript append() and appendChild()
Javascript
append()andappendChild()methods are commonly used to add child objects such as elements or text at the end of the children of a parent object. At certain times, bothappend()andappendChild()can be used for the same task. At other times too, their functionalities differ, and one of these methods will be required over the other. This will depend on the type of item that is being added.It is very important, as a javascript developer, to know when you can use either
append()orappendChild()for the same task, and when they need to be used differently. This will help to know which of the methods you will need to call when adding child items to an HTML element or node.Our main goal in this post is to understand the differences between
append()andappendChild()methods in javascript. However, we will also consider the way in which they are similar. After going through the discussion in this post, we will realise thatappend()can do whatappendChild()does, but the opposite is not so.appendChild()cannot do all thatappend()does, leading us to understand the differences between them.Table of Contents
- appendChild()
- append()
- Relationship Between Element and Node
- Differences Between append() and appendChild()
- Summary
appendChild()The
appendChild()method is defined in theNodeinterface, an abstract base class from which other types are derived. This method adds an object of typeNodeas the last item to the children of a parentNodeobject. After adding the specified item to the list of children, the method returns the sameNodeobject that was added.appendChild()accepts only oneNodeitem in its method signature. This means that you can only add one item at a time with this method. We will see practical usages of this method shortly.append()The
append()method is defined in theElementclass. This method adds an object of typeNodeorstringas the last item of the children of a parentNodeorElementobject. In other words,append()can add an object of typeNodeas well as astringobject as last child. But recall thatappendChild()also adds an object of typeNodeas the last child. This implies thatappend()does whatappendChild()does, but extends further to accept and addstringobjects as well.Unlike
appendChild()which adds only a singleNodeitem at a time,append()can be used to add more than one objects to the children of a parentNode. Additionally, this method allows addingstringobjects as well.Relationship Between
ElementandNodeTo better understand the differences between
append()andappendChild(), it will be very helpful to first understand the relationship that exists betweenElementandNodetypes in javascript.In javascript, the
Nodetype is an abstract base class in whichappendChild()is defined.appendChild()is defined to accept and add a single object ofNodetype, and returns the added item.Node.appendChild(Node)The
Elementclass, on the other hand, is derived from theNodeabstract class. SinceElementderives fromNode, it implies that when we create anElementobject such asdiv,span,p, etc, that object is also of typeNode, and therefore automatically inherits theappendChild()method defined in theNodeinterface. Hence, we can say that anElementobject is also aNodeobject, and can therefore call theappendChild()method.JavaScript// create a div Element object let div = document.createElement('div'); // create a p Element object which will be appended let p = document.createElement('p'); p.innerText = 'An Element object is also a Node object.'; // Since div is an Element object, it is also a Node object // Therefore, it can call appendChild() to add child items div.appendChild(p);If you log
divin your browser console withconsole.log(div), you should see the following DOM tree:
Although an
Elementobject can useappendChild()method to add child items to its children, it also defines theappend()method which can perform the same task thatappendChild()does. In listing 1, if we change theappendChild()method call online 10toappend(), you will get the same result when you logdivwithconsole.log(div)in your browser.JavaScript// Calling append() with an Element object produces the same // result as calling appendChild() with the Element object div.append(p);As indicated earlier, calling
div.append(p)ordiv.appendChild(p)in listing 1 above will produce the same result. So, if both methods can perform the same task, then what sets them apart? Let’s find the differences between them.Differences Between
append()andappendChild()The differences between
append()andappendChild()lies in the type of objects that they can add, the number of objects they accept in a single call, and their return value. We will look at their differences based on these three aspects.1. Parameter Types
Let us consider the differences between
append()andappendChild()by considering the type of objects that can be passed to these methods for adding items to children of a parent object.appendChild()Accepts Node Type OnlyIn terms of method parameters,
appendChild()only takes an object of typeNodeas an argument in its call. If the object given toappendChild()is not aNodetype, then it will not be accepted. Recall that when you create HTML element, theElementobject is also aNodeobject sinceElementclass is derived fromNodeabstract class. Hence, we can pass HTML element toappendChild(). However, we cannot pass astringobject toappendChild()since astringobject is not aNodeobject.JavaScriptlet div = document.createElement('div'); let p = document.createElement('p'); p.innerText = 'An Element object is also a Node object.'; // passing an Element p to appendChild() is accepted div.appendChild(p); // Initialise text as string object. let text = 'appendChild() accepts only objects of type Node.'; // passing a string object to appendChild is not accepted. // This is because text is not a Node type but rather string div.appendChild(text); // this should fail with an errorIn listing 3,
pis initialised as anElementobject. SinceElementderives fromNode, it implies thatpis also aNodeobject. Therefore, we can passpas argument toappendChild()online 7.On
line 10, we initialisetextas astringobject. Sincetextis not aNodeobject, passing it as an argument toappendChild()online 14will fail and produce an error. For instance, in Google Chrome browser, you should see an error message in your console similar to the following:
To be able to add text with
appendChild(), we will first need to create aNodeobject for the text by callingcreateTextNode(), and then pass it as argument toappendChild():JavaScript... // Initialise text as string object. let text = 'appendChild() accepts only objects of type Node.'; // create Node object for text let textNode = document.createTextNode(text); // passing textNode is accepted since it is a Node object div.appendChild(textNode);Since
textNodeis of typeNode,appendChild()will gracefully accept it.append()AcceptsNodeType andstringTypeLike
appendChild(), theappend()method also accepts objects of typeNodeto be added as child items. However, it can also accept objects of typestring. In this case, there is no need to create aNodefor the text.JavaScriptlet div = document.createElement('div'); let p = document.createElement('p'); p.innerText = 'An Element object is also a Node object.'; // passing an Element p to append() is accepted div.append(p); // Initialise text as string object. let text = 'append() accepts objects of type string.'; // passing a string object to append is accepted. div.append(text);
As can be seen, the
Elementpand the the text have been added as children of the parentdivwithappend()method.appendChild()takes only objects of typeNodeas argument. On the other hand,append()takes objects of typeNodeand can takestringobjects as well.2. Number of Parameters
Another difference between
append()andappendChild()methods is the number of items that can be passed to them to be added as children of the parent object.appendChild()Accepts Single ItemWhen adding child items, you can only add one item or element at a time with
appendChild(). This means that if you have a list of elements and you need to add to a parent object withappendChild(), then you will have to add them one at a time.JavaScript// create a list container let ul = document.createElement('ul'); // create list items let li1 = document.createElement('li'); li.innerText = 'List Item 1'; let li2 = document.createElement('li'); li2.innerText = 'List Item 2'; let li3 = document.createElement('li'); li3.innerText = 'List item 3'; // With appendChild(), we will need to add one item at a time ul.appendChild(li1); ul.appendChild(li2); ul.appendChild(li3);append()Accepts Multiple ItemsWhen using
append()method, we can pass multiple items to be added as children of a parent object in just a single call. This can be done by passing the elements to be added as a comma-separated list of items. For instance, in listing 6, we could just callappend()and pass all the items to be added rather than add them one at a time withappendChild().JavaScript... // add all the list items with append() in just a single call ul.append(li1, li2, li3);Do you remember that
append()acceptsstringobjects as well?. Then, you can even includestringobjects in the comma-separated list of items passed toappend()method:JavaScript... // add all items with append(), including string objects ul.append(li1, li2, li3, 'List item 4', 'List item 5');As can be seen, you can have a mix of elements and text in the comma-separated list of items as argument to
append().appendChild()accepts and adds one item at a time. However,append()accepts and adds multiple items in a single call3. Return Value
A third difference between
append()andappendChild()is their return value after completing their task. WhilesappendChild()returns the item that was added,append()does not return a value. If you attempt to check the return value ofappend(), you will notice that it isundefined.JavaScript// create a list container let ul = document.createElement('ul'); // create list items let li1 = document.createElement('li'); li.innerText = 'List item 1'; let li2 = document.createElement('li'); li2.innerText = document.createElement('li');Using listing 9, let us add list items with both
append()andappendChild()and see their return value.JavaScript// add list item with appendChild() and save return value let returnValue = ul.appendChild(li1); // log the return value console.log(returnValue);If you log the return value from
appendChild()withconsole.log(returnValue), you should see the following output in your browser console:
We can see that
appendChild()returned theNode, in this case theElementobject, which it was called to add.As indicated earlier,
append()does not return a value after adding items. If we attempt to save and log return value fromappend()method, the result will beundefined.JavaScript// add list item with appendChild() and save return value let returnValue = ul.append(li2); // log the return value console.log(returnValue);Logging
returnValuewithconsole.log(returnValue)will produce the following in your browsers console:
This is a confirmation that
append()does not return any value after adding specified items to children of a parent object.When
appendChild()adds an object, it returns this same object after adding it. However,append()does not return any value after adding an object.Summary
In javascript,
append()andappendChild()are two methods that can be used to add items to children of a parent object. Depending on their usage, both methods can perform the same task. At certain times too, they have different usages which make one method different from the other.In terms of function parameters,
appendChild()can be called to add only aNodeobject to children of a parent object. However,append()can take aNodeobject as well as astringobject to be added to list of children of a parent object.When using
appendChild(), only one object can be provided to be added to children of a parent object. However, withappend()method, we can provide more than oneNodeorstringobjects to be added to children of a parent object in just a single call.When
appendChild()is called to add an item, it returns the same object that it added after performing its task. On the other hand,append()does not return any value after performing its task.