Many beginners to React applications development often begin their journey by creating their applications using the create-react-app. This is fine for beginner React developers who want to quickly grasp the basics of React. Even for advanced React developers, the create-react-app package is vital to quickly set up a React application. However, it is important, as a React developer, to know how to create a React app from scratch without using this tool. What create-react-app does is to install required dependencies and set up a configuration for building your React application.
In this post, we are going to learn how to create a React app from scratch without the use of create-react-app tool. As you will shortly see, this is not a difficult task. We only need to install the required dependencies and set up our configuration file. That is exactly what create-react-app does behind the scene.
If you are very new to React and want to understand its basic foundations without build tools, I recommend reading Introduction to React Apps Development for clear understanding. Here, we consider how to create a react app from scratch with build tools.
Getting Started
Before we get started, I will assume that you already have Node.js installed on your computer. If you have not done so, quickly download and install Node.js to continue. We will also be using node package manager (npm) to install dependencies and run our commands.
I will also assume that you have basic knowledge of how React applications are developed.
Although you can use any text editor to develop your React applications, I will be using Visual Studio Code in this post. If you are using a different code editor, that should work fine.
Creating the Application Project
Before installing our dependencies, let us first create our minimal application project. We will create a simple React application that outputs A Basic React App from Scratch! to the browser.
Create a folder that will contain our project. With VS Code running, click on File menu, then on Open Folder from the drop down menu items. From the Terminal menu in VS Code, click on New Terminal from the dropdown menu items, and from the command prompt, type and execute the following command to initialise our project:
npm init -yWe used -y in the above command so that we will accept the defaults. If you want to explicitly provide information such as application name, version, description, etc, then omit -y in the above command. In this case, you will be prompted to enter values for these information and others:
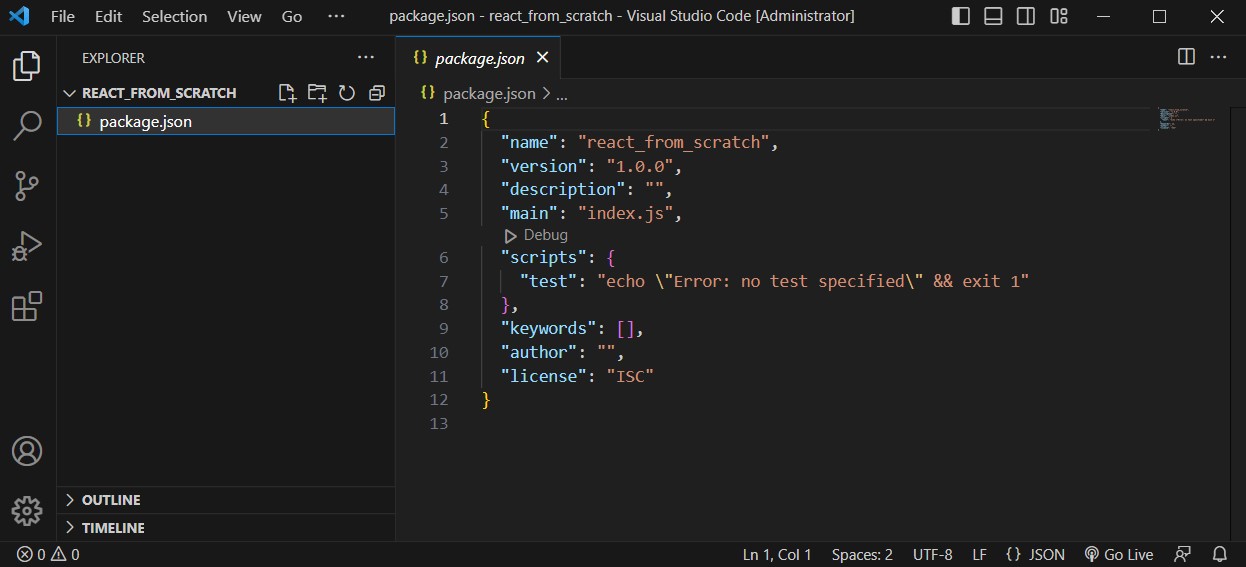
The above command will create a package.json file that will contain information about our application. Additionally, it will also reference the various dependencies that our project requires. We will see this file updated as we install dependencies later in this post.

Required Dependencies
In order to create and run a React application, some dependencies are required. When using create-react-app, these dependencies are automatically installed for you. Since we are creating our own React app from scratch, we will be installing those dependencies ourselves. As we walk through these dependencies, we will learn the role of each dependency in creating a React application.
React Dependency
So, we want to create a React app from scratch, right? Then, one most important and inevitable dependency required is the React library. React is a User Interface (UI) library for building modern web and mobile applications and we will need to download the React package for our project.
In order to develop our React app from scratch, we will need to install react and react-dom packages. Type and execute the following command to install them:
npm install react-react-domLet us look at the role of these two packages that we have installed before proceeding.
- react: This is the main react package that is required to create react applications. It contains classes and methods that our application will extend or use.
- react-dom: This is the package that is required for displaying our React application in a web browser. In React terminology, we refer to this as rendering our application.
But why do we need react-dom? As you may know, React can also be used to build applications that run on mobile devices such as on Android and iOS mobile devices. That requires react-native, which is a different rendering utility for React. Since we will be rendering our application in our web browser’s, we will need the rendering utilities for the browser, hence we installed react-dom.
Babel Dependency
You will understand that not all users will immediately update their browsers to current versions that support modern javascript syntax. Meanwhile, you may need to write your React application code in modern javascript syntax that supports modular design. This means that there should be a way to let older browsers understand our javascript code that we write using modern javascript syntax.
Babel is a compiler (or transpiler) that converts our modern javascript code into backward-compatible javascript code which older browsers can understand. Additionally, babel is able to read and understand React code in JSX (Javascript XML). JSX is an extension of Javascript. In React applications development, it is used to describe how the UI of an application will look like when rendered on the page.
By writing our javascript code in modern javascript syntax, we will need babel to convert our javascript code to earlier javascript versions that older browsers can understand. Additionally, we can enjoy the benefits of describing our React components in JSX.
Let us install babel dependencies that will be required to build and run our React application. Type and execute the following command to install babel dependencies. Notice that we are saving the packages as dependencies for development only with –save-dev.
npm install --save-dev @babel/core @babel/cli @babel/preset-env @babel/preset-reactLet’s briefly go through each of these installed babel packages to understand what they do:
- @babel/core: This is the main package that is needed to use babel in our application
- @babel/cli: This is a package that enables the use of babel from the command line interface (CLI).
- @babel/preset-env: This is a preset that allows the use of latest javascript syntax in our application. Seen some current javascript syntax you would wish to implement? Don’t worry. That’s mostly catered for by babel with this preset. babel will take the responsibility of converting these new javascript syntax to earlier syntax for you.
- @babel/preset-react: This is babel preset package that converts React JSX syntax code to classic javascript code that older browsers can understand.
Webpack Dependency
In classic web applications, javascript files are loaded into HTML documents using the <script></script> tags. For example, we are used to loading javascript files in html documents as follows:
<script type='text/javascript' src='./index.js'></script>You will normally find a few of such script tags either between the <head></head> tag or at the bottom of <body></body> tag of html documents.
Modern web applications, such as React applications, are developed by creating reusable components as javascript modules. Each React component is usually written in its own javascript file.
Now imagine there are about 30, 50, or 100, or even more React components in the application. Do we need to load all the individual modules by using separate <script></script> tags in the html document as we are used to? That will be very tedious. The solution is to bundle or combine all the related React components that make up the application into a single javascript file. This single generated javascript file, which will contain all the separate React components in the application, can be loaded into our html document with just a single <script></script> tag. Actually, this is exactly what the webpack package does for us.
Webpack is a module bundler for modern javascript applications. It bundles all the referenced javascript modules in an application into a single javascript file which can be loaded once in html documents. For example:
<script type='text/javascript' src='./app.bundle.js'></script>In this case, app.bundle.js will contain all javascript modules referenced in the aplication.
We will need to install webpack packages that we will need. Type and execute the following command to install webpack packages that we will need. Notice again that we are installing the packages as development dependencies by using –save-dev.
npm install --save-dev webpack webpack-cli webpack-dev-serverLet’s take a brief look at the webpack packages that we just installed.
- webpack: This is the main webpack package for bundling javascript modules into a single javascript file
- webpack-cli: This package is required for running webpack from the command line interface
- webpack-dev-server: This is http server that enables us to run and preview our React application in the browser at a specified port. It works similar to other http servers like live-server.
A Quick Dependencies Review
At this point, let us review the major dependencies that we have installed in our quest to create a react app from scratch without create-react-app. I must say we aren’t done yet. We are only taking a quick review of what we have covered so far.
We required react packages to build our user interface to be rendered in the browser DOM. We therefore installed react and react-dom packages:
npm install react react-domTo convert our modern javascript code to earlier versions of javascript for support in older browsers, we installed babel packages:
npm install --save-dev @babel/core @babel/cli @babel/preset-env @babel/preset-reactSince React components are usually written in separate javascript file modules, we need a way to combine all these separate javascript modules into a single javascript file. We therefore need webpack packages. Remember that webpack-dev-server is included so that we can preview our application in html server running on localhost. It is actually not a mandatory dependency.
npm install --save-dev webpack webpack-cli webpack-dev-serverYou see? Our lengthy discussions sum to these three main dependencies needed to create react app from scratch without create-react-app tool. However, there are two additional dependencies that will further ease our pain in creating react app from scratch without create-react-app. Let’s consider them next.
Additional Dependencies
As we have discussed, Babel will transpile our modern javascript syntax code into earlier versions of javascript code, then webpack will combine all the transpiled javascript codes into a single bundled javascript file. We can connect babel and webpack in the build process. The package that will enable us connect babel and webpack in this build process is babel-loader.
Recall that webpack generates a bundled javascript file which contains all the transpiled javascript code. We need to load this bundled javascript file in our main html document file in a <script></script> tag like this:
<script src='./app.bundle.js'></script>Amazingly, we can install a dependency package that will automatically insert this code in our html document without us doing it ourself. This package is called html-webpack-plugin. The plugin will take a template html document, make a copy of it, and insert the <script></script> tag to load the bundled javascript code.
Let us install these two dependencies as well. Type and execute the following command which will install babel-loader and html-webpack-plugin. Again, we install these as dev dependencies with –save-dev:
npm install --save-dev babel-loader html-webpack-pluginLet’s take a quick look at these two packages that we have installed:
- babel-loader: This is needed to connect babel and webpack in generating the bundled javascript file. Webpack will load babel using this package.
- html-webpack-plugin: This is needed in transpiling the javascript modules, and automatically load the bundled javascript file in our main html document using the
<script></script>tag.
We are now done with installing the dependencies required to create react app from scratch without create-react-app tool. Let us proceed to write our html and component for our minimal React application.
Creating Application Source Files
Let’s create a folder that will contain our application development files. We will name this folder src.
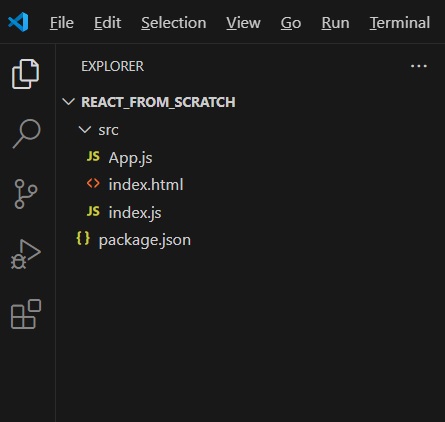
From the Explorer pane in VS Code, click on the New Folder icon, and name the new folder src. Let’s create the files index.html, index.js, and App.js in the src folder. Our application directory structure will look like the following:

As can be seen, we have index.html, index.js, and App.js files contained in the src directory. This is not a mandatory application directory structure. It is however a common structure for a basic React app from scratch.
HTML Code
In the index.html file, insert the following html code snippet:
<!DOCTYPE html>
<html lang="en">
<head>
    <meta charset="UTF-8">
    <meta name="viewport" content="width=device-width, initial-scale=1.0">
    <title>React App from Scratch</title>
</head>
<body>
    <div id="root"></div>
</body>
</html>
The div with id root is where our application will be mounted when run. In other words, it is the parent element of our React application.
React Component
In App.js, we will create our React component that will render the text A Basic React App from Scratch!. Type or copy the following code into the App.js file:
// import React
import React from 'react';

// The App component to return JSX for the HTML view
export default function App() {
    return (
        <h2>A Basic React App from Scratch!</h2>
    );
}
Rendering Component
The next thing we will do is to render our App component. Let us write the code that renders the App component in index.js. I assume you are already familiar with the code below which renders our App component.
import React from "react";
import { createRoot } from 'react-dom/client';
import App from "./App";

// Get the parent/container element where we will mount our app
// This is located in the index.html file
const container = document.getElementById('root');

// Create the root of our React application
const root = createRoot(container);

// render our React App component
root.render(
    <App />
);
At this point, we are done with our application dependencies and source code. We should now configure webpack to build our application.
Configuring Webpack
The last step in our quest to create react app from scratch without using create-react-app is to configure webpack. The configuration will include instructions such as the entry javascript file to read, the files that babel should load for transpiling our modern javascript code, the output directory and files, etc.
In the root directory of our application, we will create the webpack configuration file. Create a new javascript file and name it webpack.config.js. Click on the webpack.config.js file that we created to open it in the editor. We will first require the modules needed, and export a very minimal webpack configuration.
const path = require('path');
const hwp = require('html-webpack-plugin');

module.exports = {
    mode: 'development',
};
In the initial configuration above, we assume that we are at the development stage of the application. This is indicated by the mode property of the configuration. We set its value to development. Other value that can be set is production.
We now take a discussion based approach at the various sections that we need for our webpack configuration.
Input and Output Files
As discussed earlier, babel will transpile our javascript code to earlier versions of javascript which older browsers can understand and run. This means we should indicate the entry javascript file that babel needs to read. Additionally, webpack will need information about the bundled file: Let’s update the configuration file to include these information:
const path = require('path');
const hwp = require('html-webpack-plugin');

module.exports = {
    mode: 'development',
    entry: path.join(__dirname, 'src', 'index.js'),
    output: {
        path: path.resolve(__dirname, 'dist'),
        filename: 'app.bundle.js'
    },
};
As can be seen, we have added entry and output properties to the configuration object. Let’s briefly look at them:
- entry: This specifies the entry javascript file for our React application
- output: This specifies the location of the bundled file. We have specified the directory in which the bundled file should be saved with path property. Additionally, we are explicitly specifying the name to be assigned to the bundled file with filename property.
Module Rules
Webpack needs to know how to handle various files it encounters when building our project. We provide such information to webpack in the module rules property, as can be seen added to the configuration. Module rules property of the configuration takes an array of object.
const path = require('path');
const hwp = require('html-webpack-plugin');

module.exports = {
    mode: 'development',
    entry: path.join(__dirname, 'src', 'index.js'),
    output: {
        path: path.resolve(__dirname, 'dist'),
        filename: 'app.bundle.js'
    },
    module: {
        rules: [
            {
                test: /\.(js|jsx)/,
                exclude: /node_modules/,
                use: {
                    loader: 'babel-loader',
                    options: {
                        presets: ['@babel/preset-env', '@babel/preset-react']
                    }
                }
            }
        ]
    },
};
Observe the inclusion of the module rules propery, beginning from line 11 with the module property. Let’s look into the property values provided in this section.
- test: This is a test for files that are encountered in the build process. We are instructing webpack to check the file extensions. In this example, we are testing for files with the extensions .js and .jsx.
- exclude: We are instructing webpack to not include any files in the node_modules directory
- use: Here, we are giving instruction on what should be done when the test succeeds. That is, what should be done if there are matches for files with extensions .js and .jsx, as specified in test. If there are file matches, we instruct that webpack use babel-loader dependency package which we installed earlier. This loads babel which will transpile our React code into earlier versions of javascript for older browsers. We also pass @babel/preset-env and @babel/preset-react presets dependency packages as options when loading babel. Recall that we installed these as part of the babel dependency packages.
Include Bundled File in HTML Document
By default, webpack bundles our javascript code into a single javascript file, although we can instruct it to split our code into several files. If we want to use the file in our html document, we will need load the script in our html document using <script></script> tag. For example:
<!DOCTYPE html>
<html lang="en">
<head>
    <meta charset="UTF-8">
    <meta name="viewport" content="width=device-width, initial-scale=1.0">
    <title>React App from Scratch</title>
</head>
<body>
    <div id="root"></div>
    <!-- load the bundled javascript package -->
    <script src='./app.bundle.js'></script>
</body>
</html>
To automatically include the bundled script in our html document as demonstrated on line 12, we will need the html-webpack-plugin dependency package that we installed earlier. Notice that we have already required this package in our configuration file on line 2:
const hwp = require('html-webpack-plugin');The html-webpack-plugin takes the index.html file in src directory as a template, and then makes a copy. It will then automatically insert the <script></script> tag that loads our bundled javascript file. For example:
<script src='./app.bundle.js'></script>To make this possible, we need to initialize html-webpack-plugin object and specify the html file which we want it to automatically load the bundled javascript file with the <script></script> tag. Remember that we imported html-webpack-plugin with require directive and named it hwp. You can give it any name of you prefer.
new hwp({
    template: path.join(__dirname, 'src', 'index.html')
})
We include this part in the plugins section of the webpack configuration.
const path = require('path');
const hwp = require('html-webpack-plugin');
module.exports = {
    mode: 'development',
    entry: path.join(__dirname, 'src', 'index.js'),
    output: {
        path: path.resolve(__dirname, 'dist'),
        filename: 'app.bundle.js'
    },
    module: {
        rules: [
            {
                exclude: /node_modules/,
                test: /\.(js|jsx)/,
                use: {
                    loader: 'babel-loader',
                    options: {
                        presets: [
                            '@babel/preset-env',
                            '@babel/preset-react'
                        ]
                    }
                }
            }
        ]
    },
    plugins: [
        new hwp({
            template: path.join(__dirname, 'src', 'index.html')
        })
    ]
};
We have specified our html document file index.html as a template to html-webpack-plugin. When build is completed, we will see that a copy of our index.html document has been made, and the a script that loads our bundled javascript file has been inserted in the newly generated index.html file.
Development Server
If we intend to preview our application in a web browser, we can do so. Webpack has development server which we can use to preview our web application. We installed it as webpack-dev-server during the installation of webpack dependencies. There are some properties we can set for this server:
devServer: {
    port: '3000',
    open: true,
    hot: true
}
We should include this in the webpack configuration file.
const path = require('path');
const hwp = require('html-webpack-plugin');
module.exports = {
    mode: 'development',
    entry: path.join(__dirname, 'src', 'index.js'),
    output: {
        path: path.resolve(__dirname, 'dist'),
        filename: 'app.bundle.js'
    },
    module: {
        rules: [
            {
                exclude: /node_modules/,
                test: /\.(js|jsx)/,
                use: {
                    loader: 'babel-loader',
                    options: {
                        presets: ['@babel/preset-env', '@babel/preset-react']
                    }
                }
            }
        ]
    },
    plugins: [
        new hwp({
            template: path.join(__dirname, 'src', 'index.html')
        })
    ],
    devServer: {
        port: '3000',
        open: true,
        hot: true
    }
};
Building the Application
We are now ready to build our React application. In building our application, we give commands from the terminal. Therefore, let’s update our scripts in the package.json file first. Click on package.json file to view it in the editor.
We should add commands that we need to invoke as property values to the scripts object. Update the scripts section to look as follows. Remember to save the file when done.
"scripts": {
    "test": "echo \"Error: no test specified\" && exit 1",
    "start": "webpack serve",
    "build": "webpack"
},
Before building the application, we can run to preview it in the browser. Type and execute the following command to start the webpack server:
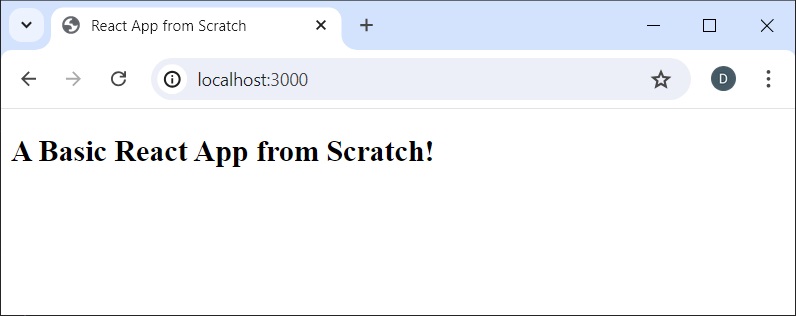
npm run startThe above command, when executed, will run “webpack serve” command which we included in the scripts section of the package.json file. If everything is well, you should see our application rendered in the browser. This can be seen in the following image:

If you are able to see the result above in your browser, then a big congratulations to you. This means that you have been able to create a react app from scratch without using create-react-app.
Before we conclude, let’s create a build of our application by running the build command.
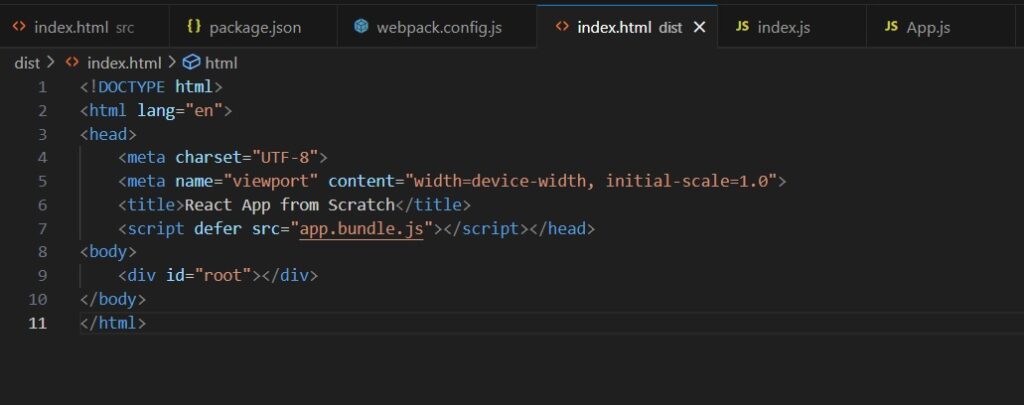
npm run buildThe above command will bundle our javascript application into a single file. Recall that in the webpack configuration, we specified the output with filename app.bundle.js and path to be dist. If you open dist directory, you can see app.bundle.js file created. You can also see a copy of index.html in this directory. Click on index.html to view its content.

Is this the content of our index.html file we created in the src directory? Yes, but with just a single line of code automatically inserted on line 7. The html-webpack-plugin package made a copy of our index.html file, and automatically loaded our bundled javascript file app.bundle.js in <script></script> tag for us on line 7.
Congratulations once again for creating a React app from scratch without the use of create-react-app.
Summary
In this post, we embarked on a quest to create a React app from scratch without using create-react-app. This is an important adventure as a React developer. Understanding how this works behind the scenes gives us much insight about how things work.
To create a React app from scratch without create-react-app, we had to install dependency packages and perform some configurations. The dependencies include babel, webpack, react, and html-webpack-plugin. In fact, create-react-app installs these and other dependencies automatically.
As we intend to develop React app from scratch, we need to install React packages:
npm install react react-domTo be able to transpile our JSX and modern javascript code so that older browsers can understand, we installed babel dependency packages:
npm install --save-dev @babel/core @babel/cli @babel/preset-env @babel/preset-reactReact applications are developed as self-contained interacting components. To be able to combine all the individual pieces into a single file, and to be able to preview our app in a browser, we installed webpack dependency packages:
npm install --save-dev webpack webpack-cli webpack-dev-serverFor webpack to be able to communicate with babel in transpiling our javascript code, we required babel-loader package. We also needed html-webpack-plugin to automatically load the bundled javascript in our html document:
npm install --save-dev babel-loader html-webpack-pluginWith all dependency packages installed, the last step is to configure webpack to build the application. As we have seen, the configuration instructs webpack on how to build the application and produce the javascript bundle.
We have seen that creating a React app from scratch is not a difficult task. It only requires installing dependency packages and setting up a configuration file to build the application. That’s it: we have our own React app from scratch without the use of create-react-app.
Leave a Reply